Localhost Loopback Issues Troubleshooting Guide
February 06, 2024A loopback issue arises when your computer network fails to route network traffic back to itself correctly, causing disruptions in applications that rely on internal network communication. This can often be resolved by editing the hosts file on your computer, which maps hostnames to IP addresses. To ensure that your computer can communicate effectively with itself, you'll need to confirm that localhost is mapped correctly to the loopback IP address 127.0.0.1 and correct any erroneous entries in the hosts file.
As a student working with localhost environments for your projects, you might occasionally face loopback issues. This can be frustrating, but don't worry—we've got you covered! In this troubleshooting guide, we'll teach you how to fix loopback issues with localhost on both Windows and macOS systems.
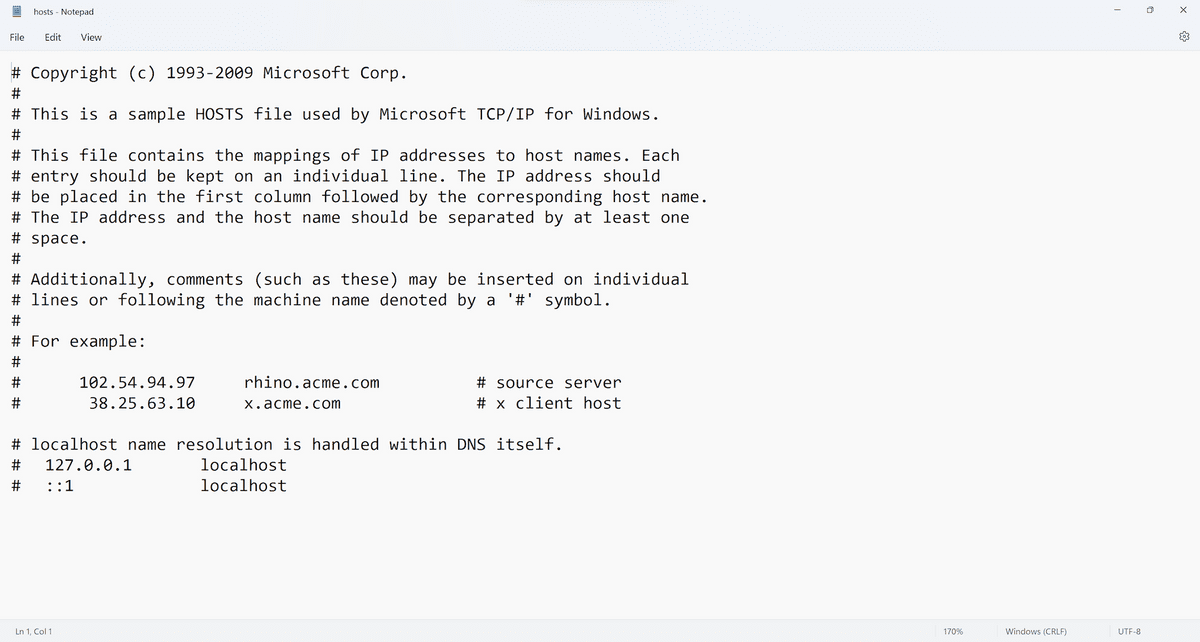
Now we will demonstrate how to access and modify the hosts file using a text editor, ensuring that localhost is correctly mapped to the 127.0.0.1 loopback address, as shown in the following image:

Here are the steps to edit your hosts file in Windows:
Open Notepad or any text editor as an administrator. To do this, right-click on the Notepad icon and select "Run as administrator."
In Notepad, click on "File" and then "Open."
In the "Open" window, navigate to
C:\Windows\System32\drivers\etcand select thehostsfile.Note: If you don't see the
hostsfile, make sure that you have selected "All Files" in the dropdown menu.In the
hostsfile, you will see a list of entries. Make sure that127.0.0.1 localhostis at the top of the list of the other entries, and note the following:If
127.0.0.1 localhostdoesn't exist in the list, make sure to add it in at the top of the list.If
127.0.0.1 localhostis below the entry::1 localhost, an error will occur. You will need to move it above::1 localhost.
Save the file and close Notepad.
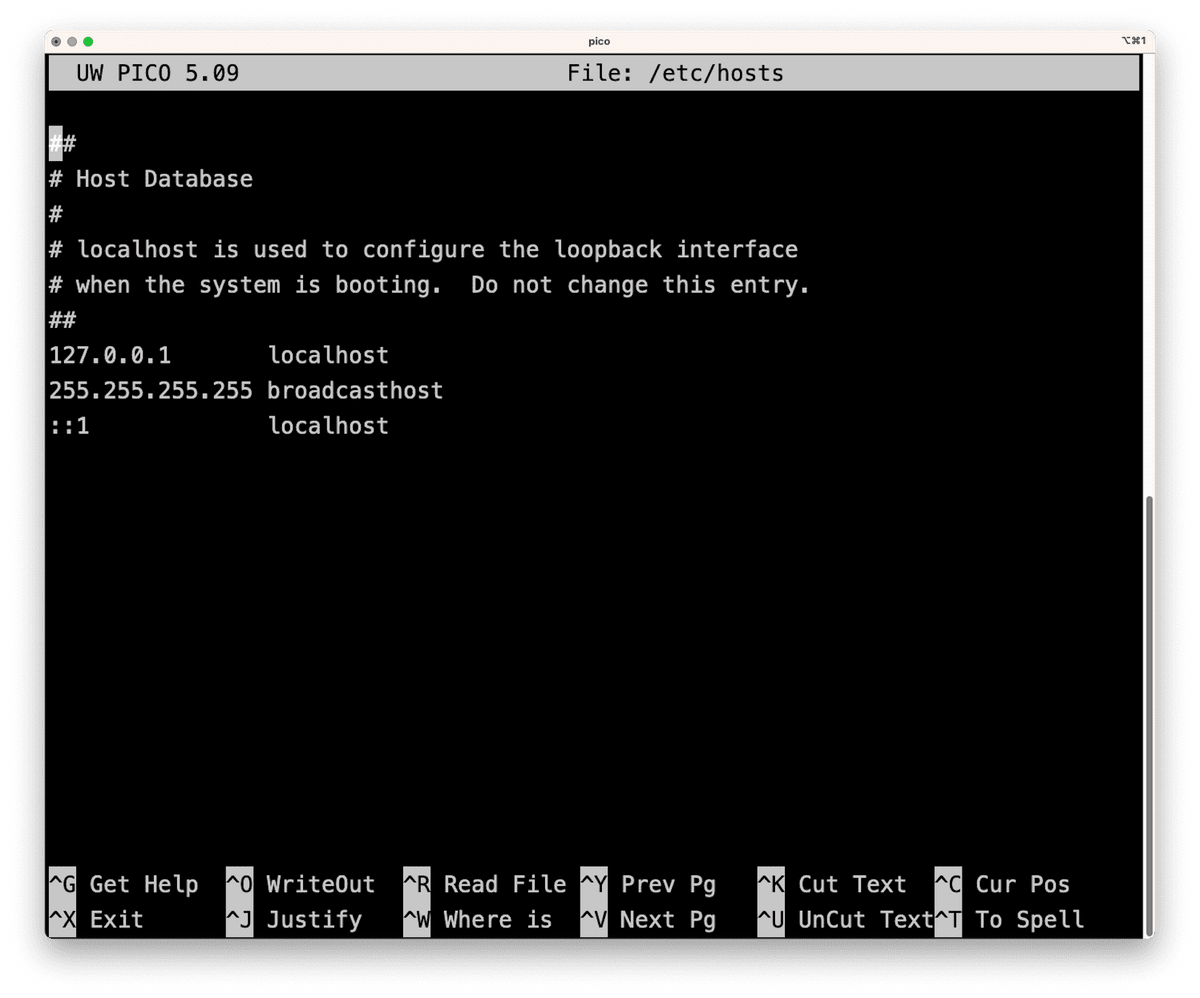
Now we will demonstrate how to access and modify the hosts file using the macOS Terminal, ensuring that localhost is correctly mapped to the 127.0.0.1 loopback address, as shown in the following image:

Here are the steps to edit your hosts file in macOS:
Open Terminal from the Applications > Utilities folder.
Type the following command in the Terminal:
sudo nano /etc/hostsand press enter.Enter your administrator password when prompted. This will open the
hostsfile in the nano text editor with root privileges, which allows you to make changes to the file.You will see a list of entries. Make sure that
127.0.0.1 localhostis at the top of the list of the other entries, and note the following:If
127.0.0.1 localhostdoesn't exist in the list, make sure to add it in at the top of the list.If
127.0.0.1 localhostis below the entry::1 localhost, an error will occur. You will need to move it above::1 localhost.
Save the file by pressing "Ctrl + O," then press "Ctrl + E" to exit, and finally press "Enter" to finalize the operation.
Close the Terminal.
Fixing loopback issues with localhost is simple and can be done in just a few steps. By following the instructions provided above, you'll be able to resolve the problem and get back to working on your projects in no time. Don't let minor technical issues hold you back—keep learning, experimenting, and pushing the boundaries of your knowledge!
This page was updated 6 months ago
© 2022 edX Boot Camps LLC. Confidential and Proprietary. All Rights Reserved.
Category: Computer Literacy
Tagged under: computer settings, Windows settings, macOS settings, localhost, loopback,
All Posts
- OpenAI Account Setup Guide
- NodeJS Installation Guide
- PostgreSQL Reference Guide
- GitHub Copilot Guide
- PostgreSQL Installation Guide
- Deploy with Render and PostgreSQL
- API Resources
- Render Deployment Guide
- Deploying a MERN Stack Application to Render
- Deploy with Render and MongoDB Atlas
- The Science and Research Behind Our Unconventional Educational Approach
- What Makes Up a Web Development Project?
- Localhost Loopback Issues Troubleshooting Guide
- Video Submission Guide
- A Growth Mindset for Life
- Web Literacy
- Developer Resources
- Introduction to Computer Structure and Organization
- MySQL Installation Guide
- HTML Cheatsheet
- Advanced Computer Skills
- Introduction to Computer Skills
- How to Use API Keys
- How to Install MongoDB
- MySQL Reference Guide
- Heroku Deployment Guide
- Getting Started with Git
- Using the GraphQL Playground in a MERN application
- Professional README Guide
- Regular Expression Tutorial
- How to Install the Heroku CLI
- How to Install NodeJS
- Deploy with Heroku and MySQL
- Deploy with Heroku and MongoDB Atlas
- Set Up MongoDB Atlas