How to Install MongoDB
February 06, 2024Disponible en español
MongoDB is a general purpose, document-based, distributed NoSQL database built for web application developers in the cloud era. It’s one of the most popular database choices for modern applications.
To install MongoDB on your machine, follow the instructions for your operating system below. Some of the images and versions mentioned below may be slightly different from the MongoDB web site, but the general instruction is the same.
Refer to the following instructions if you’re using Windows; scroll down for instructions for macOS.
MongoDB’s Install Documentation is a great place to start when installing MongoDB. It’s updated constantly, and it will provide you with the most recent changes to any part of the installation process. We’ve also provided step-by-step instructions here.
Important: The first step is to create a data directory to store MongoDB’s databases. Without this, you won’t be able to complete the installation.
Open git Bash, then cd into the root directory (c: drive) of your computer:
cd /c
Once you’re in the root directory, run the following command to create a data/db directory:
mkdir -p data/db
This directory will be the default location for MongoDB’s databases. Without a directory for your databases, MongoDB will not run.
Now you can download and install MongoDB.
To install MongoDB on your Windows machine, download the MongoDB installer.
After the installer has downloaded, open it to begin the installation process. Follow the prompts by clicking Next in the Setup Wizard, as shown in the following image:
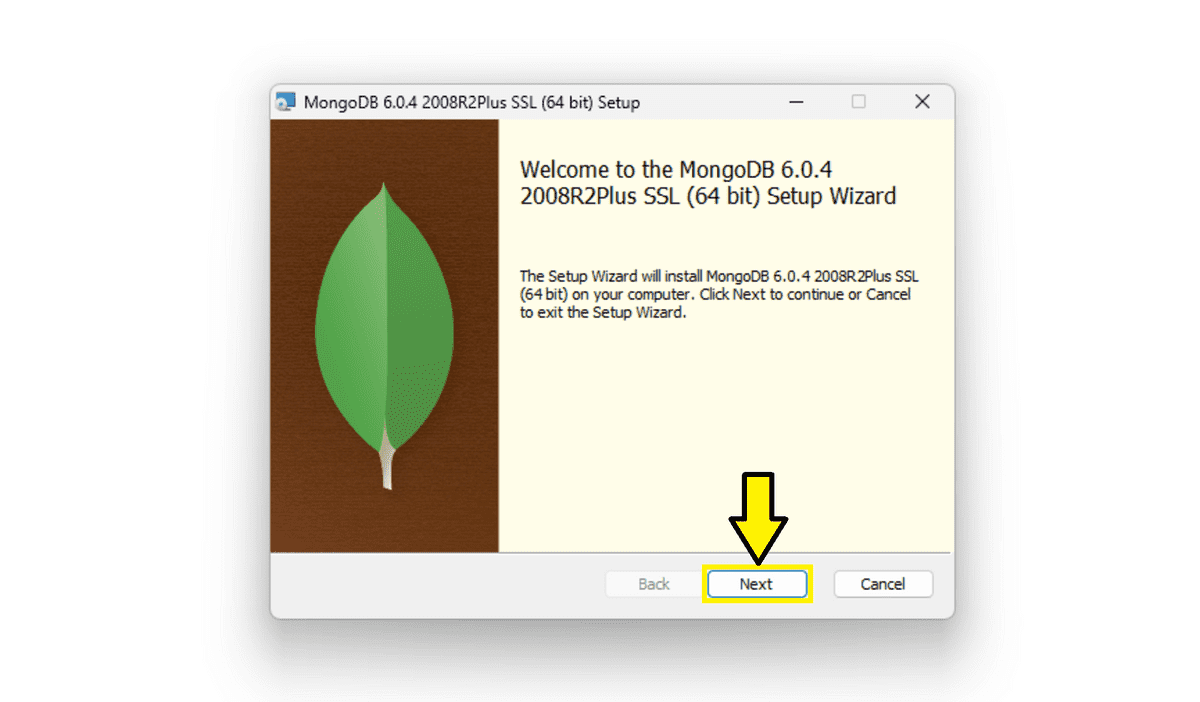
Note: A window might appear mid-installation, asking you whether you’re sure you want to download a particular component of MongoDB. Click yes; otherwise, the install will fail.
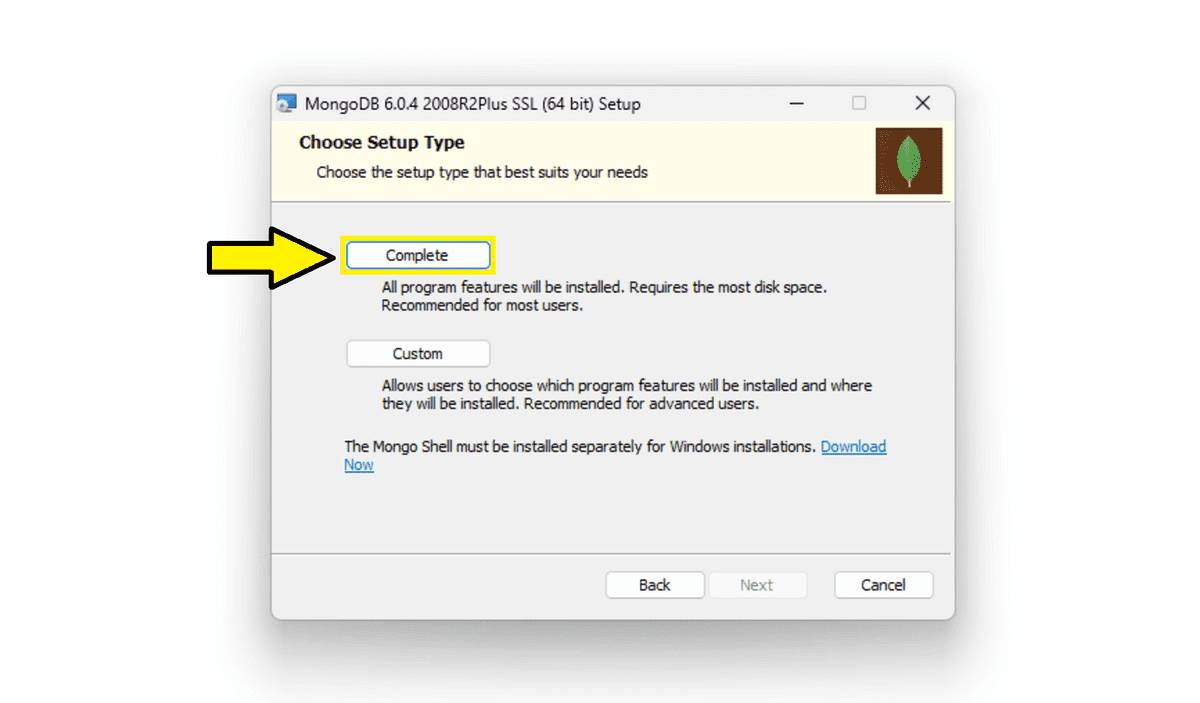
You’ll also need to accept the terms in the License Agreement before you can continue. When the installer prompts you to Choose Setup Type, click Complete, as shown in the following image:
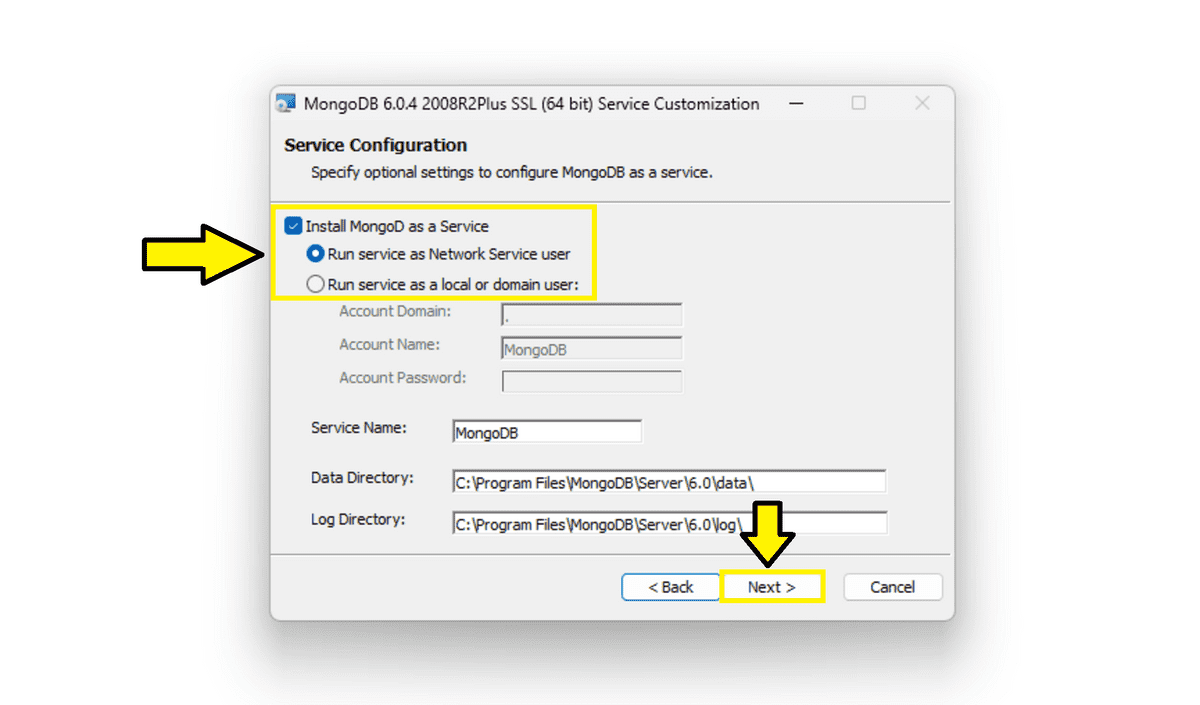
On the next screen, ensure that the checkbox for “Install MongoD as a Service” is checked and that the option “Run Service as Network Service user” is selected. These options should already be selected. Leave everything the way it is and click Next, as shown in the following image:
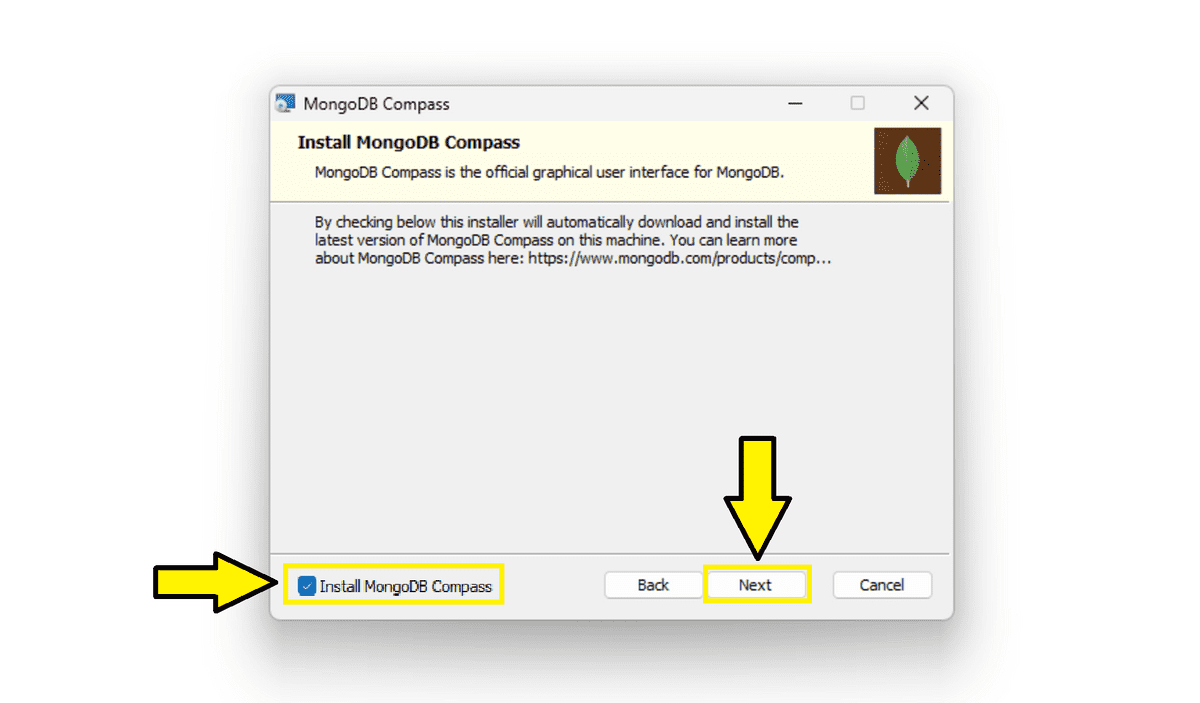
You should then see a screen that says Install MongoDB Compass.
Ensure that the checkbox for Install MongoDB Compass is selected and click Next, as shown in the following image:
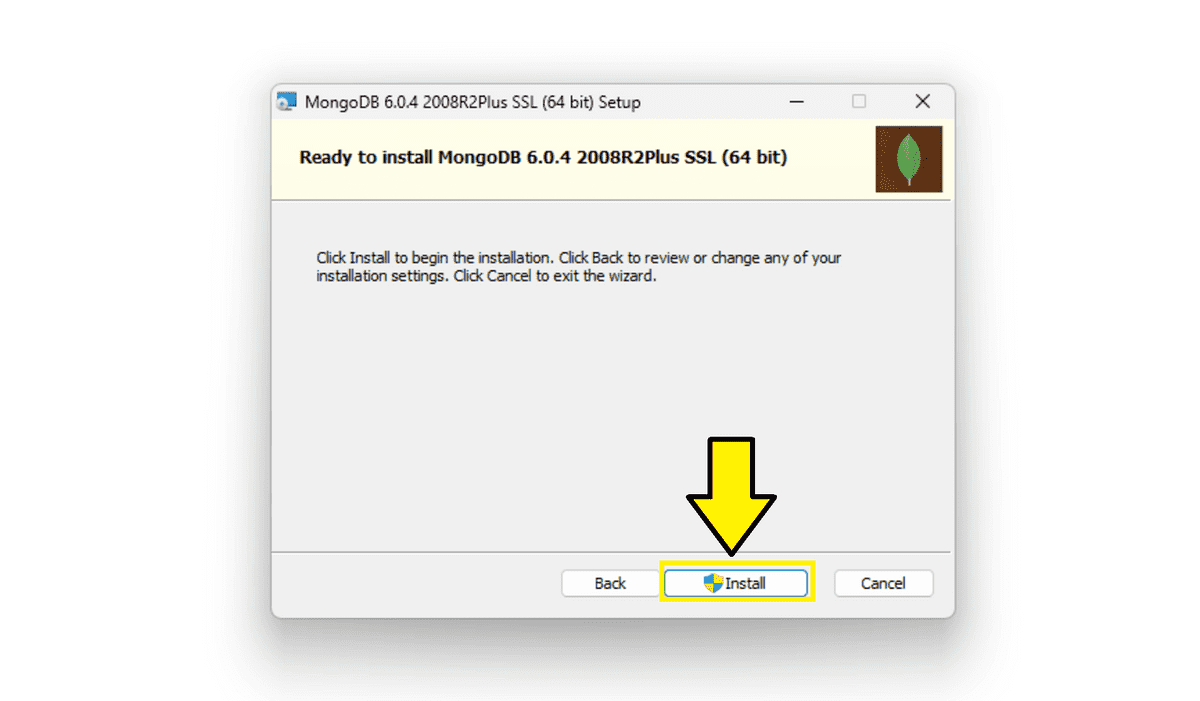
On the next screen, you’ll see a message that says “Ready to install MongoDB” followed by the version number. Click Install to finish installing MongoDB, as shown in the following image:
The last screen you’ll see will say that you’ve completed the installation. Click Finish.
Now that you’ve installed MongoDB, you’ll need to add the PATH to the MongoDB install to your environmental variables. Follow these steps to do that:
Copy the PATH to MongoDB to your clipboard. Open any folder on your computer and click on This PC in the left-hand navigation bar, as shown in the following image:

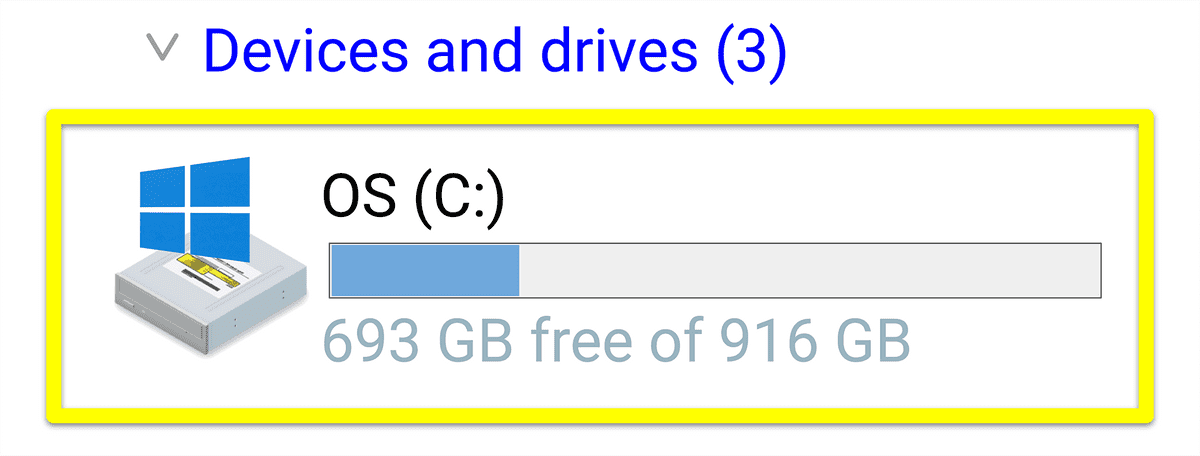
Next, double-click your C: drive, as shown in the following image:
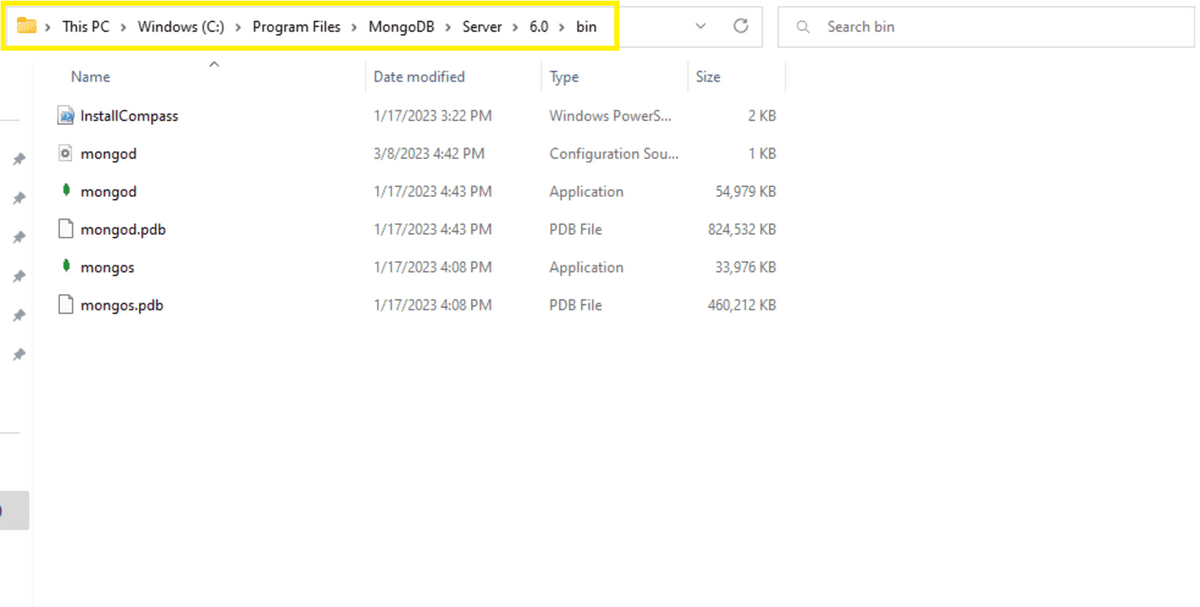
Double-click the folder named Program Files, then double-click the MongoDB folder. Double-click the Server folder, then double-click the folder with the MongoDB version number as its name.
Finally, double-click the folder named bin. Your screen should look like the following image:
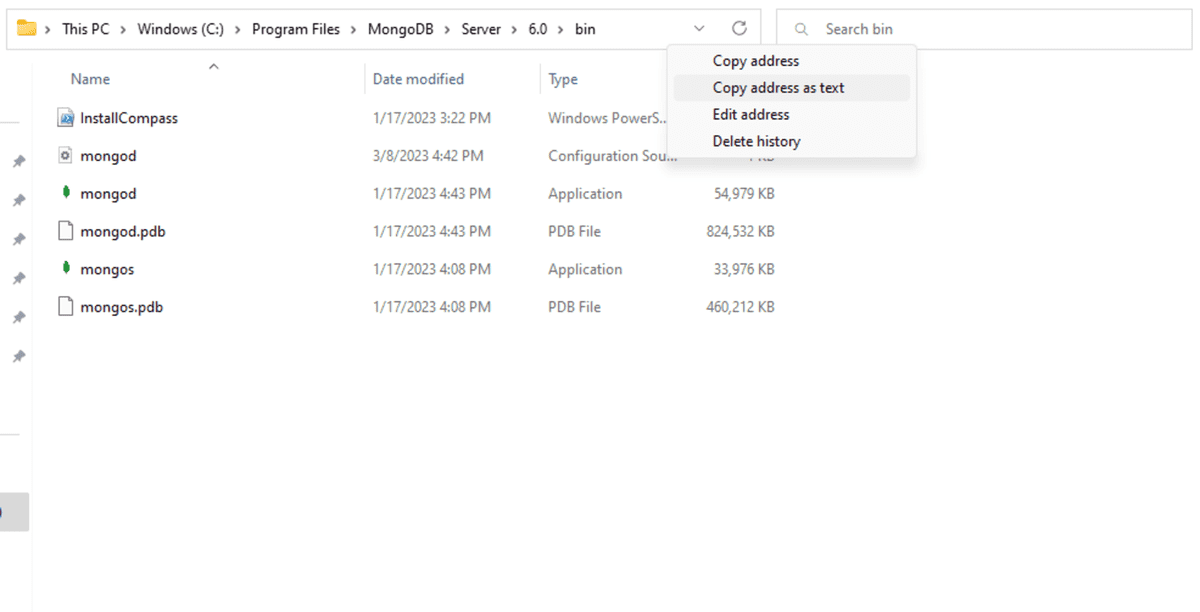
Right-click the address at the top of the screen and select “Copy address as text.” You should see something like the following image.
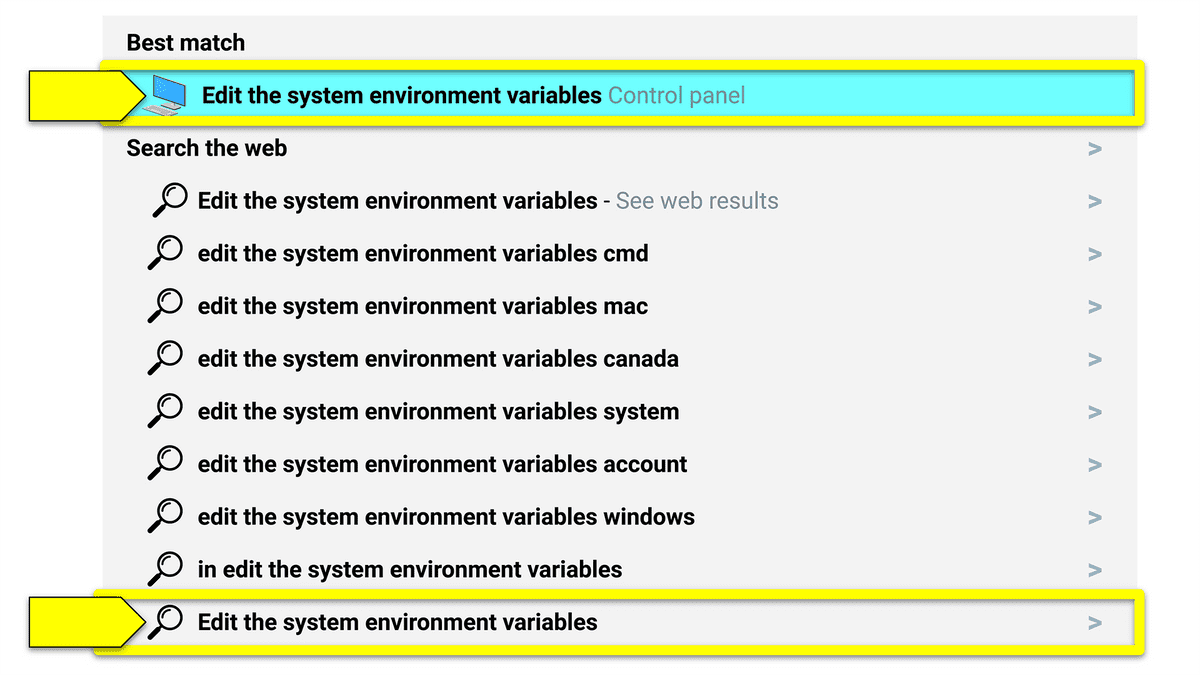
Now that you’ve got the PATH copied to your clipboard, press the Windows key on your keyboard and search for “Edit the system environmental variables”. Once that shows up in the search screen, click it, as the following image shows:
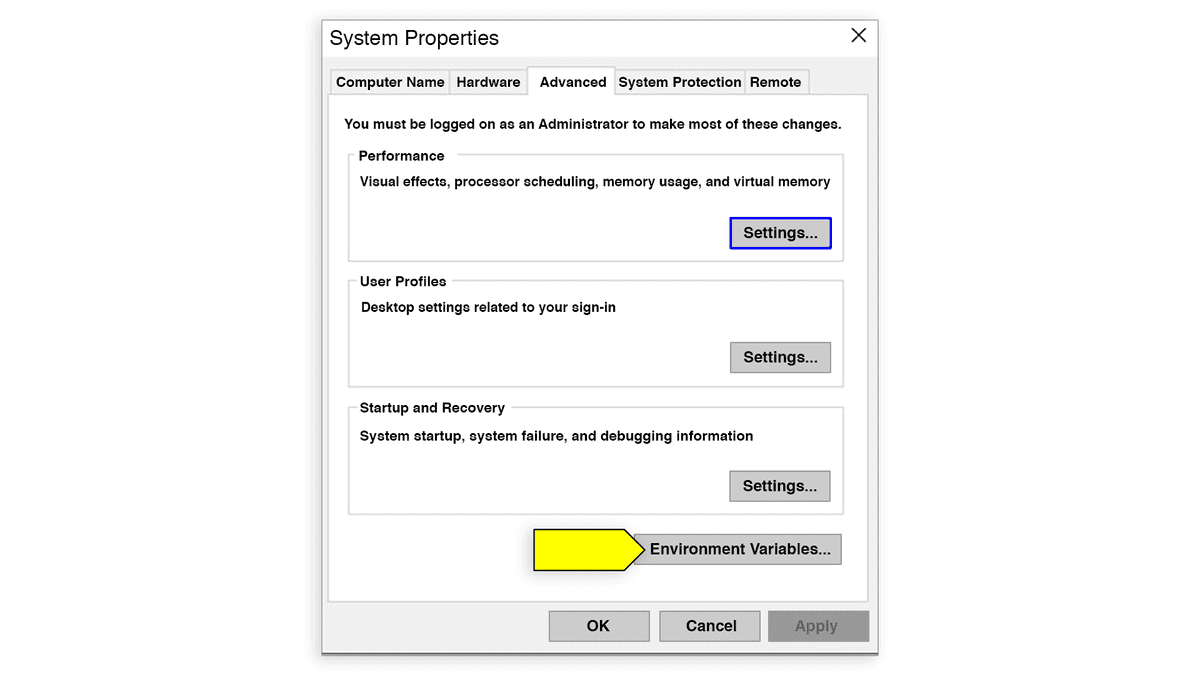
You’ll then be prompted with the System Properties window. Make sure that the Advanced tab is highlighted, and click on Environment Variables, as shown in the following image:
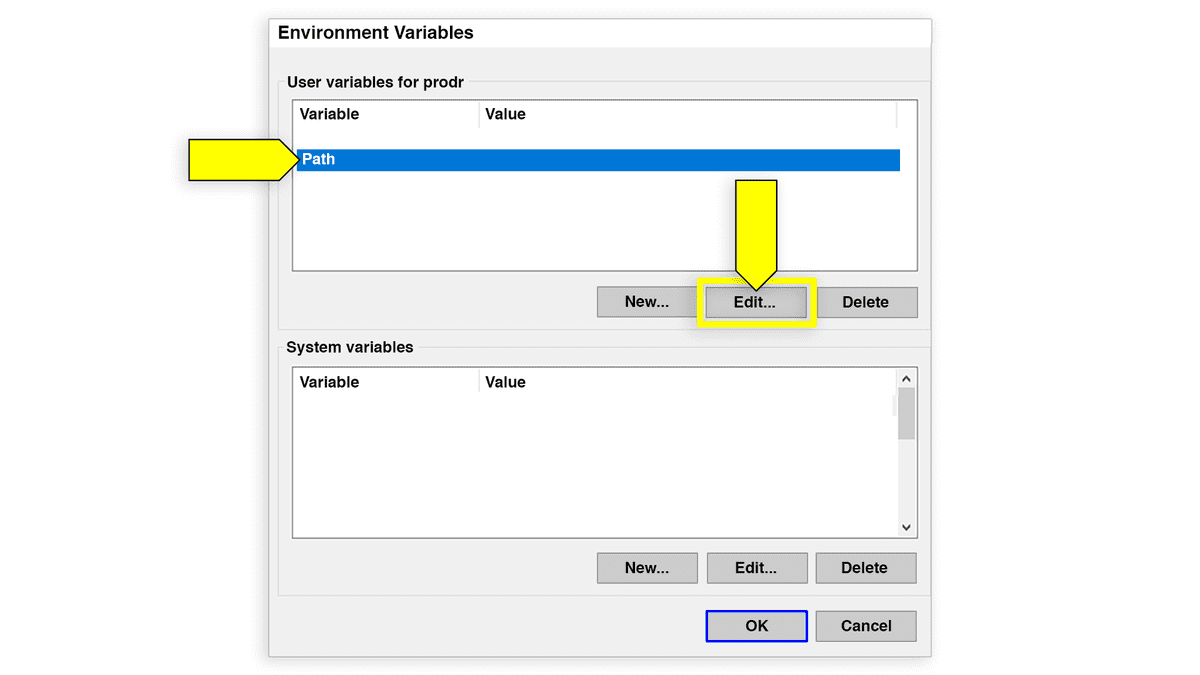
You’ll see a window entitled Environment Variables. In the top section, under “User variables for <user>” (where <user> is your username on that computer), click Path and then click “Edit...”. It should look like the following image:
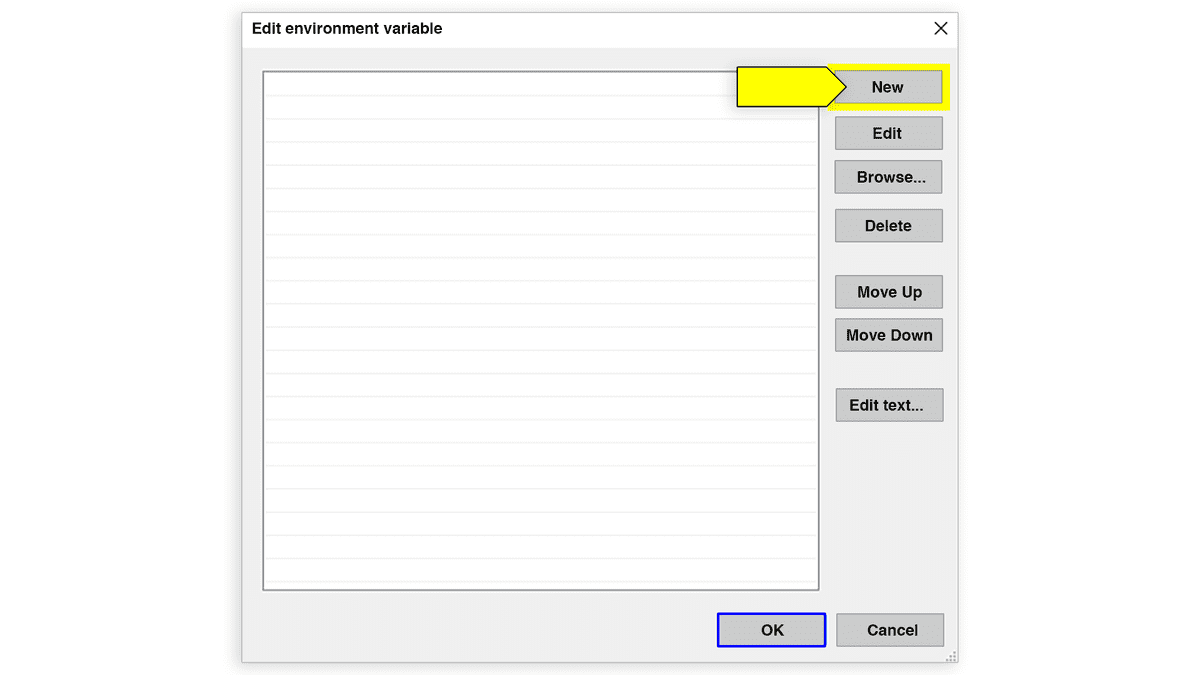
The next window to appear will be “Edit environment variable.” Click “New…”, as shown in the following image:
Your cursor will appear in a new line at the bottom of the variables. Paste your PATH in this box and click OK. It should look like the following image:
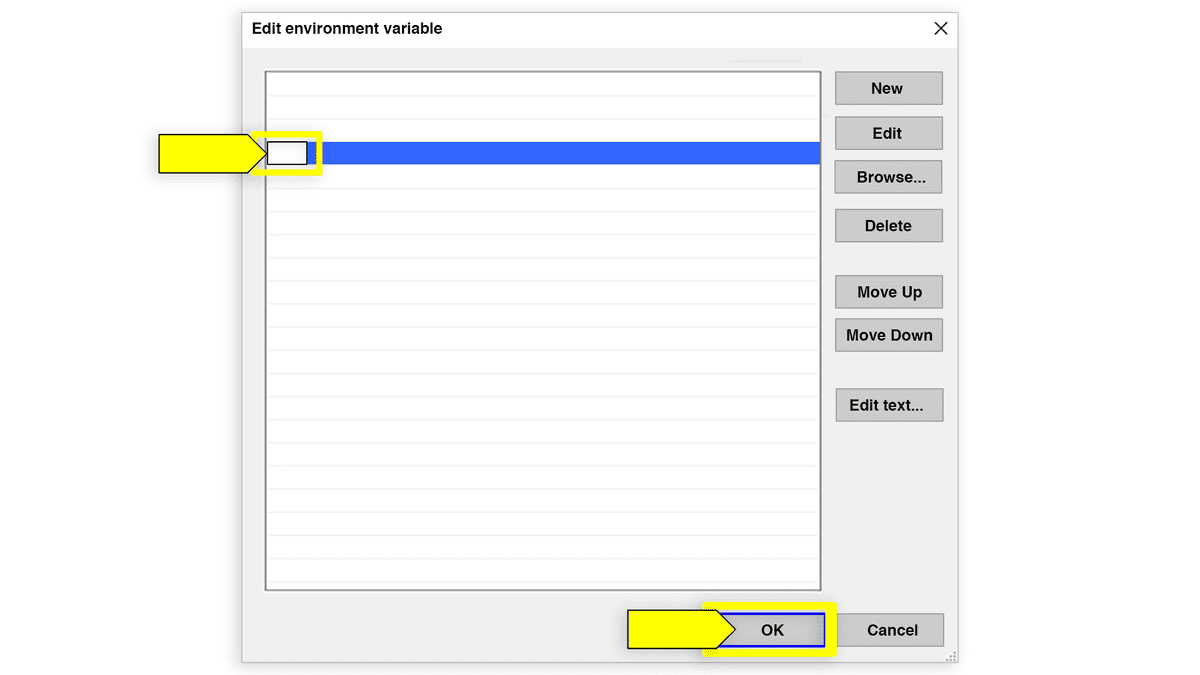
Click OK on any remaining screens, then restart Git Bash completely. You can verify that the installation was correct by going to Git Bash and typing the following:
mongod
Note: There is no "b" at the end of this command; just
mongod.
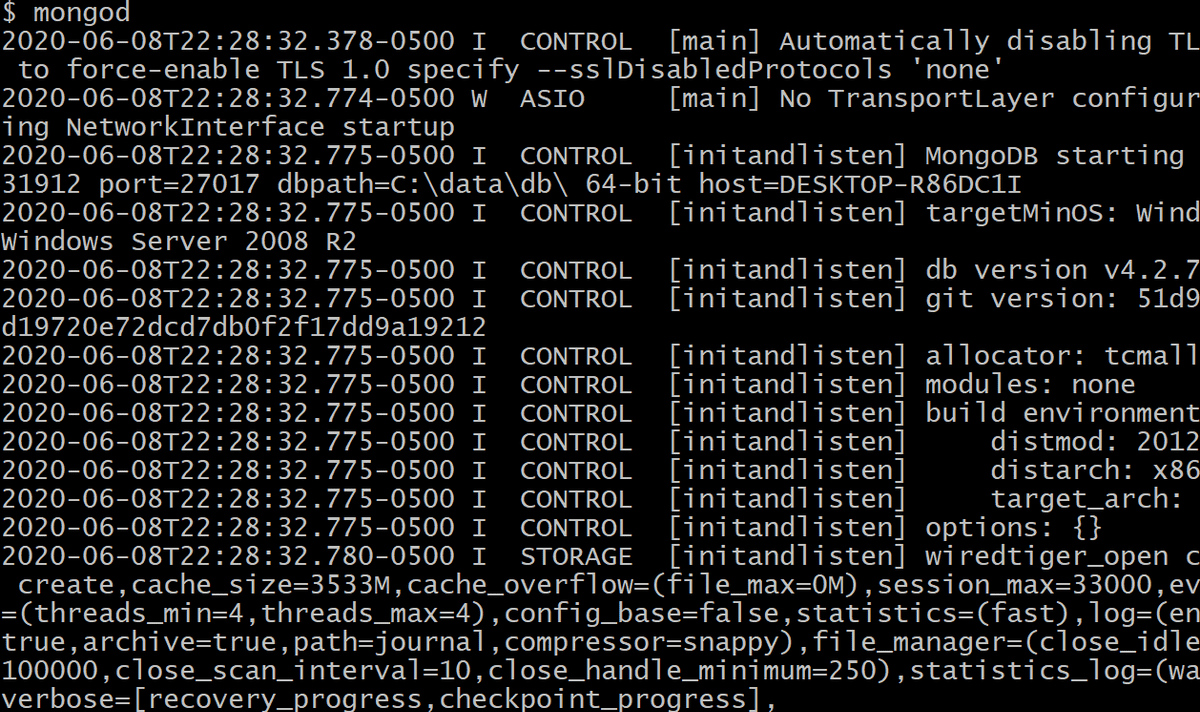
You should see a large number of characters printed to the console, as in the following image:
Note: If
mongoddidn’t run, and instead you received a "command not found" error, make sure you added MongoDB’s bin directory to your PATH variable. Then, close out git bash and try runningmongodagain.
Important: If
mongodstarts but closes after a series of prompts, make sure you created thedata/dbdirectory in the root directory of your computer (this is the very first step in this walkthrough). MongoDB cannot run without this directory.
MongoDB’s Install Documentation is a great place to start when installing MongoDB. It is updated constantly, so it will provide you with the most recent changes to any part of the installation process. We’ve also provided the following step-by-step instructions.
Important: Ensure that you've installed Xcode and Homebrew before continuing.
To check to see if Homebrew is installed, run
brew --versionin your terminal window. If your terminal displays a version of Homebrew, you can move on to the installation guide. If you see an error message likecommand not found, run the following command in your terminal to install Homebrew:/bin/bash -c "$(curl -fsSL https://raw.githubusercontent.com/Homebrew/install/HEAD/install.sh)"
Once you have confirmed that Homebrew is on your machine, move on to the installation guide.
To install MongoDB on macOS, run the following command:
brew tap mongodb/brew
Next, run the following installation command:
brew install mongodb-community@6.0
Note: The version number following the
@symbol may have changed. See the MongoDB tutorial on installing on macOS to make sure that you have the latest version to use with this command.
To run MongoDB as a service on macOS, follow these steps:
Run the following command in your terminal:
brew services start mongodb-community@6.0
Verify that the service is running by using the following command:
ps aux | grep -v grep | grep mongod
If you don't see any output from the command above, try restarting the service by running the following command in your terminal:
brew services restart mongodb-community
Now that you’ve installed MongoDB, you are ready to install Compass. MongoDB Compass is a powerful graphic user interface (GUI) that allows you to query and visually explore a MongoDB database as well as use an embedded MongoDB shell.
Navigate to MongoDB Compass's Download and Install Documentation to download and install Compass for your machine.
Select your operating system and open the Downloads page.
On the Downloads page, select the most recent stable version that is compatible with your operating system and click on the Download button.
Follow instructions on your local machine to complete the download process and open Compass.
This page was updated 6 months ago
© 2022 edX Boot Camps LLC. Confidential and Proprietary. All Rights Reserved.
Category: MongoDB
Tagged under: mongodb, nosql, installation, guide, compass,
All Posts
- OpenAI Account Setup Guide
- NodeJS Installation Guide
- PostgreSQL Reference Guide
- GitHub Copilot Guide
- PostgreSQL Installation Guide
- Deploy with Render and PostgreSQL
- API Resources
- Render Deployment Guide
- Deploying a MERN Stack Application to Render
- Deploy with Render and MongoDB Atlas
- The Science and Research Behind Our Unconventional Educational Approach
- What Makes Up a Web Development Project?
- Localhost Loopback Issues Troubleshooting Guide
- Video Submission Guide
- A Growth Mindset for Life
- Web Literacy
- Developer Resources
- Introduction to Computer Structure and Organization
- MySQL Installation Guide
- HTML Cheatsheet
- Advanced Computer Skills
- Introduction to Computer Skills
- How to Use API Keys
- How to Install MongoDB
- MySQL Reference Guide
- Heroku Deployment Guide
- Getting Started with Git
- Using the GraphQL Playground in a MERN application
- Professional README Guide
- Regular Expression Tutorial
- How to Install the Heroku CLI
- How to Install NodeJS
- Deploy with Heroku and MySQL
- Deploy with Heroku and MongoDB Atlas
- Set Up MongoDB Atlas