MySQL Installation Guide
February 06, 2024Disponible en español
MySQL is a developer-friendly open source relational database management system. Reliable and easily scalable, MySQL powers the back end of many popular social, streaming, and service web applications.
To install MySQL on your machine, follow the instructions provided for your operating system.
To install the MySQL server on a Windows computer, visit the MySQL Community Downloads page. In the Select Operating System dropdown menu, choose Microsoft Windows, as shown in the following image:
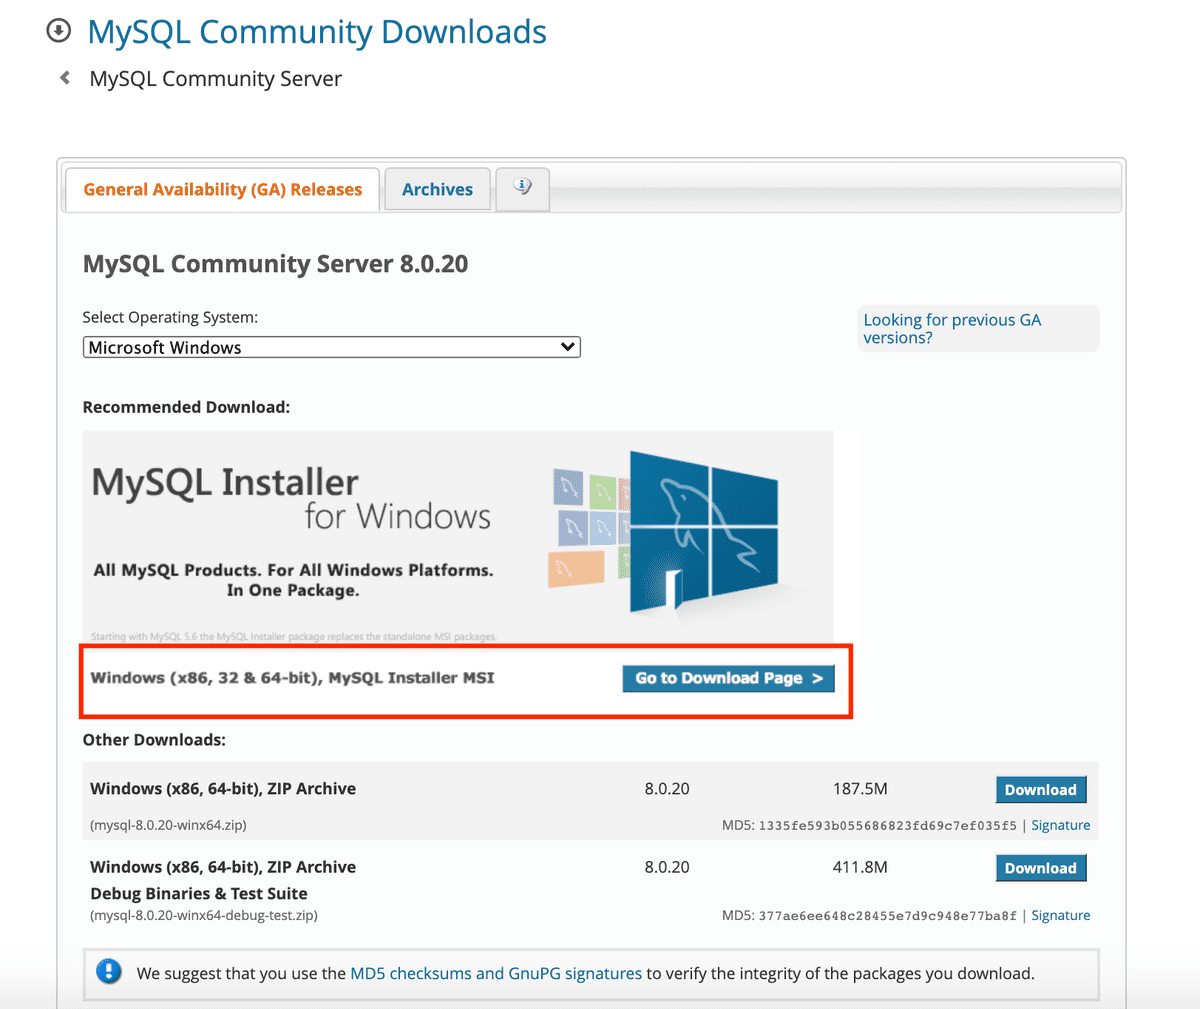
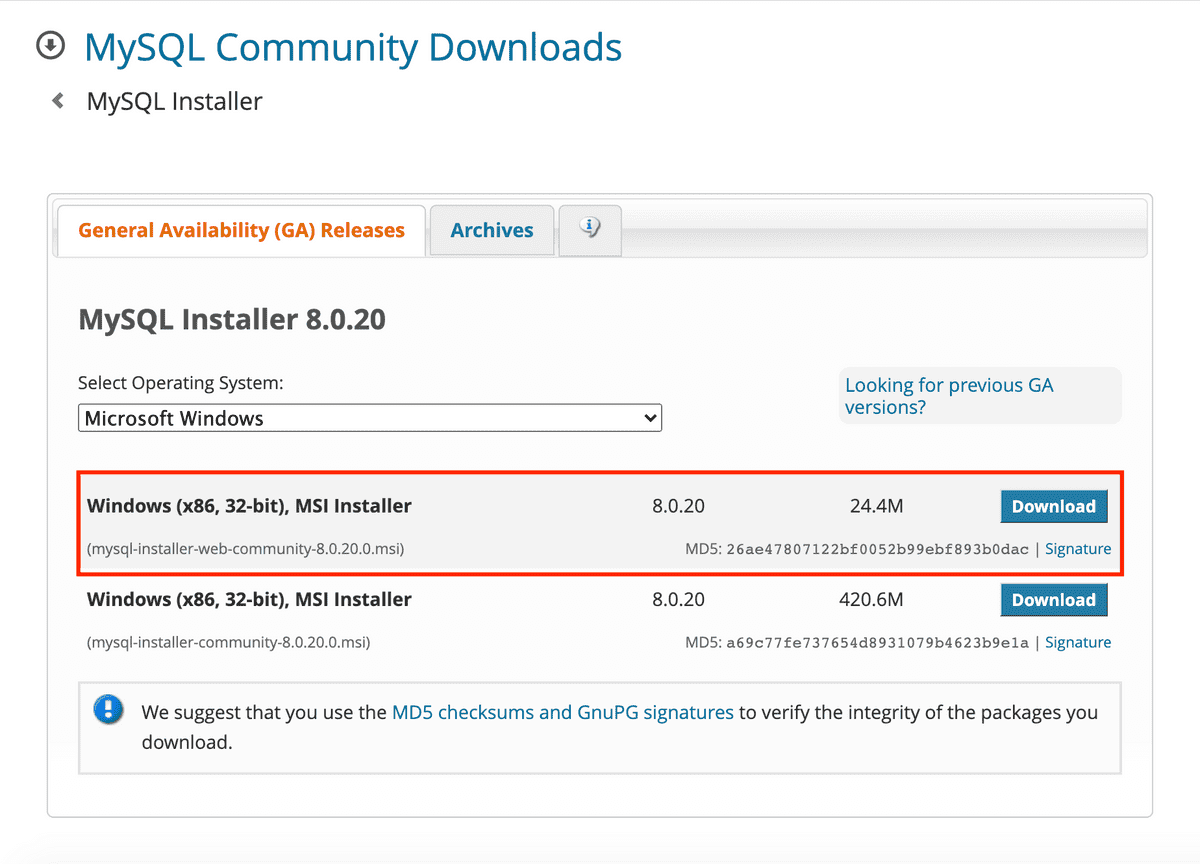
Next to "Windows (x86, 32 & 64-bit), MySQL Installer MSI", select "Go to Download Page". On the next page, find the "Windows (x86, 32-bit), MSI Installer" option that is the smaller file size, and click the Download button. This should look like the following image:
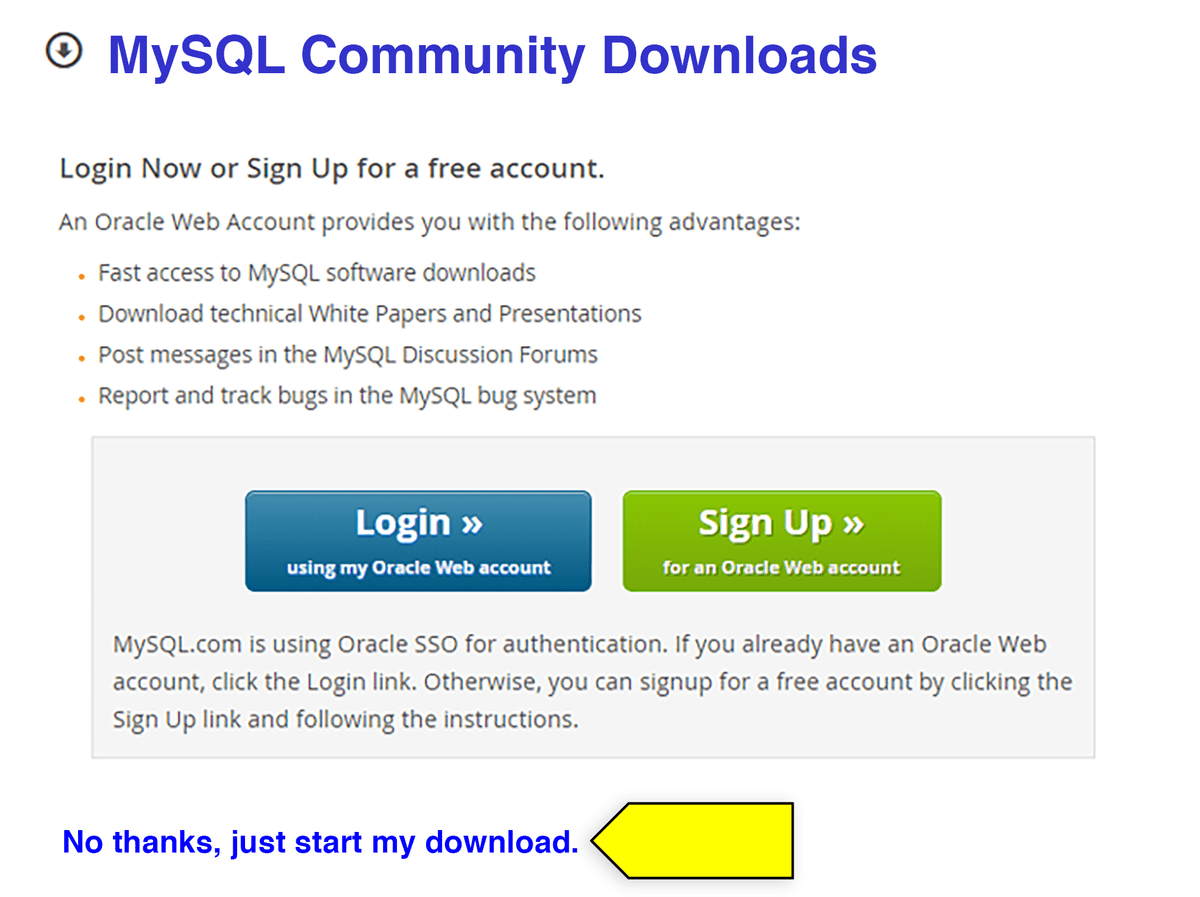
When prompted about signing up for a free Oracle Web account on the next page, select "No thanks, just start my download," as shown in the following image:
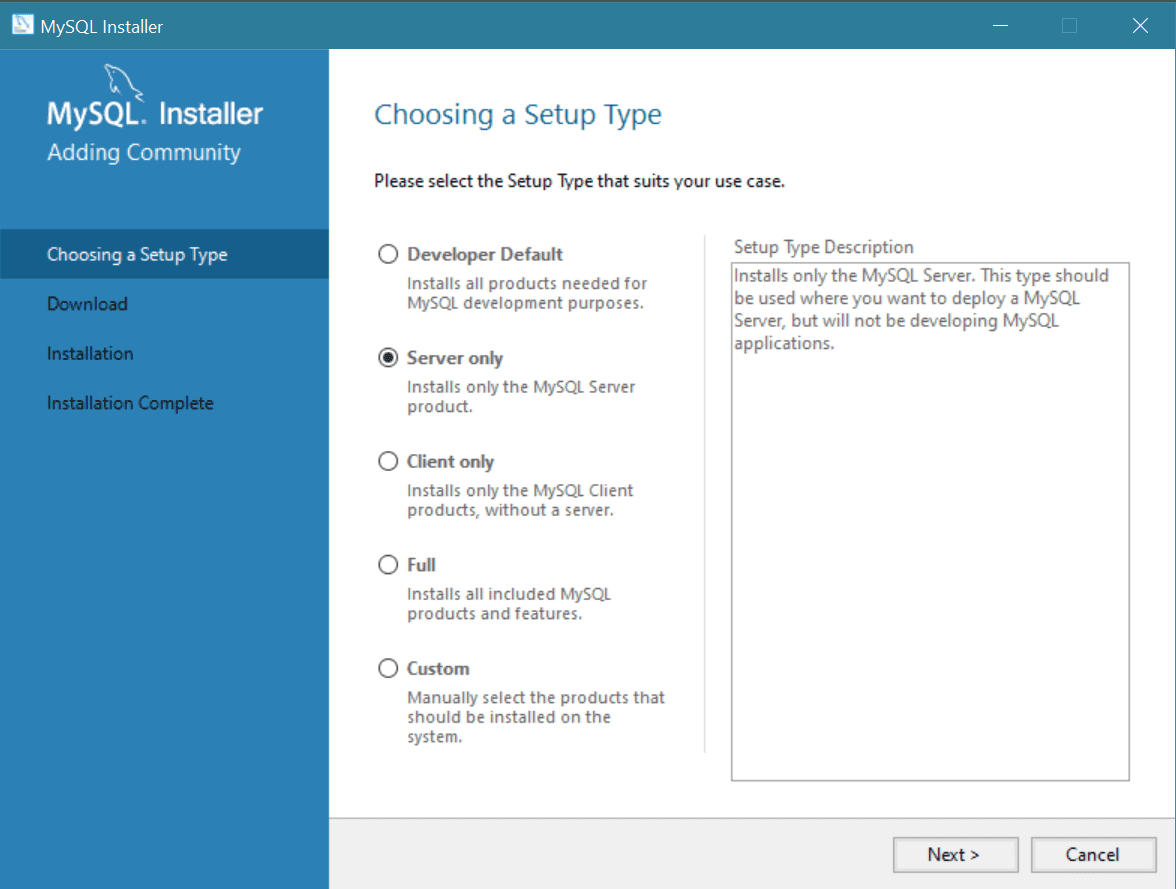
Navigate to the folder where the file was downloaded, and double-click it to run the installer. If you get prompted for an update, select Yes. When you reach the page labeled "Choosing a Setup Type", check that "Server only" is selected, and click Next:
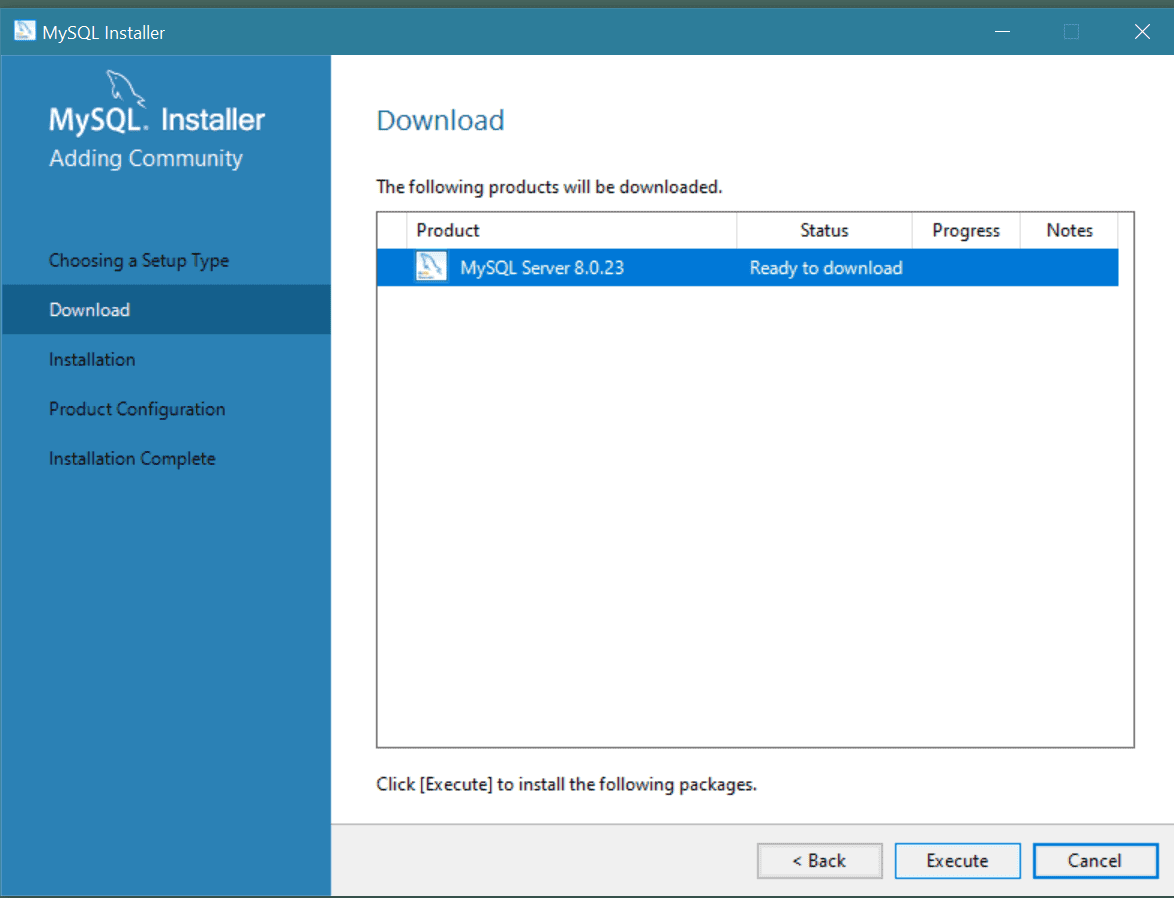
On the next screen, entitled Download, you'll see your product listed (it should say "MySQL Server" followed by a version number). Click Execute to start the installation process, as shown in the following image:
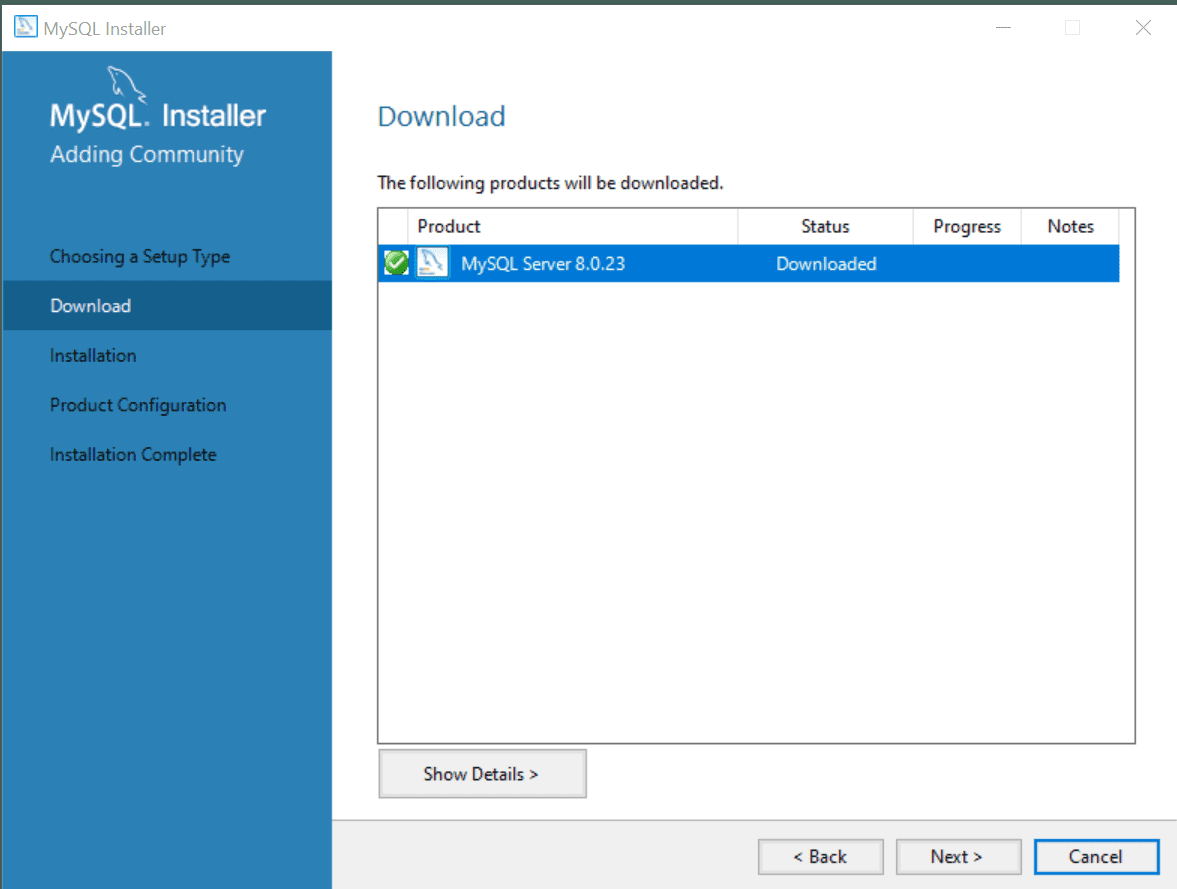
After you click Execute, the status will be listed as Downloaded. Click Next, as shown in the following image:
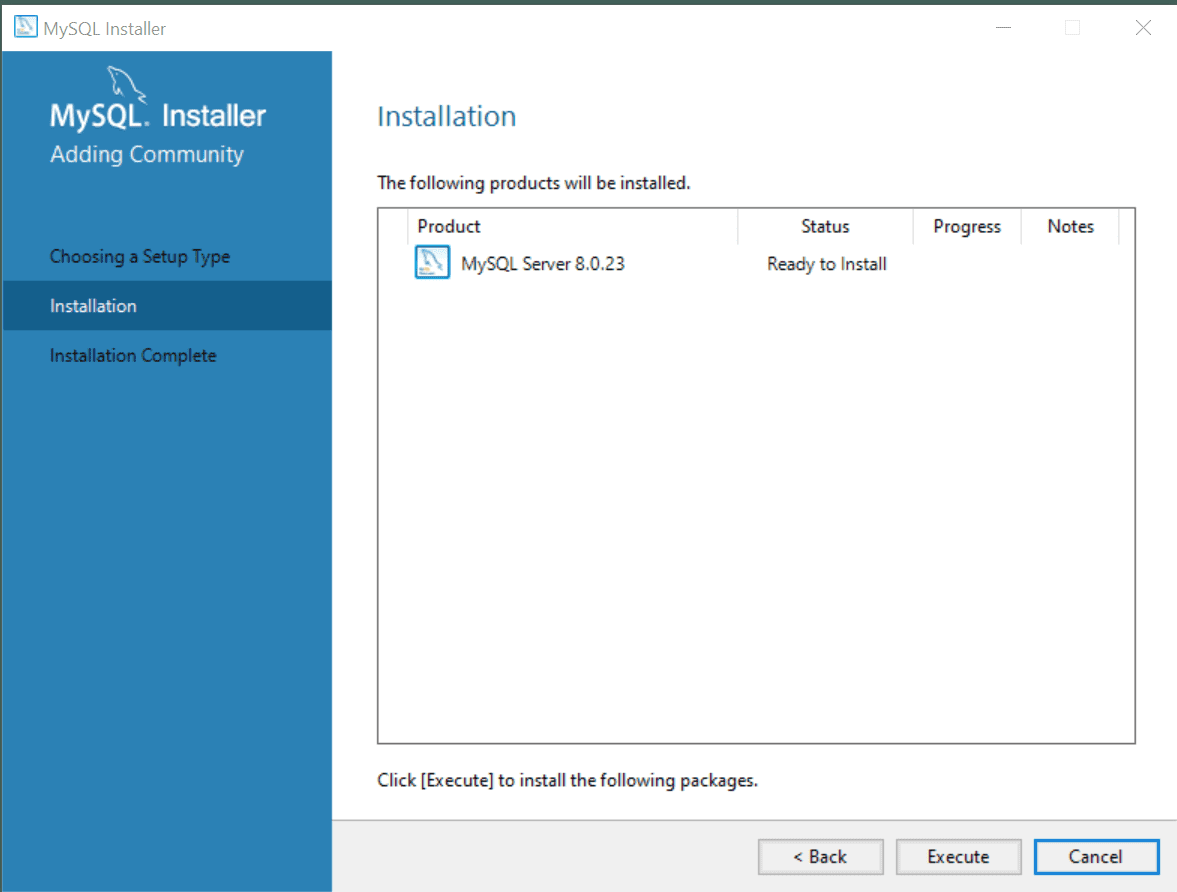
The MySQL server is now ready for installation. Click Execute to begin the installation, as shown in the following image:
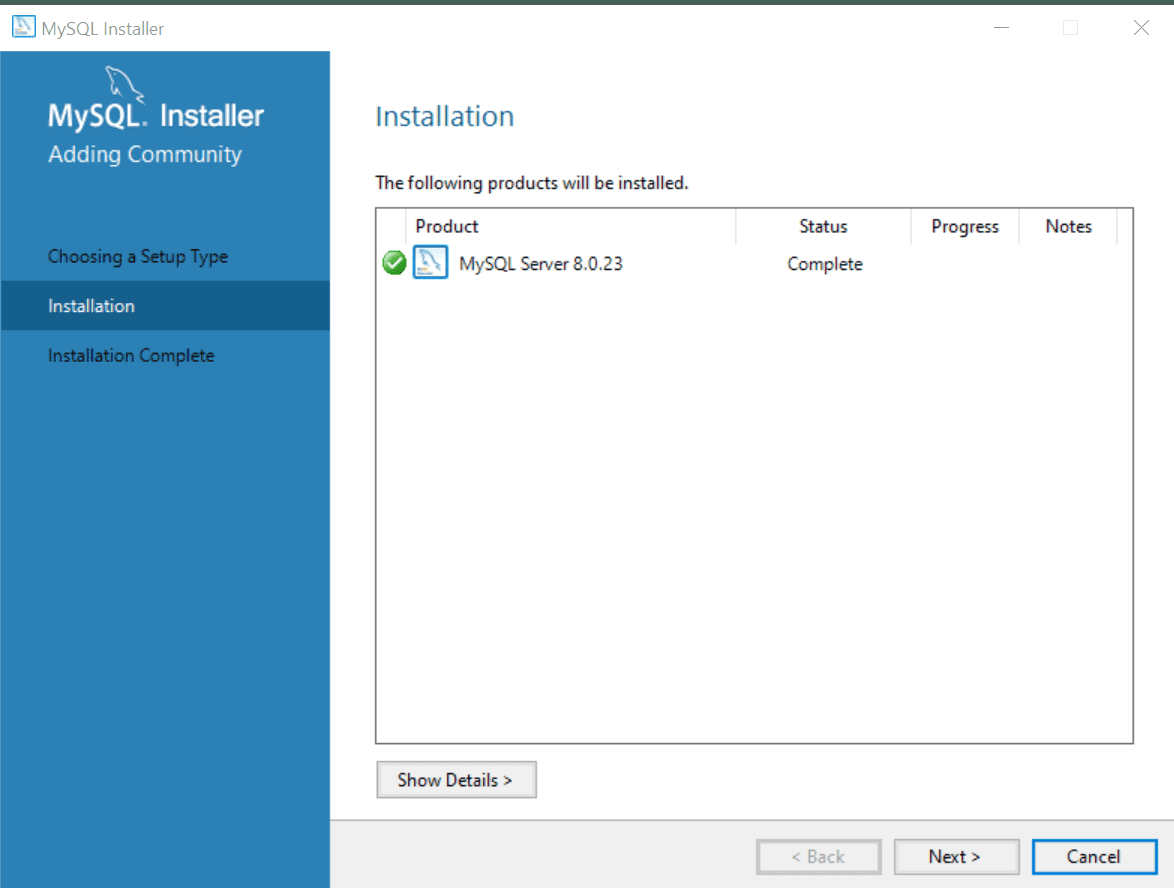
Once the installation status shows as Complete, click Next, as shown in the following image:
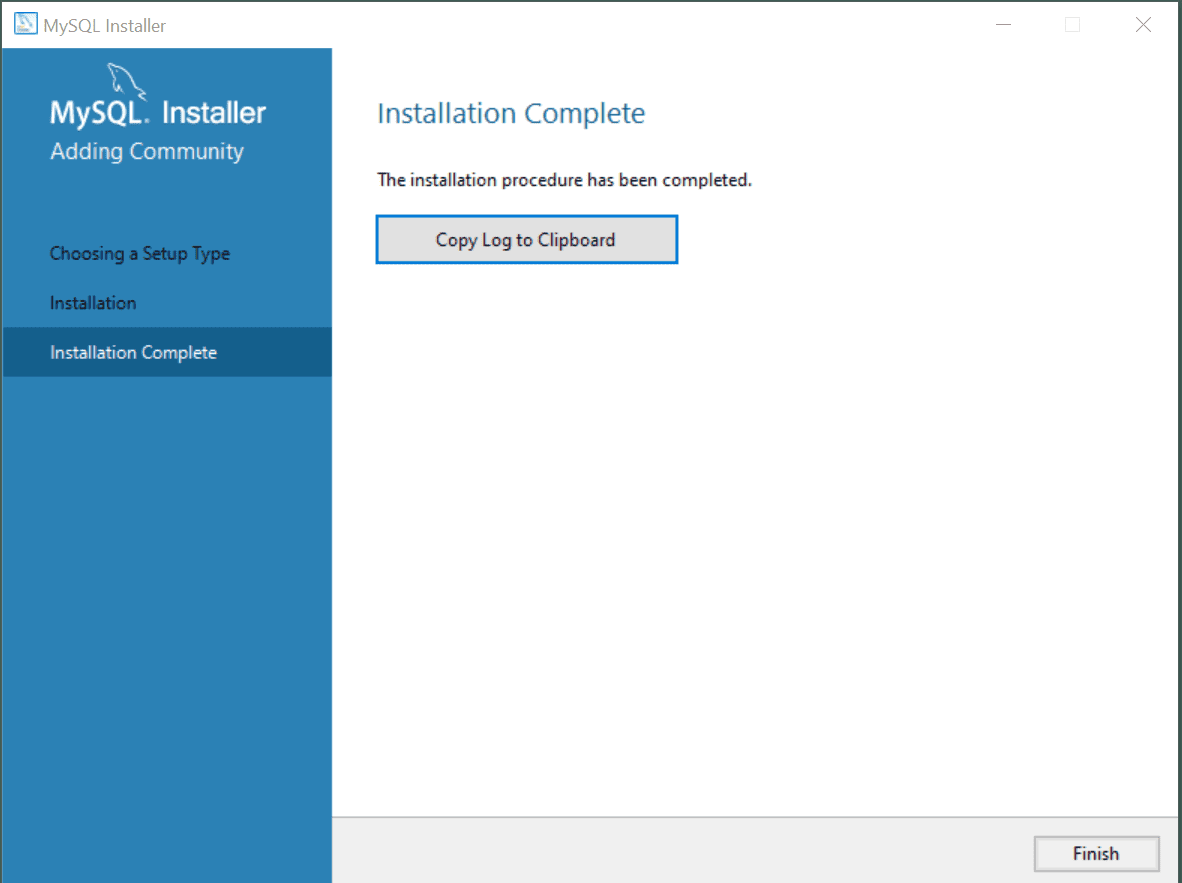
Then click Finish on the next page, which should indicate Installation Complete, as shown in the following image:
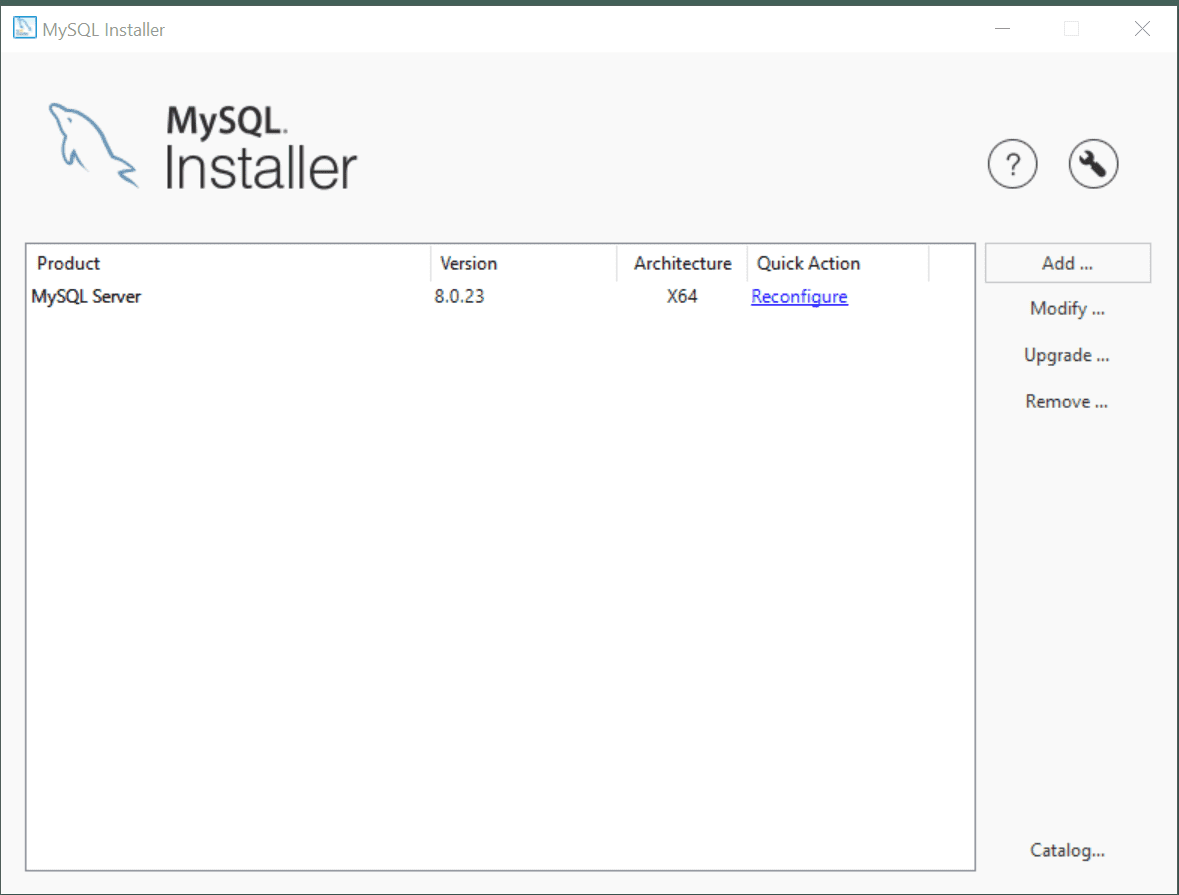
At this point, the installer should close on its own. Reopen it and click on the Reconfigure link under Quick Action, as shown in the following image:
On the Type and Networking screen, don't change anything, and click Next.
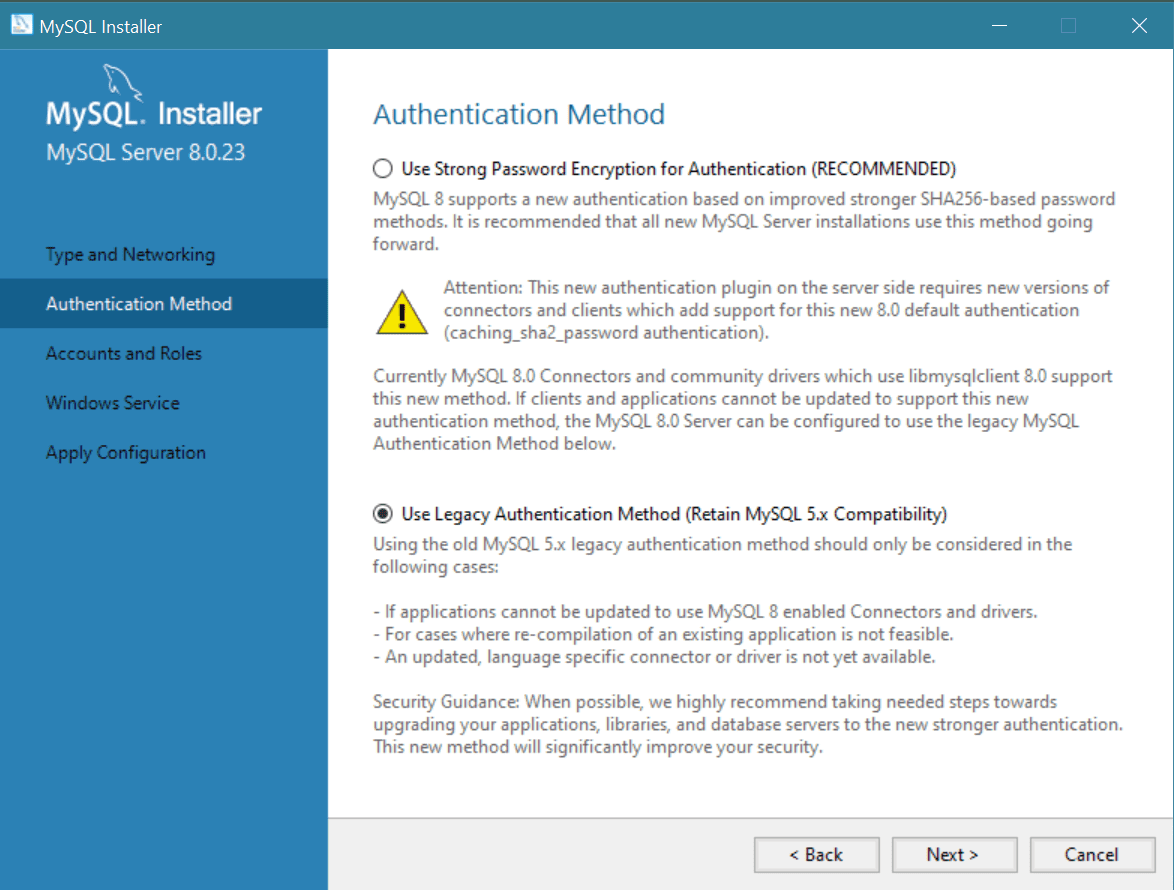
Important On the Authentication Method screen, select "Use Legacy Authentication Method (Retain MySQL 5.x Compatibility)" and click Next, as shown in the following image:
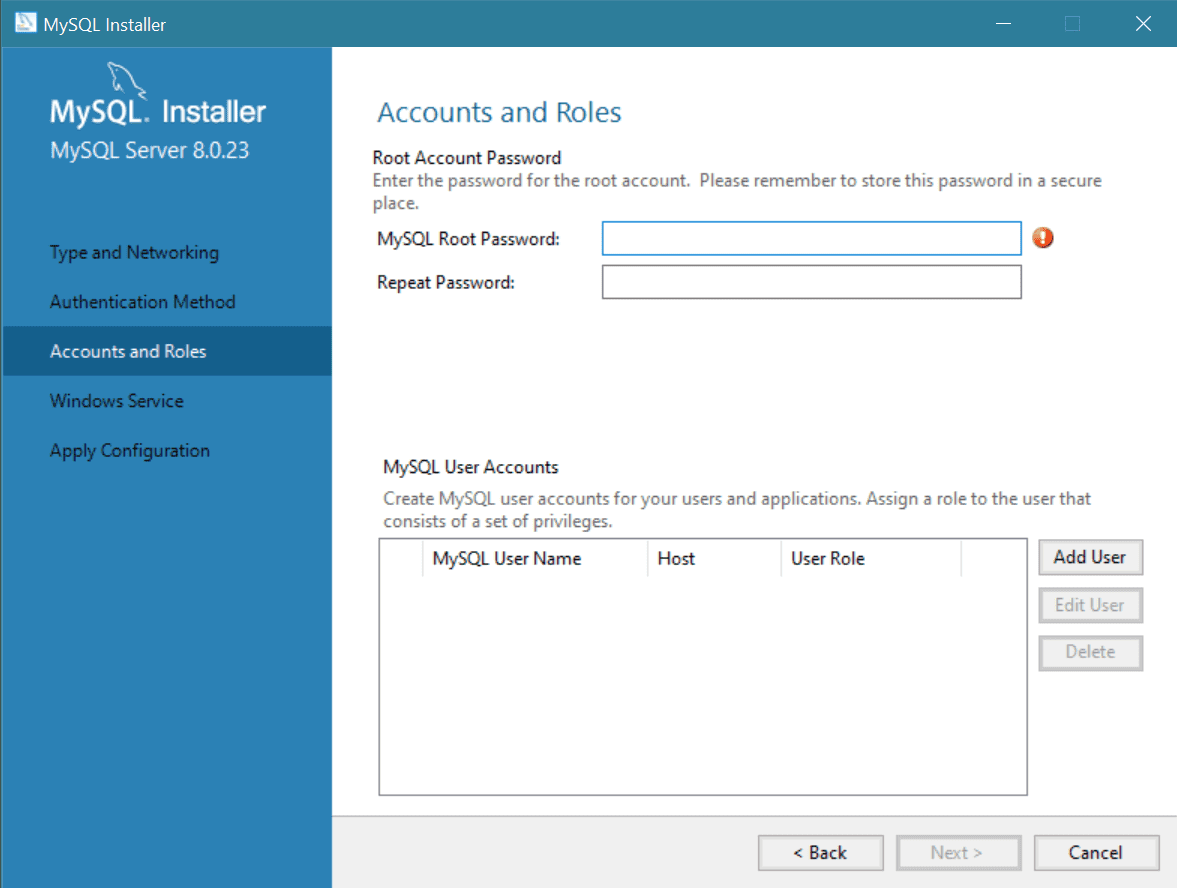
On the next screen, Accounts and Roles, you'll need to enter a strong password under Root Account Password, near the top of the screen. Make sure to enter a unique password that you've never used before. Then repeat your root password in the next field, as shown in the following image:
Caution Don't forget your password! It's extremely important that you keep track of your root password for MySQL, as it's difficult to reset. Write it down somewhere easily accessible, or add it to a password manager to keep it secure.
After entering your password twice and ensuring that you've stored it somewhere you can find it, click Next.
On the next screen, Windows Service, don't change anything, and click Next. On the Apply Configuration screen, click Execute to apply the changes, as shown in the following image:
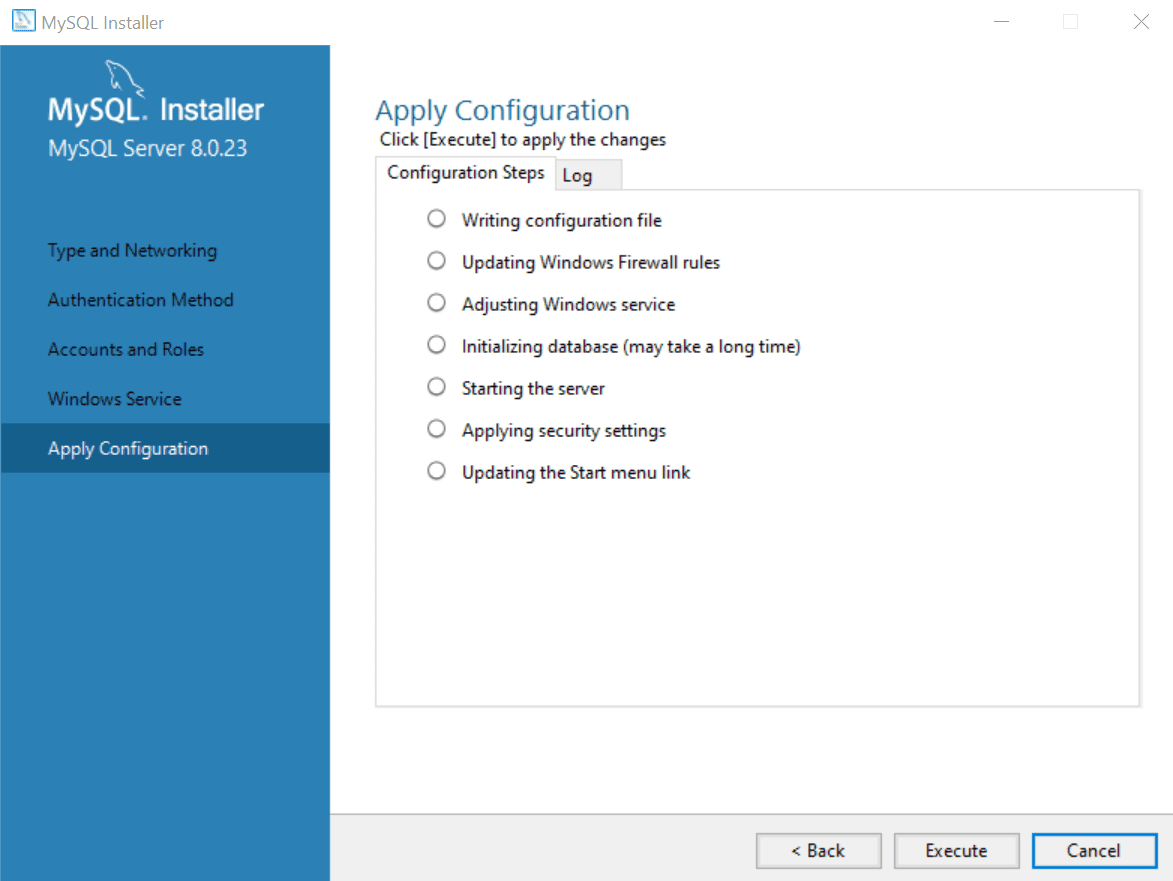
After the configuration is complete, click Finish.
Note If you have any issues with the Windows (x86, 32-bit), MSI Installer that is the SMALLER file size, go back and download the LARGER size, following the same steps.
Now you'll need to add the PATH to the MySQL install to your environmental variables.
First you'll need to copy the PATH to MySQL to your clipboard. Open any folder on your computer and select This PC in the left-hand navigation bar, as shown in the following image:

Next, double-click your C: drive, as shown in the following image:
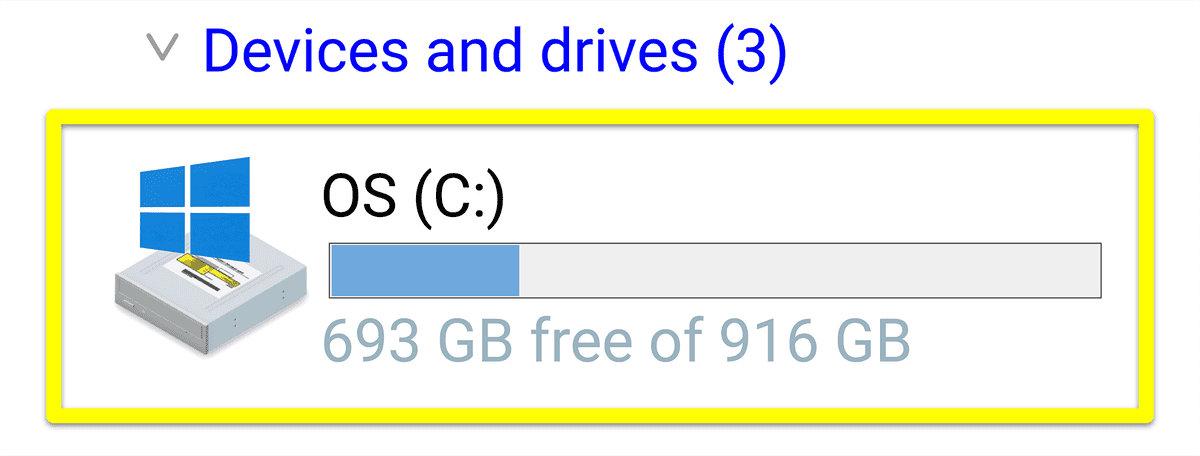
Double-click the Program files folder, then double-click the MySQL folder.
Note Depending on the version of Windows on your computer, MySQL might be inside the
Program files (x86)folder.
Double-click the MySQL Server 8.0 folder, and finally, double-click the bin folder. Your screen should look like the following image:
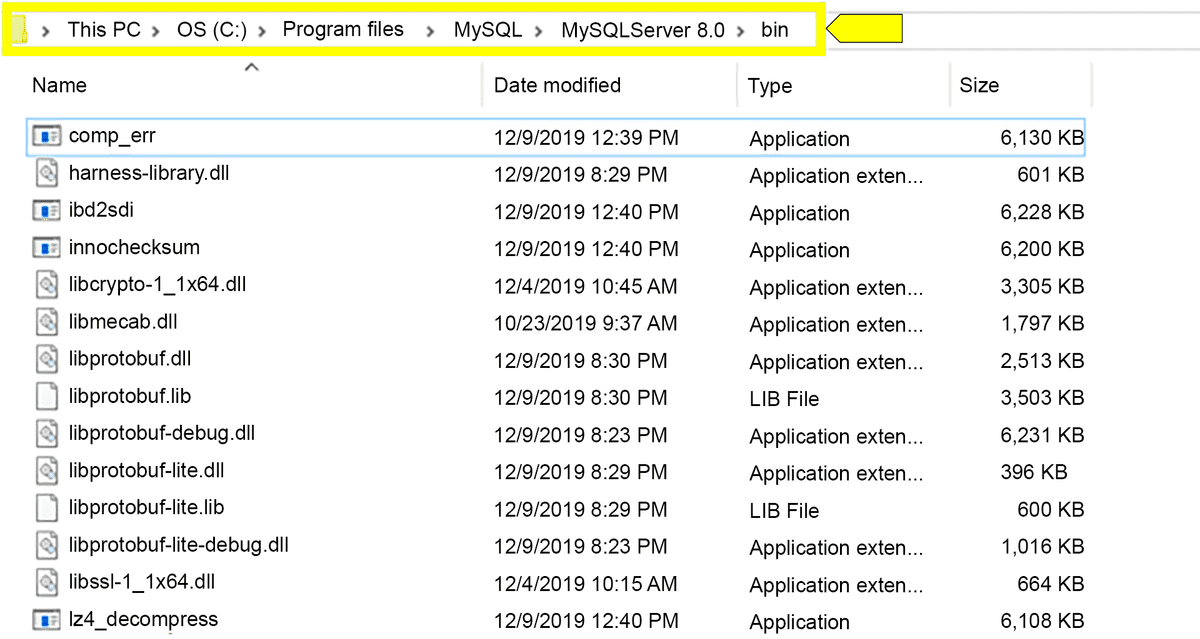
Right-click the address at the top of the screen and select "Copy address as text", like in the following image:
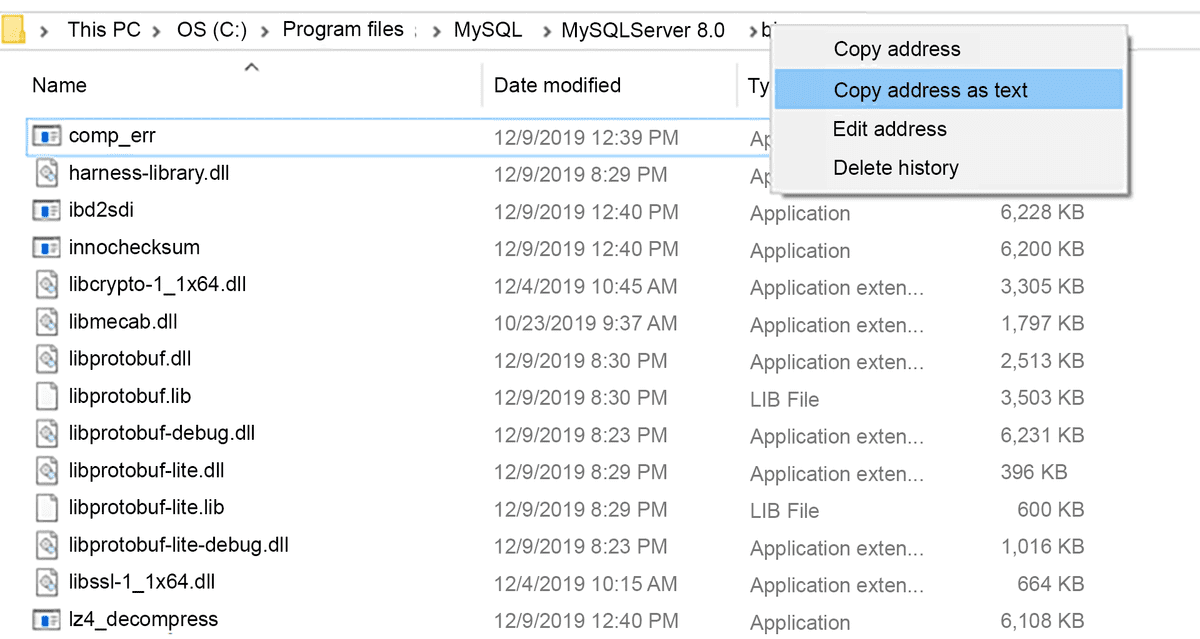
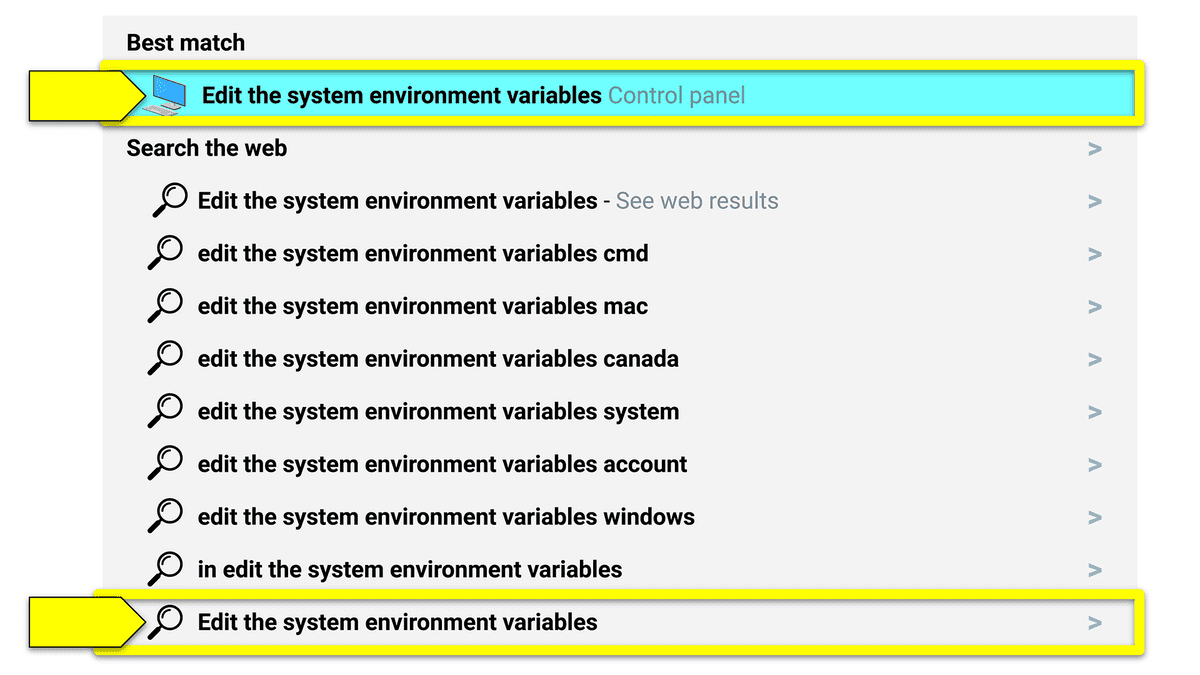
Now that you've got the PATH copied to your clipboard, press the Windows key on your keyboard and search for "Edit the system environment variables". Once that appears in the search screen, click on it, as shown in the following image:
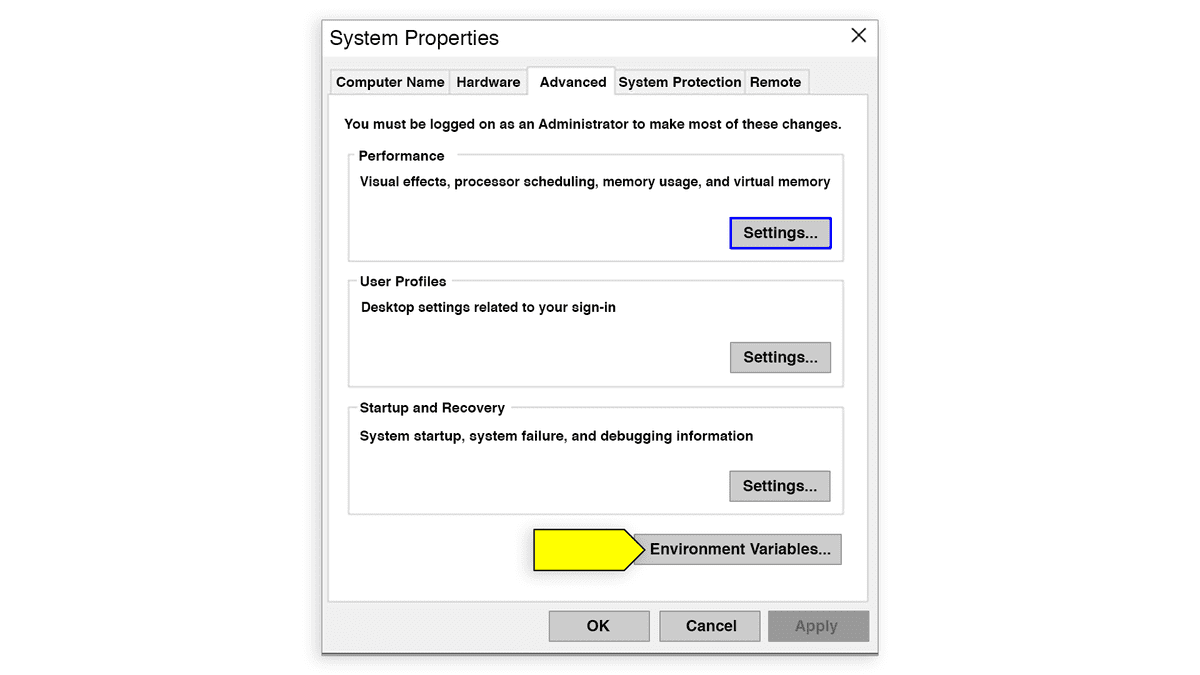
You'll then be prompted with the System Properties screen. Navigate into the Advanced tab and select "Environment Variables...", as shown in the following image:
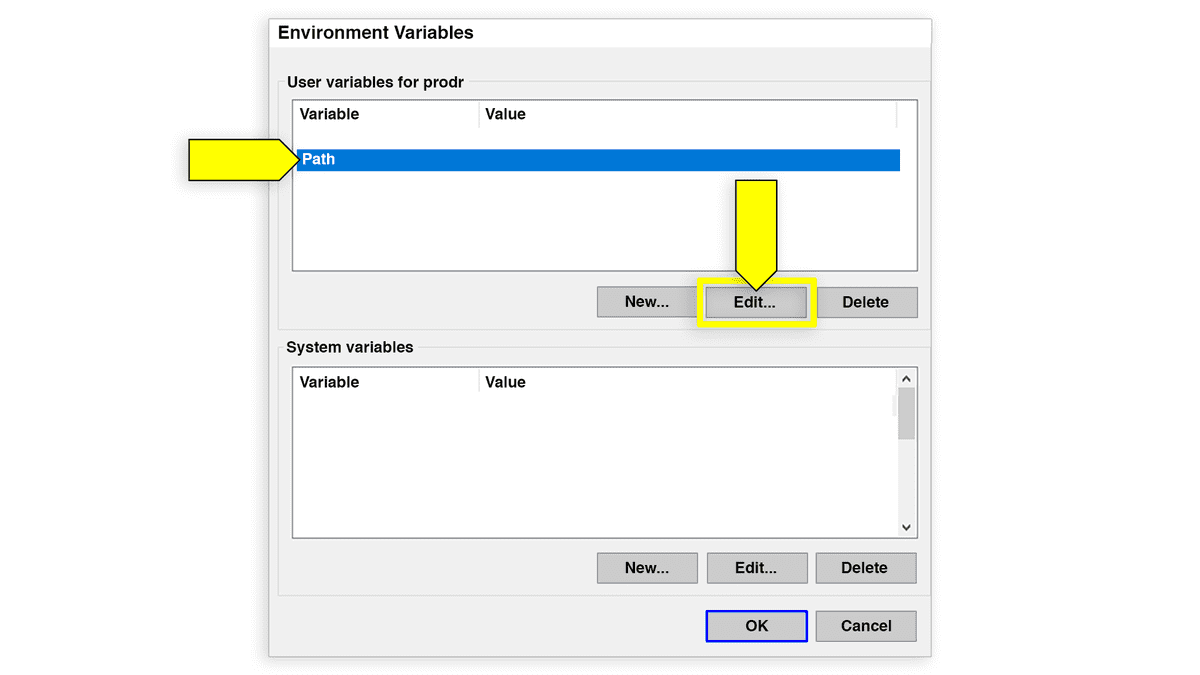
On the Environment Variables screen, under "User variables for <user>" (where <user> is your username on that computer), click into Path and then click the "Edit..." button in the top section of the screen. It should look like the following image:
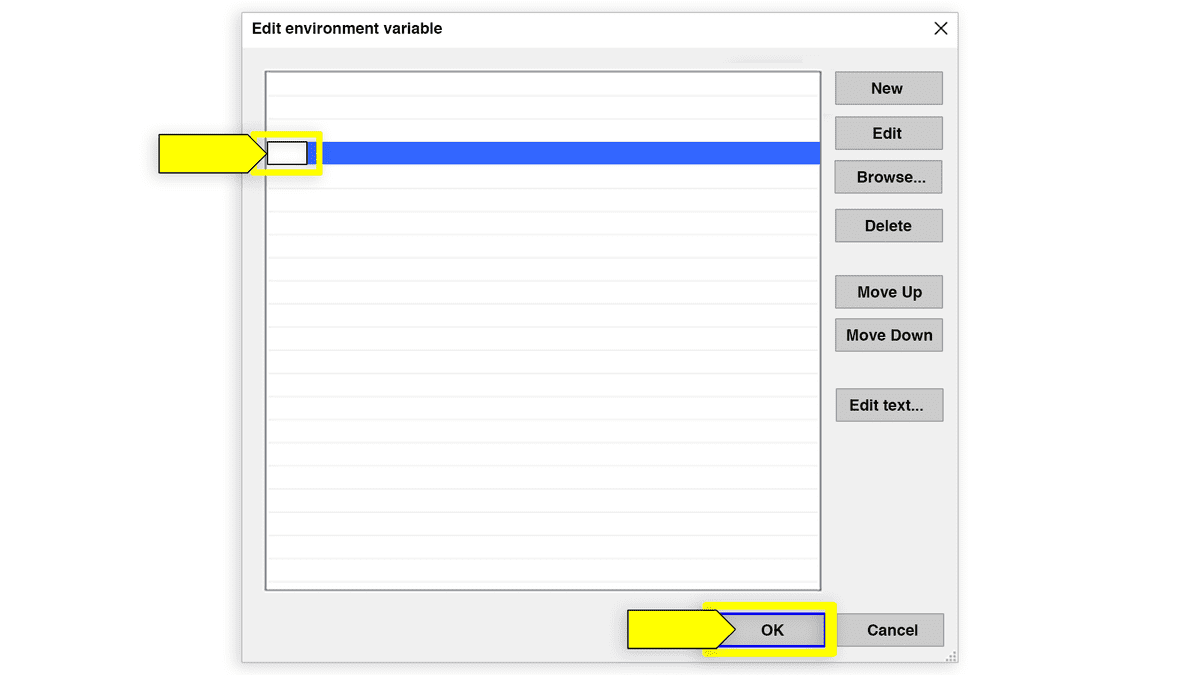
In the "Edit environment variable" window, select New, as shown in the following image:
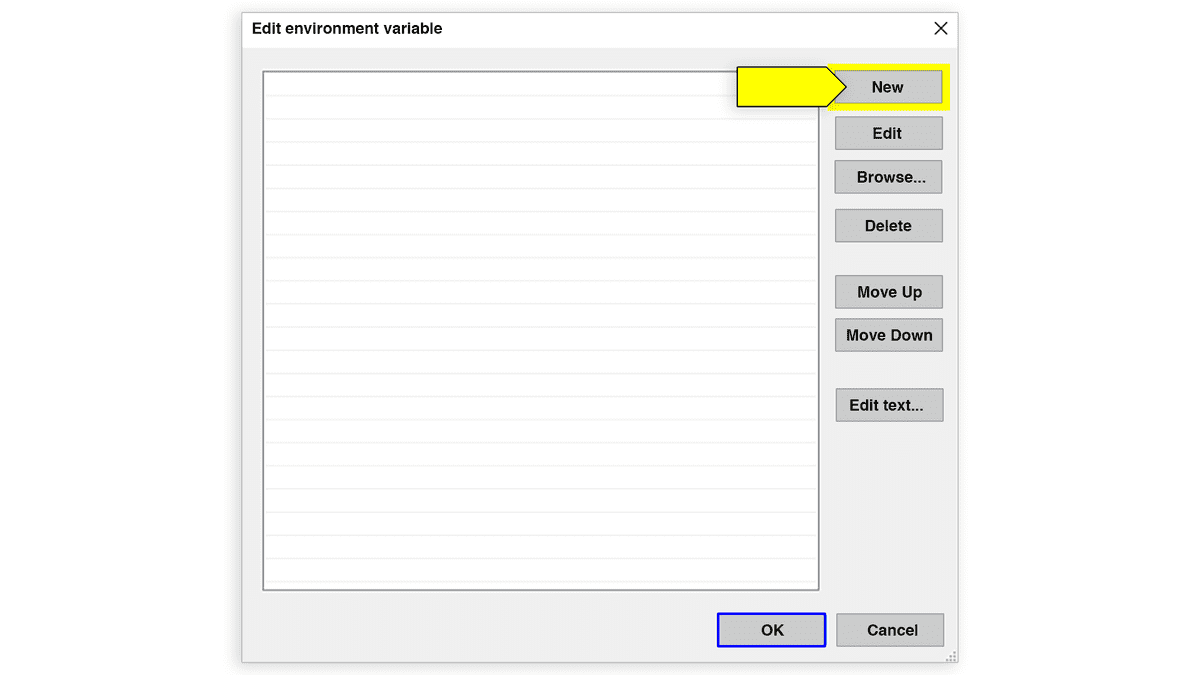
Your cursor will appear in a new line at the bottom of the variables. Paste your PATH in this box and click OK. Your screen should resemble the following image:
Once you've added the PATH, restart Git Bash completely. You can verify that the installation was correct by typing the following into Git Bash:
mysql -V
The PATH followed by the MySQL version number should be printed to the screen. Once you verify that the MySQL server was correctly installed, you can move on to setting up MySQL Shell.
Important To use MySQL commands, you'll need to use MySQL Shell. You won't be able to access this shell through your Git Bash terminal—you'll need to use the Windows command prompt.
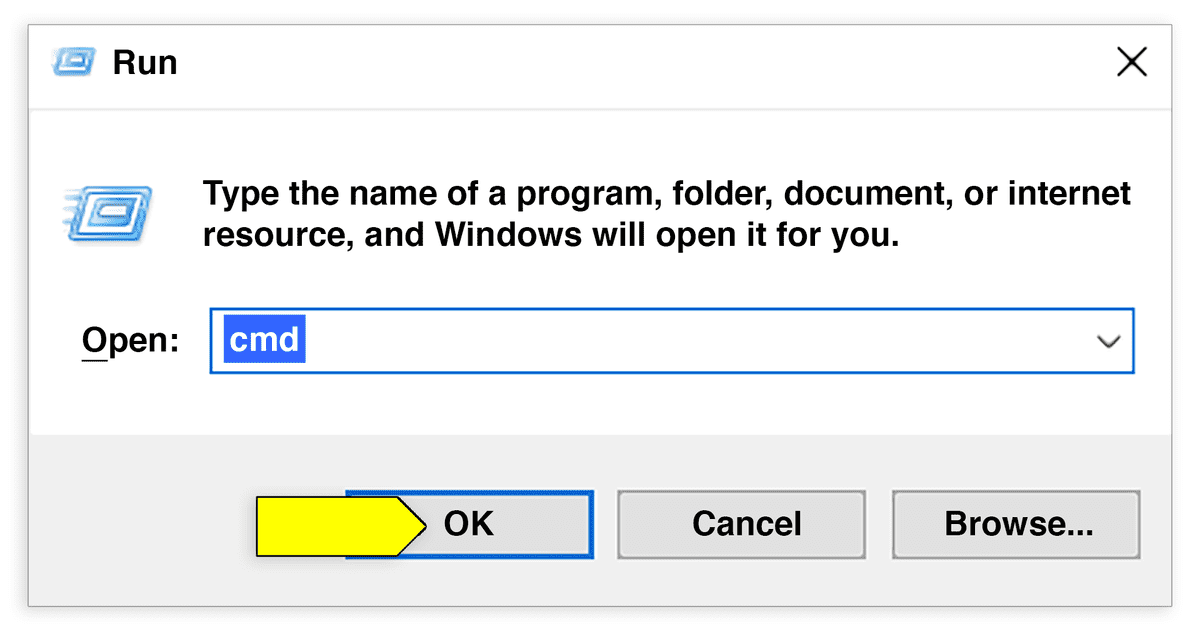
To open MySQL Shell, press the Windows key and the R key at the same time. This will bring up a dialog window titled Run. Enter "cmd" in the input and click OK, as shown in the following image:
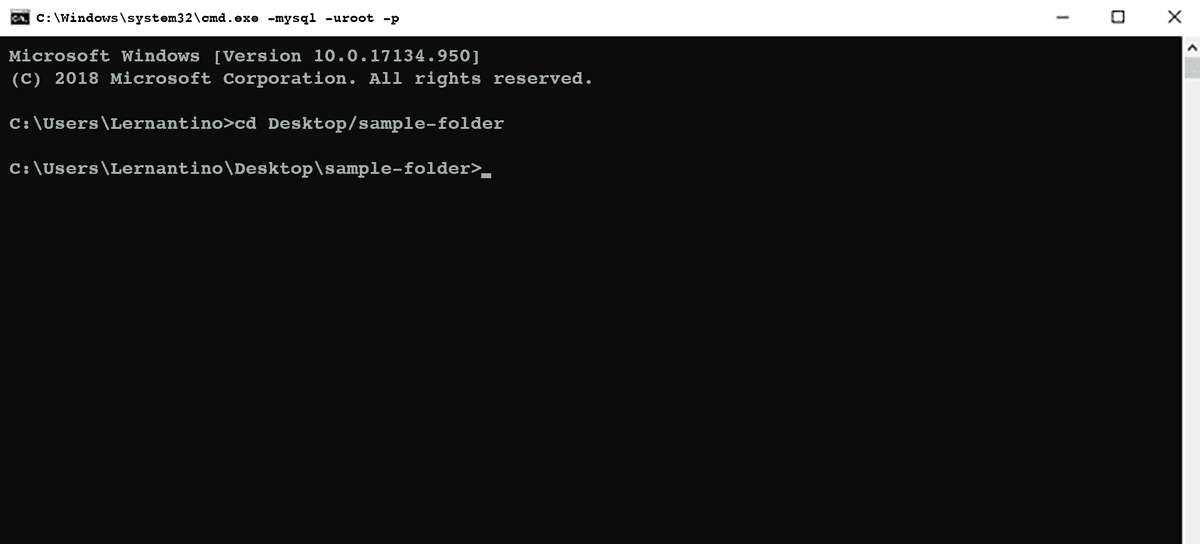
This will open your Windows command prompt, which will look something like the following image:

From here, you'll be able to use the cd command to navigate to the directory where you're working. The following command, for example, will move you into the directory of a sample folder:
cd Desktop/sample-folder
You'll see something like the following image:
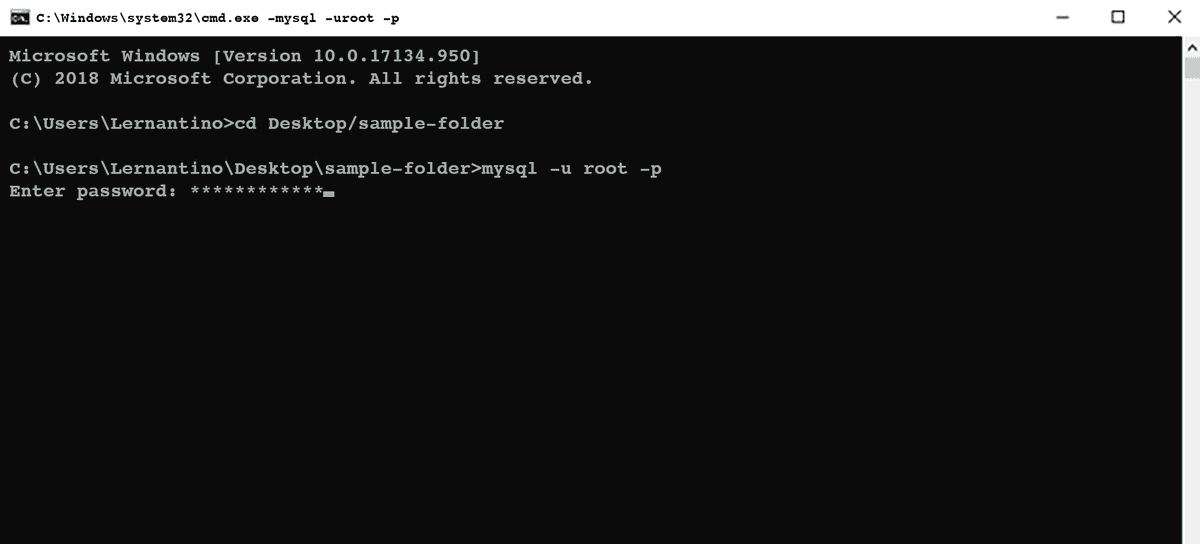
Once you're there, you'll need to log into MySQL Shell. To do so, enter the following command in the Windows command prompt:
mysql -u root -p
This tells MySQL Shell that you want to log in with the root user (-u). The -p syntax stands for "password." Once you enter this command, you'll be prompted for the root password that you created when you installed MySQL, as shown in the following image:
Enter your password and press the Enter key. This will log you into MySQL Shell, as shown in the following image:
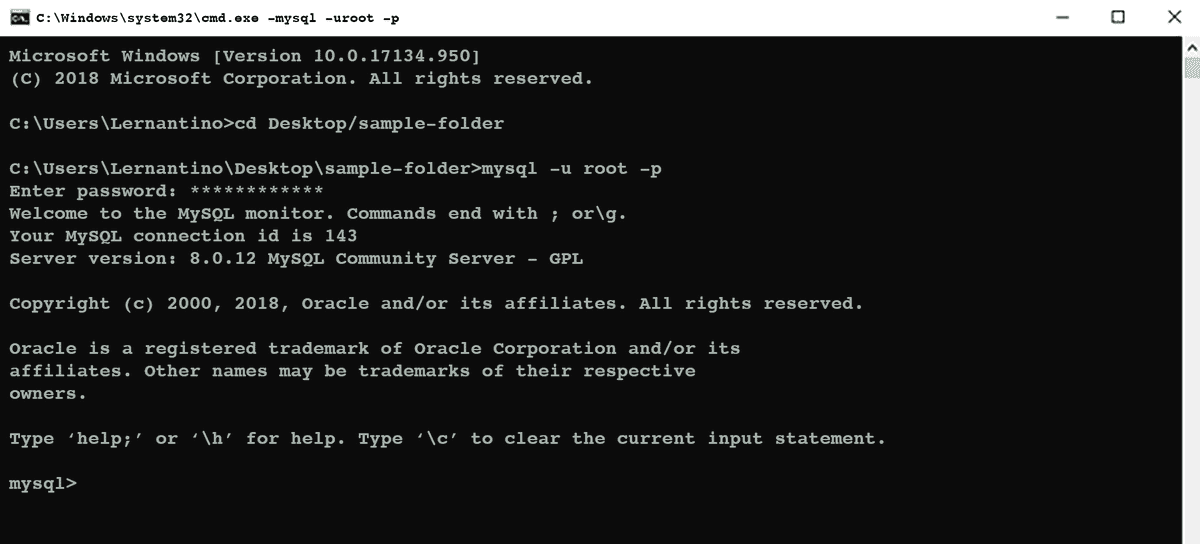
From here, you'll be able to enter MySQL commands. You don't need to do this now, but you can revisit these instructions as you work through this module.
Type the command quit; to exit MySQL Shell.
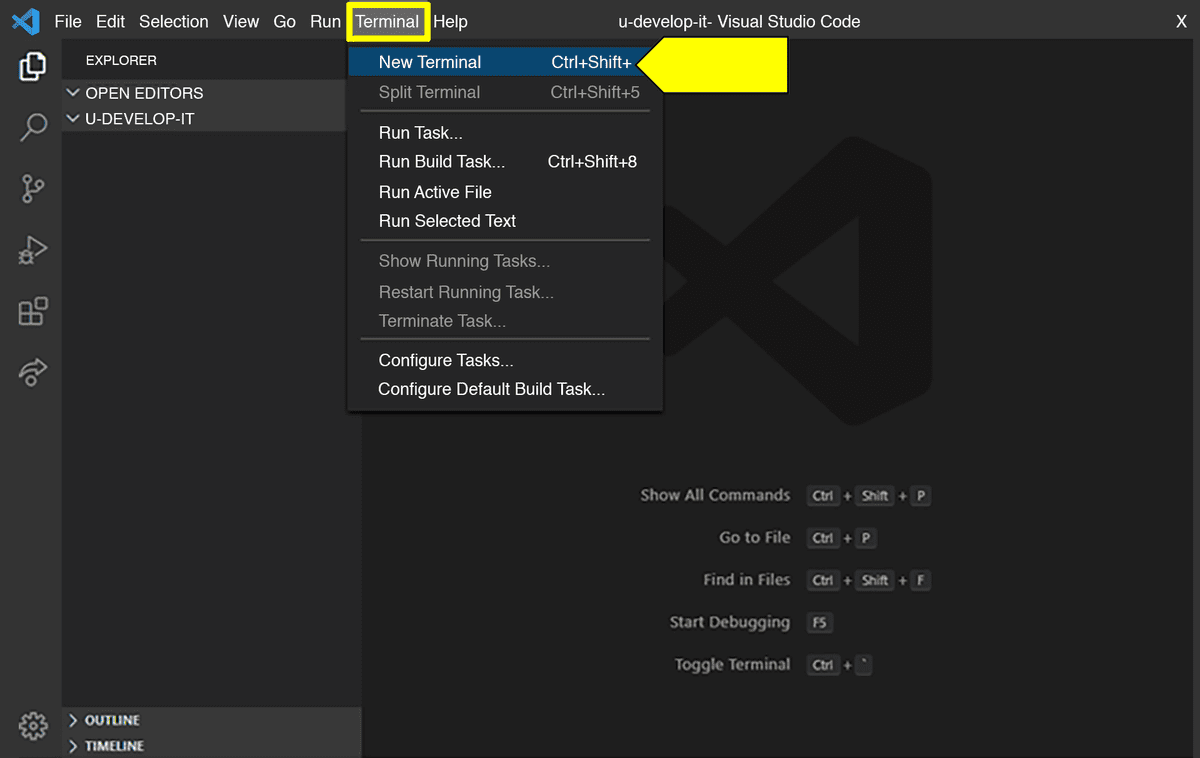
Deep Dive You can also access MySQL Shell directly in VS Code! Depending on how you set up Git Bash, this option might already be available to you. Select Terminal from your menu at the top of the screen, and select New Terminal in the dropdown menu, as shown in the following image:
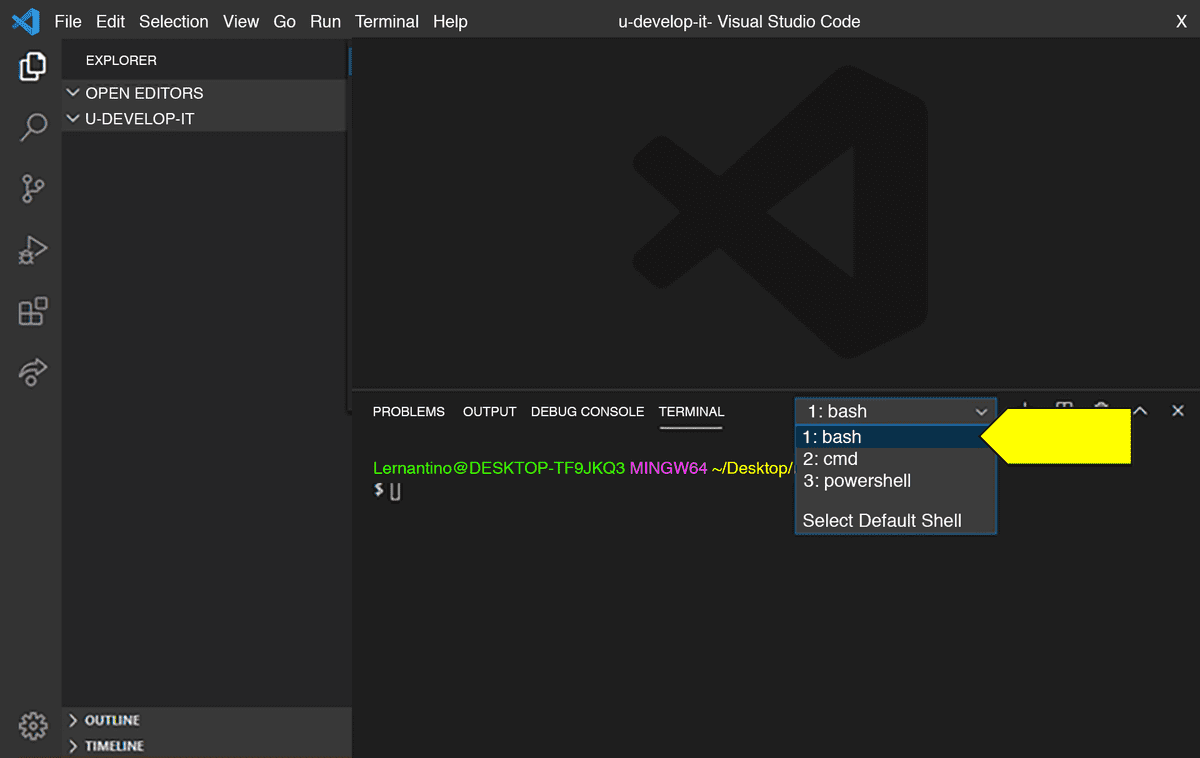
If a terminal appears at the bottom of your screen with "cmd", "powershell", or "bash" selected, you're ready to go. You can click on this dropdown to choose the integrated terminal of your choice. See the following image for an example:
If you can't access an integrated terminal and you want to, see the VS Code documentation on the integrated terminal.
Please choose only one of the following options, but not both:
One method to install MySQL Server on macOS is to through the Homebrew package manager. This will allow you to install MySQL Server from the command line.
Once you have Homebrew installed, you can install MySQL Server using the following command:
brew install mysql
The server is set up without a default root password. You can connect to it using the following command:
mysql -uroot
Important: (Optional) You should change the root password after you install MySQL Server. You can do this with the following command:
mysql_secure_installation
Another method to install the MySQL server on macOS is to download it from the MySQL Community Downloads page. Select macOS from the dropdown menu and then scroll down to find the DMG Archive version of the MySQL server installer, which should be the first one on the list. It will be labeled "macOS 10.xx (x86, ARM, 64-bit), DMG Archive", where "xx" is a combination of numbers, as show in the following image:
Note: The MySQL Community Server version number might be different from what appears in these following images.
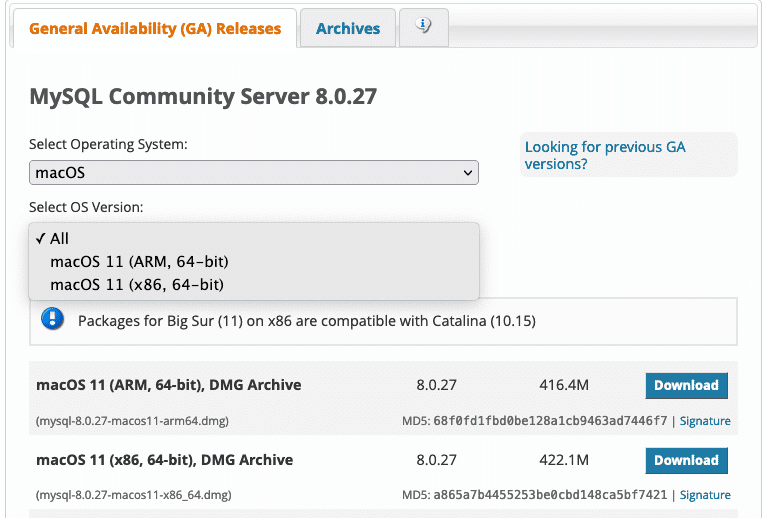
Click Download.
On the next page, select "No thanks, just start my download", as shown in the following image:
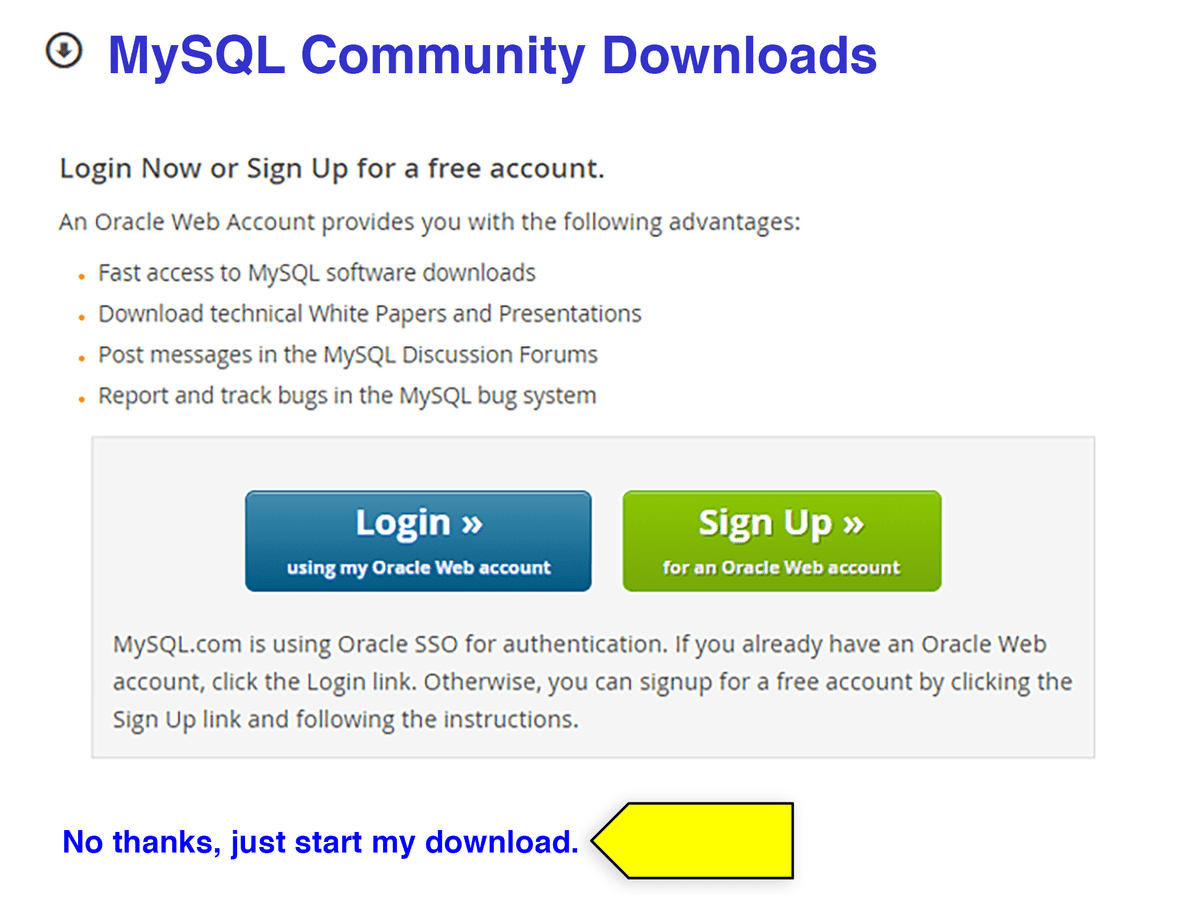
Open the DMG file after it has downloaded and go through the installation process.
Note If you see a message that the installer cannot check the file for malicious software, try right-clicking to select Open.
Click Continue to get to the Software License Agreement screen. Click Continue again on that screen, then select Agree, as shown in the following image:
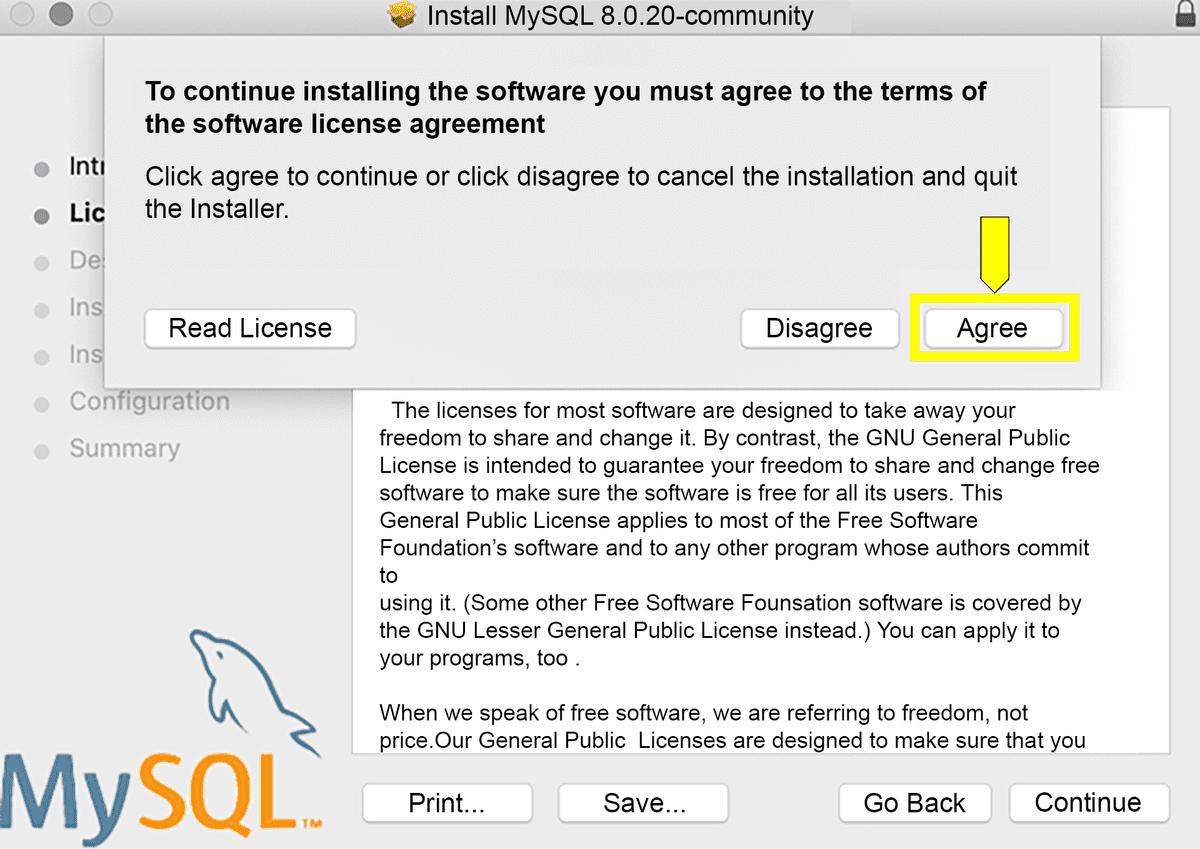
Click Install and input your password to allow the installer to continue.
Important On the Configure MySQL screen, make sure to select "Use Legacy Password Encryption" and click Next, as shown in the following image:
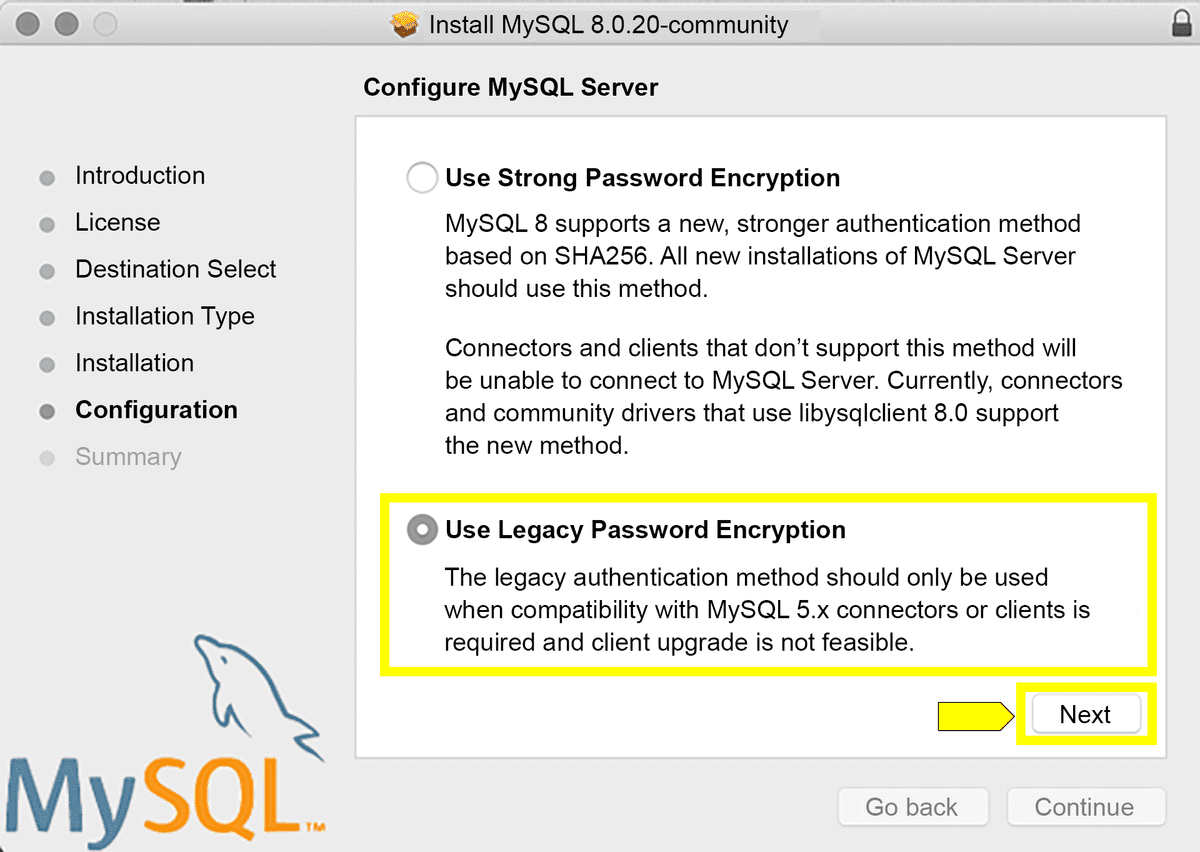
Now create a root password.
Caution Don't forget this password! It's extremely important that you keep track of your root password for MySQL, as it's difficult to reset. Write it down somewhere easily accessible or add it to a password manager.
Enter a root password on the next screen. After entering your password and ensuring that you've stored it somewhere you can find it, click Finish, as shown in the following image:
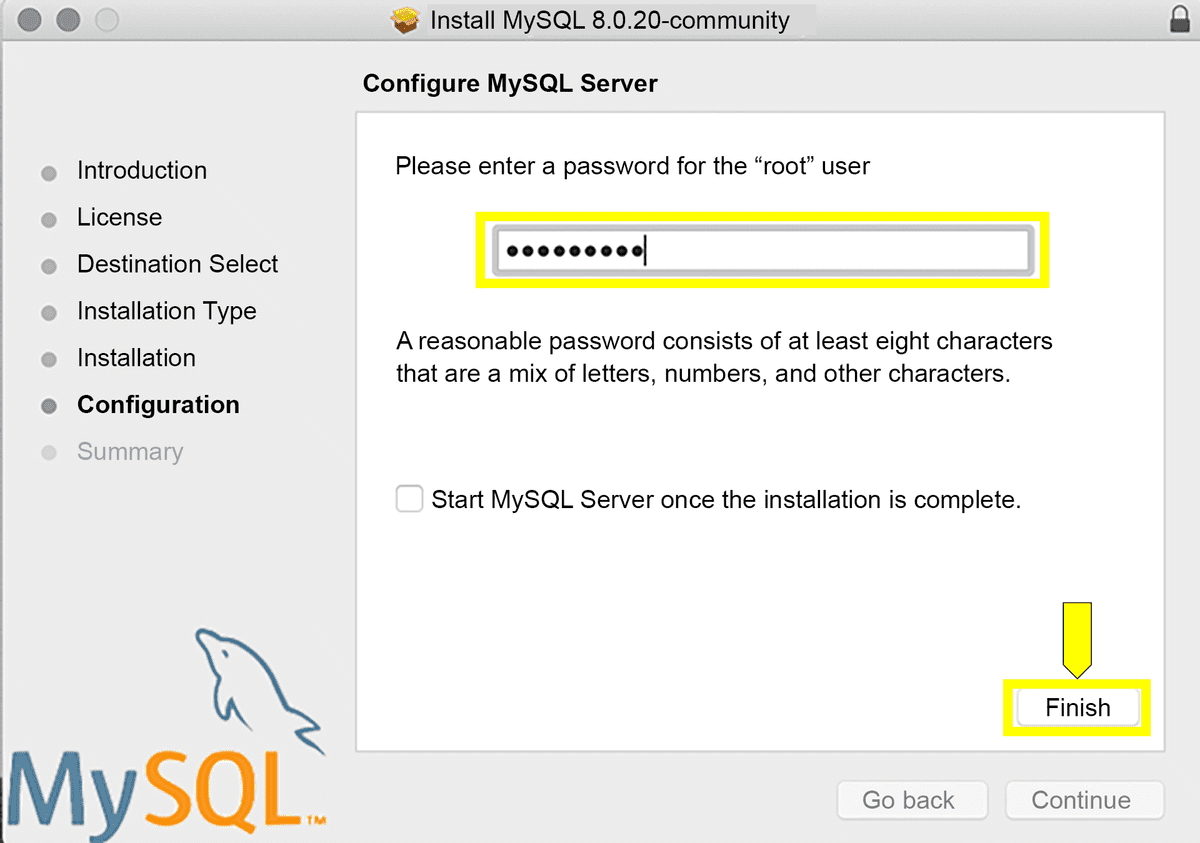
You can verify that the installation was correct by going to System Preferences and checking that the MySQL icon shows up at the bottom. You'll see something like the following image:
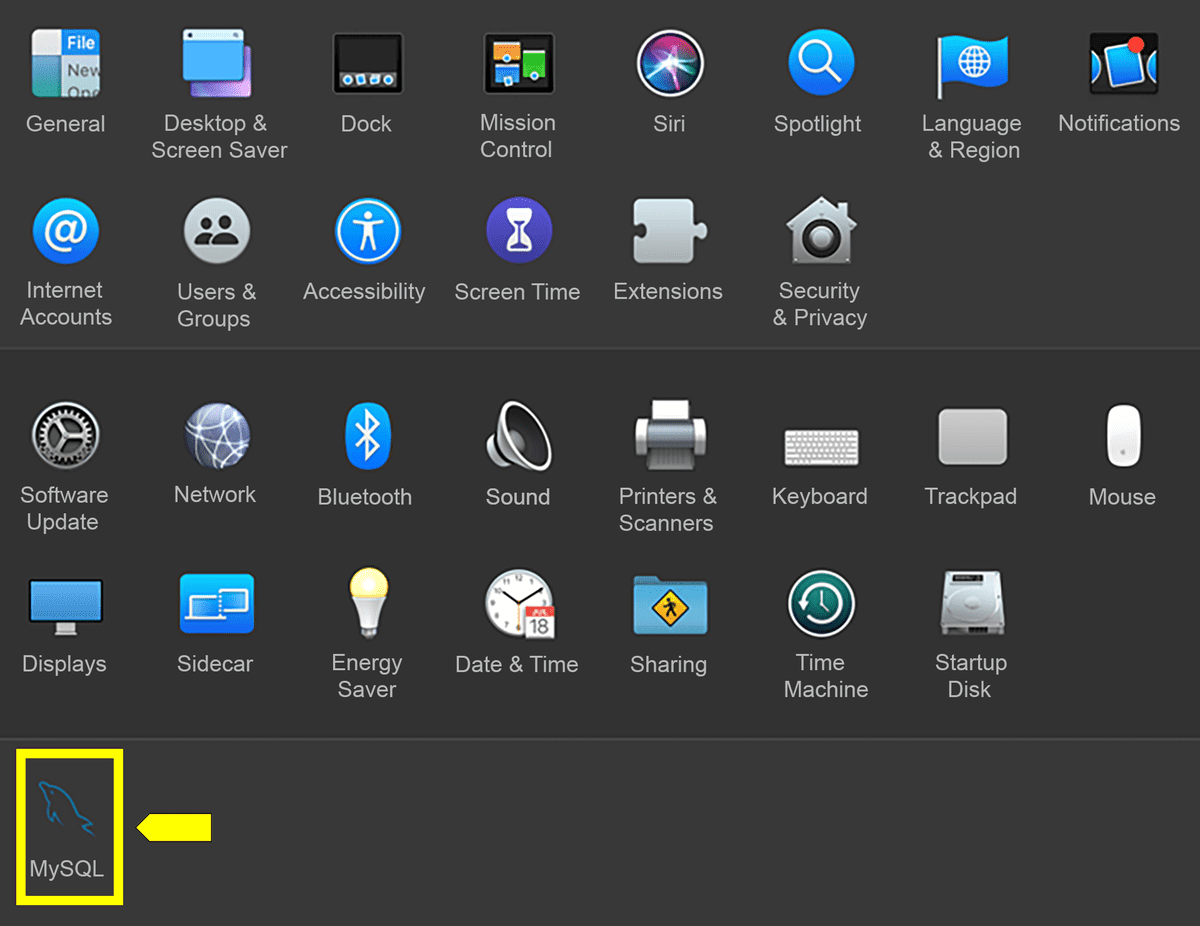
Note You can start or stop your MySQL server by clicking on the MySQL icon in System Preferences. This will bring up a GUI that you can set to automatically start the MySQL server when you turn on your computer, like in the following image:
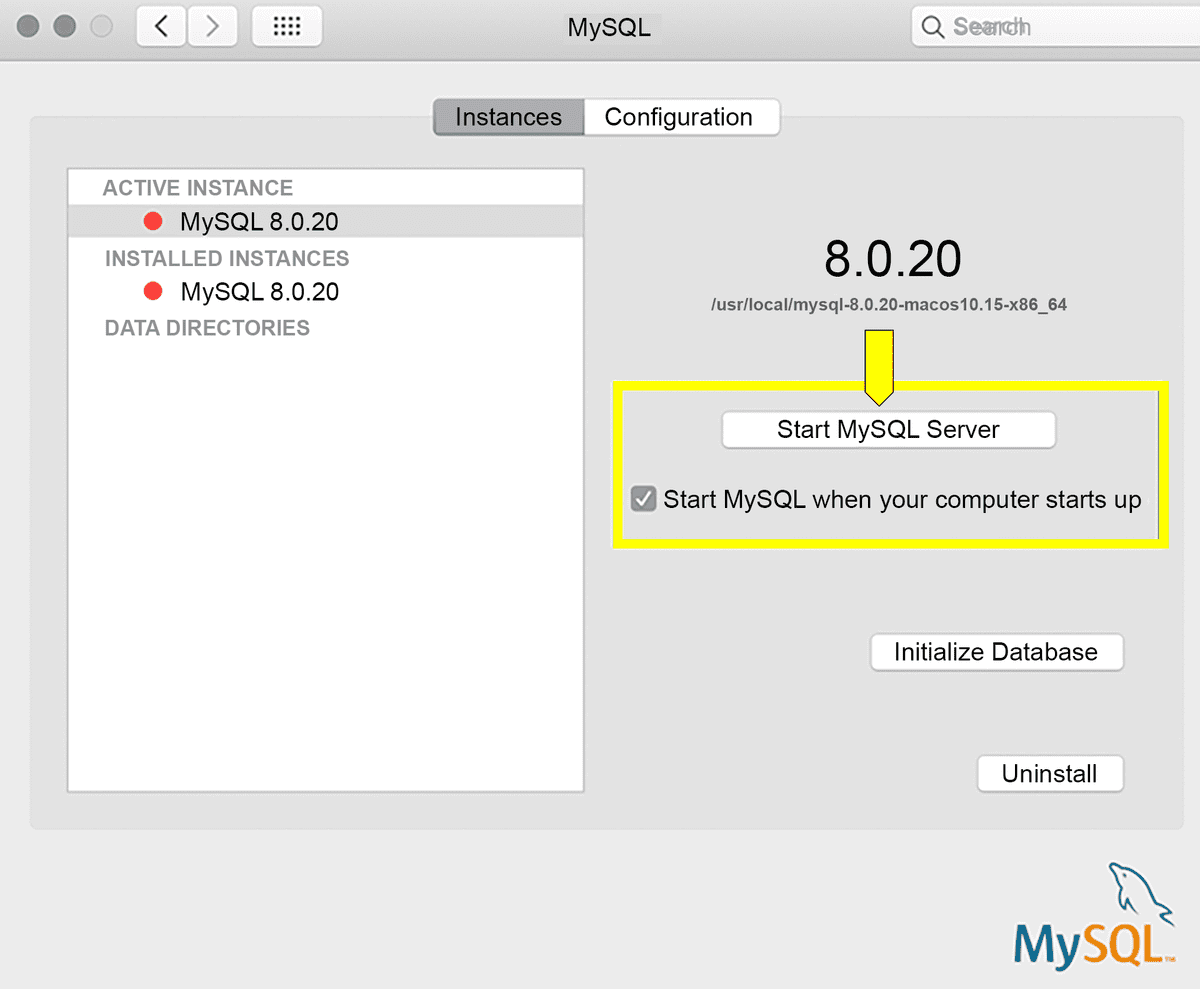
You might need to restart your computer to change these settings in System Preferences.
Once you've verified that the MySQL server was installed correctly, move on to setting up MySQL Shell.
You can use MySQL Shell simply by opening a new terminal and logging into MySQL Shell. Before you can do this, you might need to start the MySQL server, with the following steps:
Go to System Preferences and click the MySQL icon.
Click "Start MySQL Server".
Open Terminal and use the cd command to navigate to a directory where you'll be working—for example, one of your project folders. Once in the directory, enter the following command to initialize the MySQL command-line prompt:
mysql -u root -p
This tells MySQL Shell that you want to log in with the root user (-u). The -p syntax stands for "password." Once you enter this command, you should be prompted for the root password that you created when you installed MySQL. Enter your password and press the Enter key. This will log you into MySQL Shell, as shown in the following image:
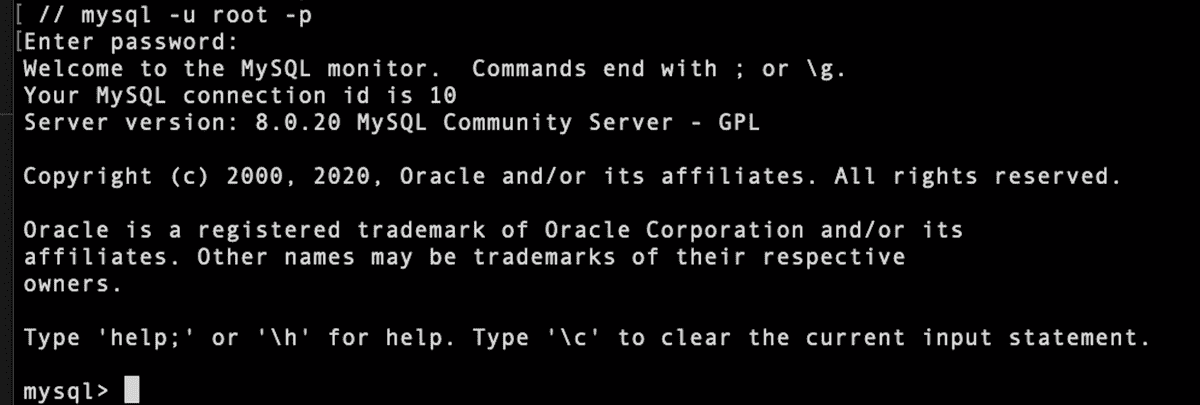
From here, you'll be able to enter MySQL commands. You don't need to do this now, but you can revisit these instructions as you work through this module.
Type the command quit; to exit MySQL Shell.
Note Some macOS users might get the error message "Command not found". If that is the case, we will need to set up a
.zshrcfile in your home directory and add themysqlcommand to it. To do this, run the following command:echo 'export PATH="/usr/local/mysql/bin:$PATH"' >> ~/.zshrcWhen you’re done, restart your terminal for this line to take effect. You can then try initializing MySQL Shell again with the following command:
mysql -u root -p
This page was updated 6 months ago
© 2022 edX Boot Camps LLC. Confidential and Proprietary. All Rights Reserved.
Category: mysql
Tagged under: mysql, mysql server, windows installation, mac installation, installation, guide, sql, databases,
All Posts
- OpenAI Account Setup Guide
- NodeJS Installation Guide
- PostgreSQL Reference Guide
- GitHub Copilot Guide
- PostgreSQL Installation Guide
- Deploy with Render and PostgreSQL
- API Resources
- Render Deployment Guide
- Deploying a MERN Stack Application to Render
- Deploy with Render and MongoDB Atlas
- The Science and Research Behind Our Unconventional Educational Approach
- What Makes Up a Web Development Project?
- Localhost Loopback Issues Troubleshooting Guide
- Video Submission Guide
- A Growth Mindset for Life
- Web Literacy
- Developer Resources
- Introduction to Computer Structure and Organization
- MySQL Installation Guide
- HTML Cheatsheet
- Advanced Computer Skills
- Introduction to Computer Skills
- How to Use API Keys
- How to Install MongoDB
- MySQL Reference Guide
- Heroku Deployment Guide
- Getting Started with Git
- Using the GraphQL Playground in a MERN application
- Professional README Guide
- Regular Expression Tutorial
- How to Install the Heroku CLI
- How to Install NodeJS
- Deploy with Heroku and MySQL
- Deploy with Heroku and MongoDB Atlas
- Set Up MongoDB Atlas