PostgreSQL Installation Guide
May 28, 2024PostgreSQL is a sophisticated open-source relational database management system. It is highly reliable, scalable, and known for its strong emphasis on extensibility and standards compliance. PostgreSQL is used as the backend for various complex applications, including web and mobile applications.
To install PostgreSQL on your machine, follow these instructions tailored to your specific operating system.
The following installation images were captured on a Windows machine. The installation process is the same for Mac, but the installer will look slightly different.
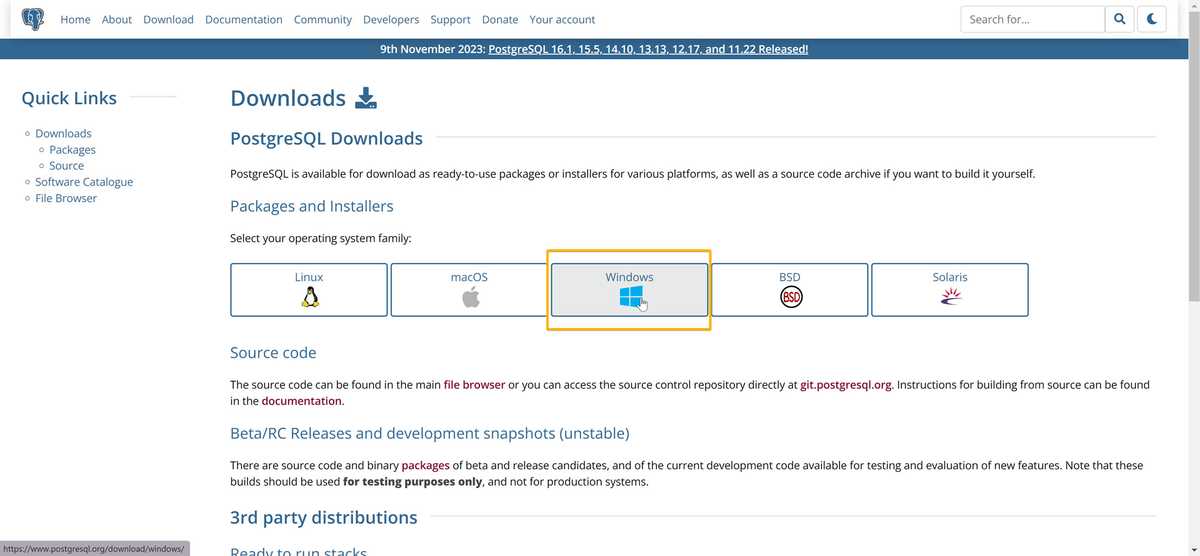
To install the PostgreSQL server, visit the PostgreSQL Downloads page. In the Select your operating system family section, choose Windows or macOS, we'll select "Windows" as shown in the following image:
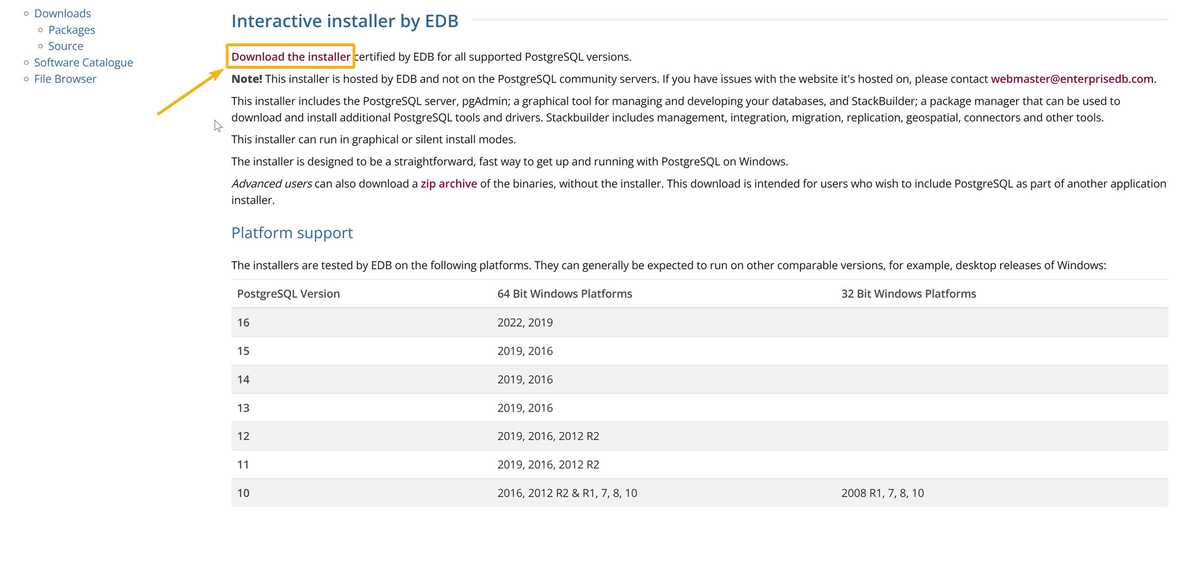
On the following page under the Interactive installer by EDB section, click the "Download the installer" link, as shown in the following image:
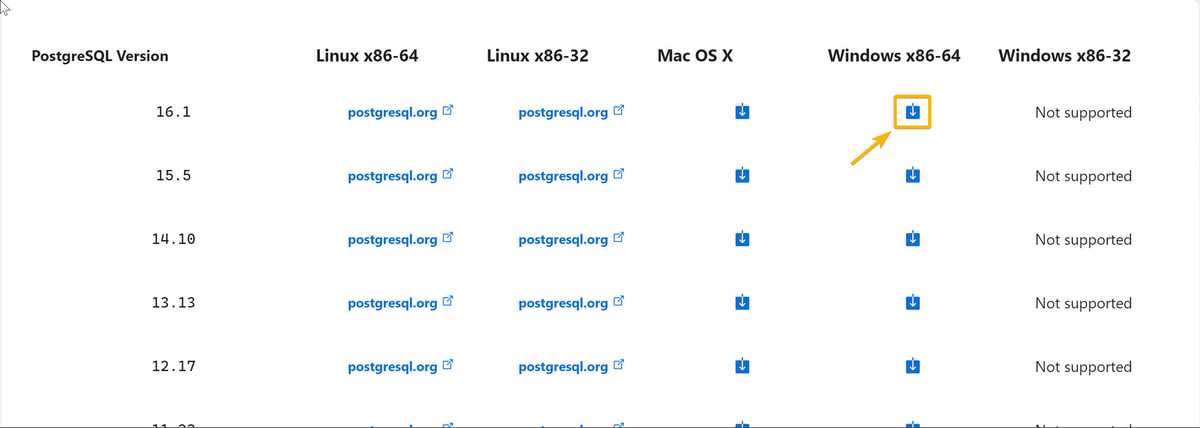
On the Download PostgreSQL page, select the most recent version depicted at the top of the list. Select the "Windows x86-64" for Windows or "Mac OS X" for Mac. We'll select the "Windows x86-64" blue download button as shown in the following image:
Note: As of the writing of this blog post, the recent version is 16.1. If you are reading this after a new version has been released, you will see a different version number at the top of the list.
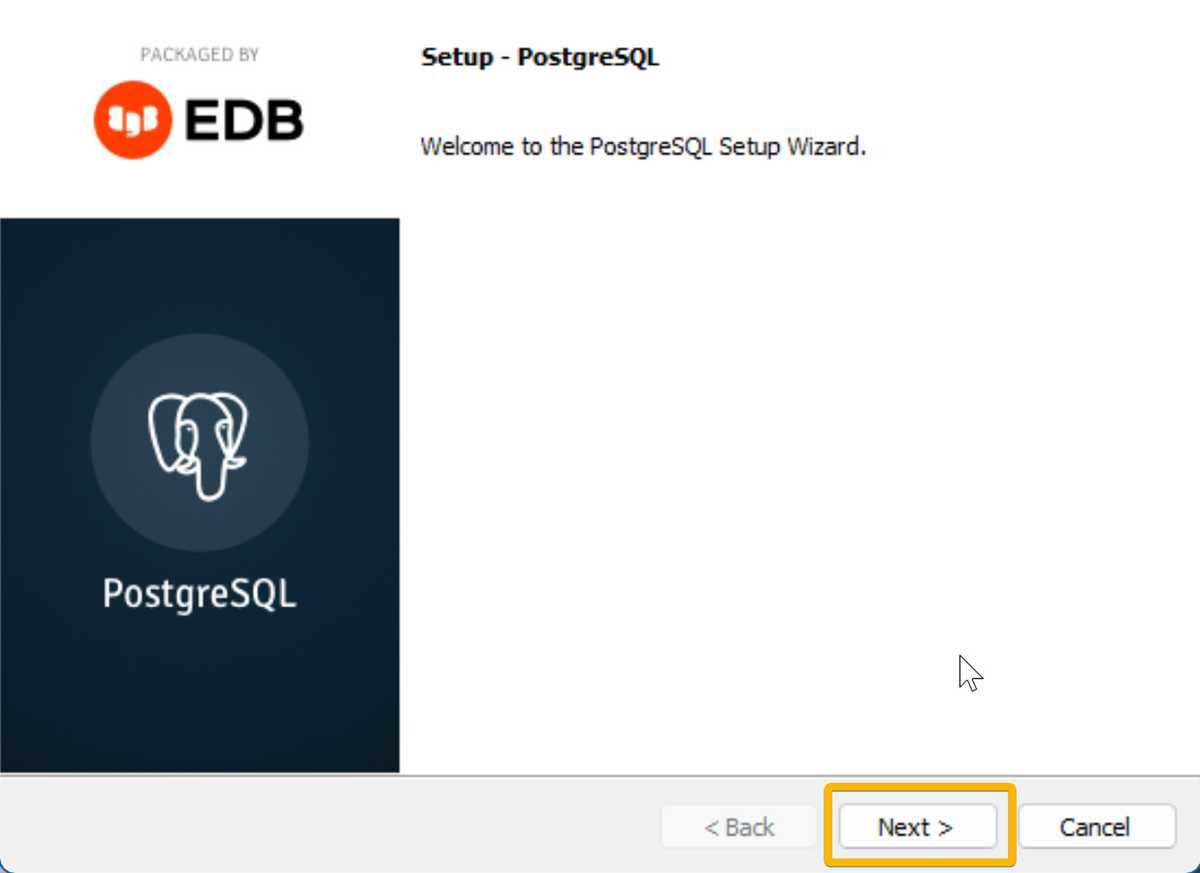
Navigate to the folder where the file was downloaded, and double-click it to run the installer. When the setup wizard opens, click Next, as shown in the following image:
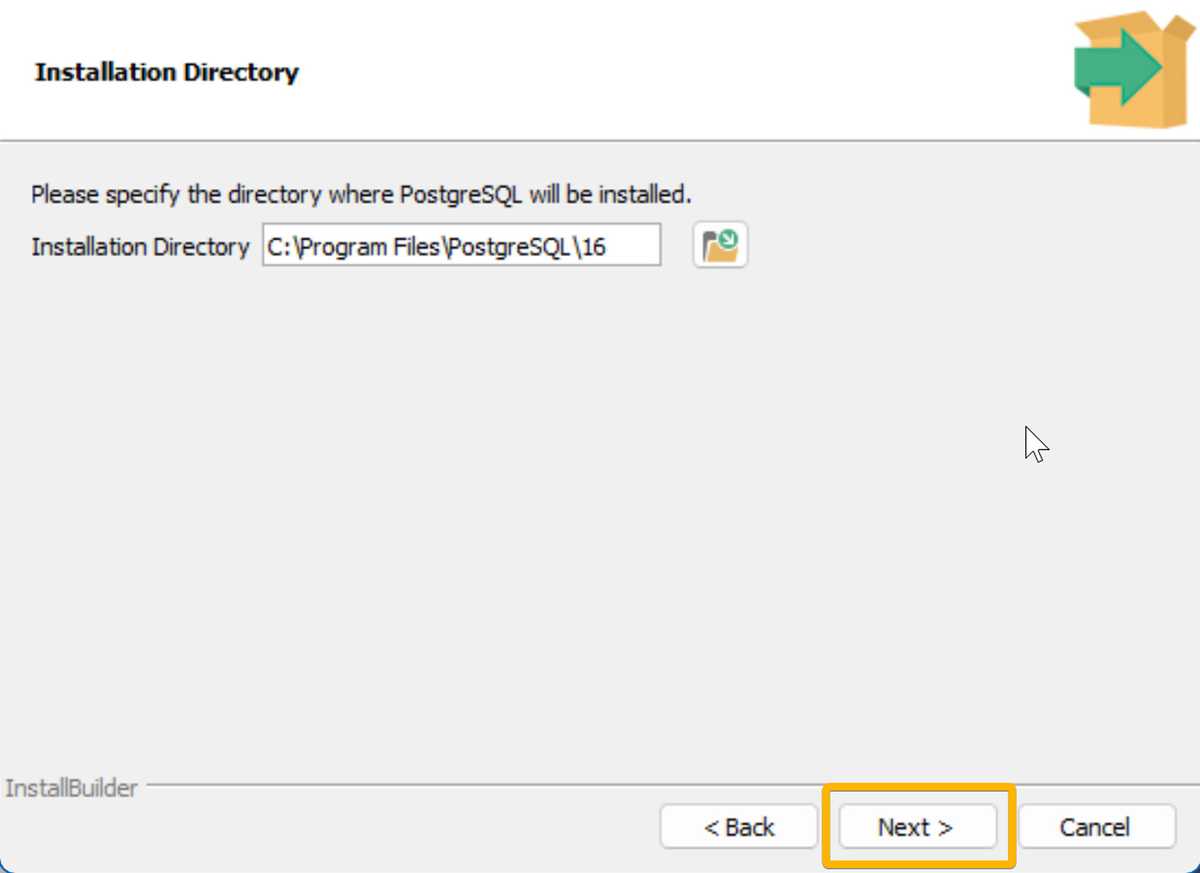
On the next screen, leave the install location as the default value and click Next, as shown in the following image:
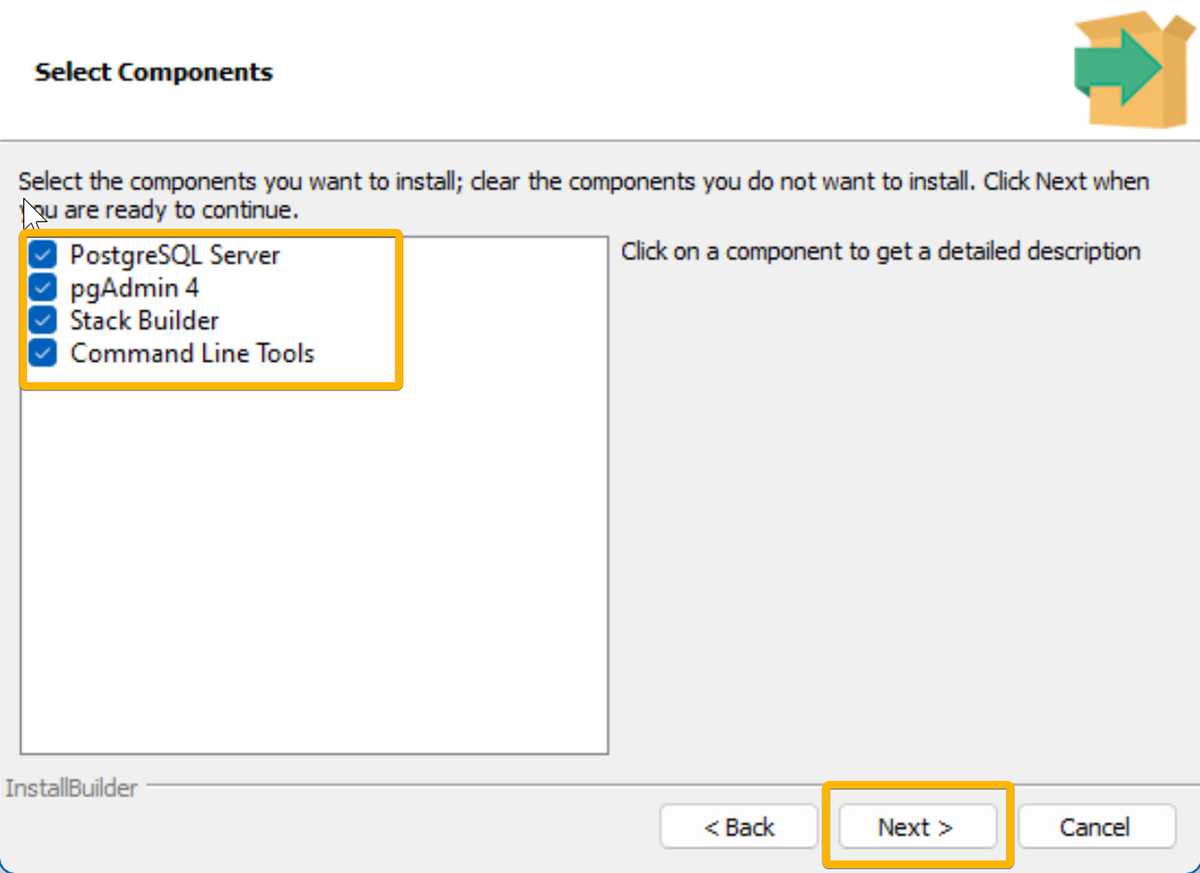
On the next screen, Select Components, leave the default components checked and click Next, as shown in the following image:
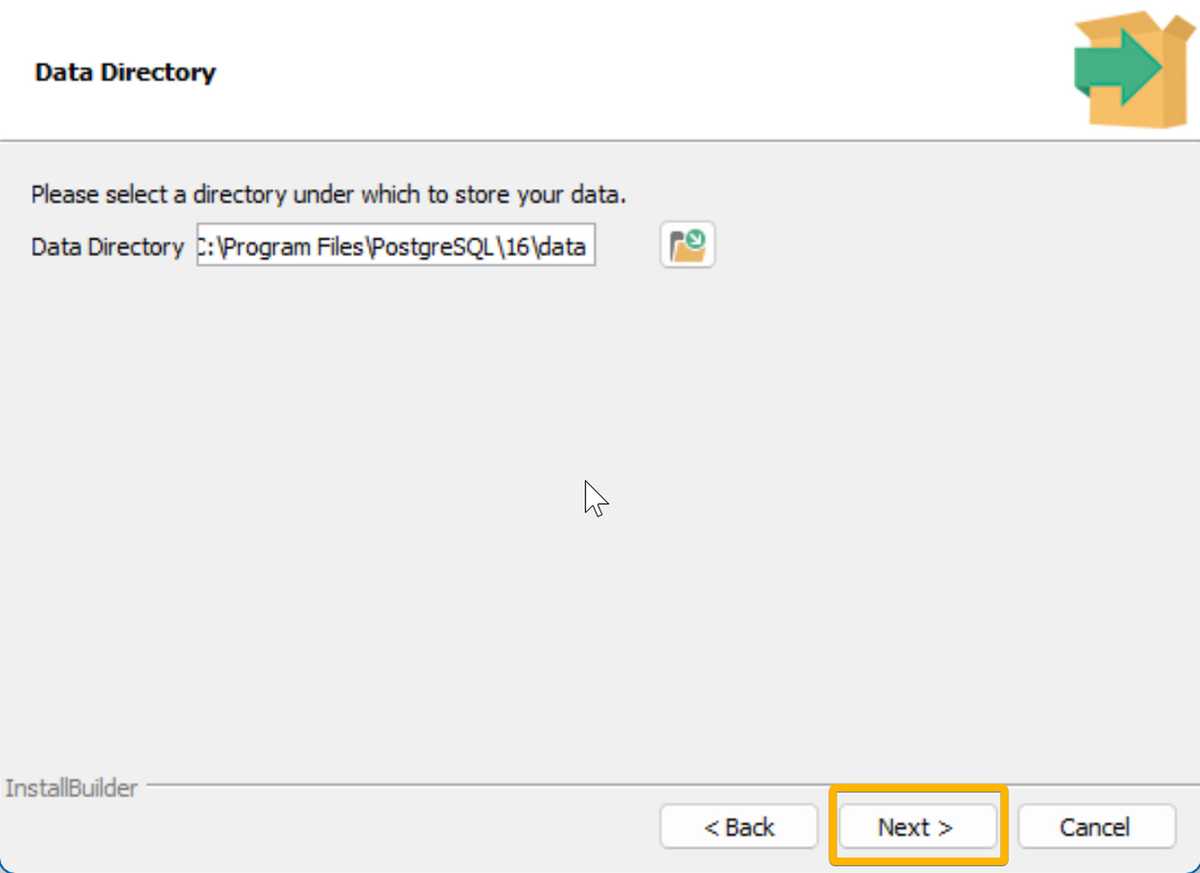
After you click Next, you will be asked for the path of your data file, leave this as default and click Next as shown in the following image:
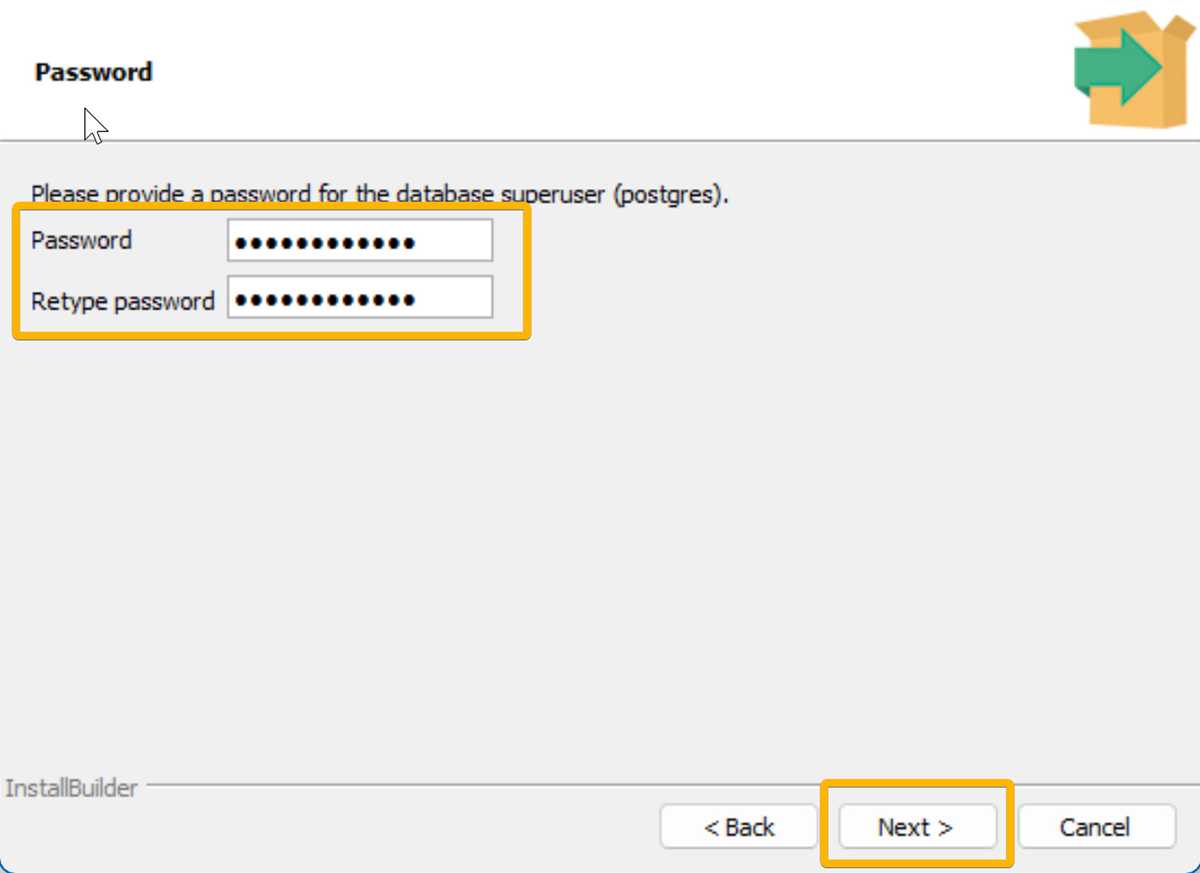
Now you'll be asked to create a password for your PostgreSQL root user. Enter a strong password and click Next, as shown in the following image:
Caution Don't forget your password! It's extremely important that you keep track of your root password for PostgreSQL, as it's difficult to reset. Write it down somewhere easily accessible, or add it to a password manager to keep it secure.
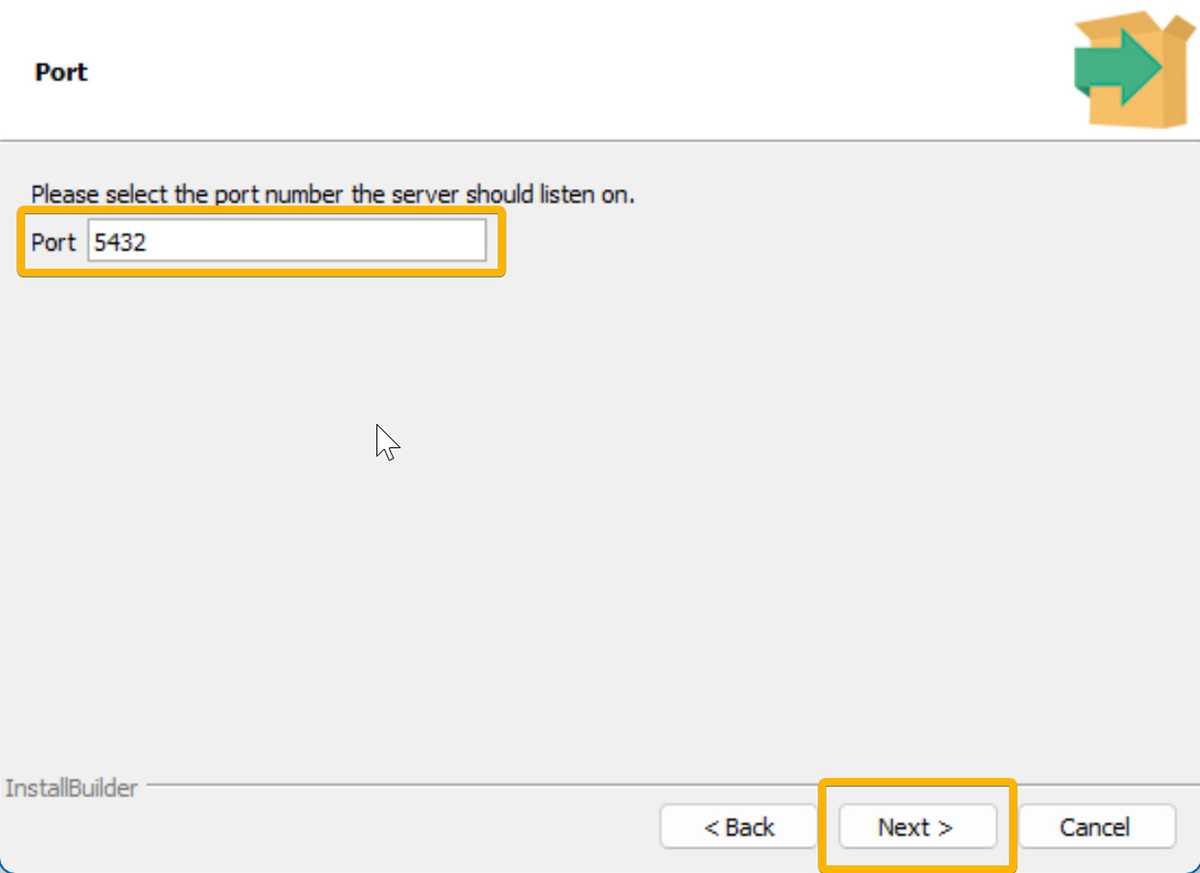
The next screen asks you to select a port number for your local server instance. Leave this as the default 5432 and click Next, as shown in the following image:
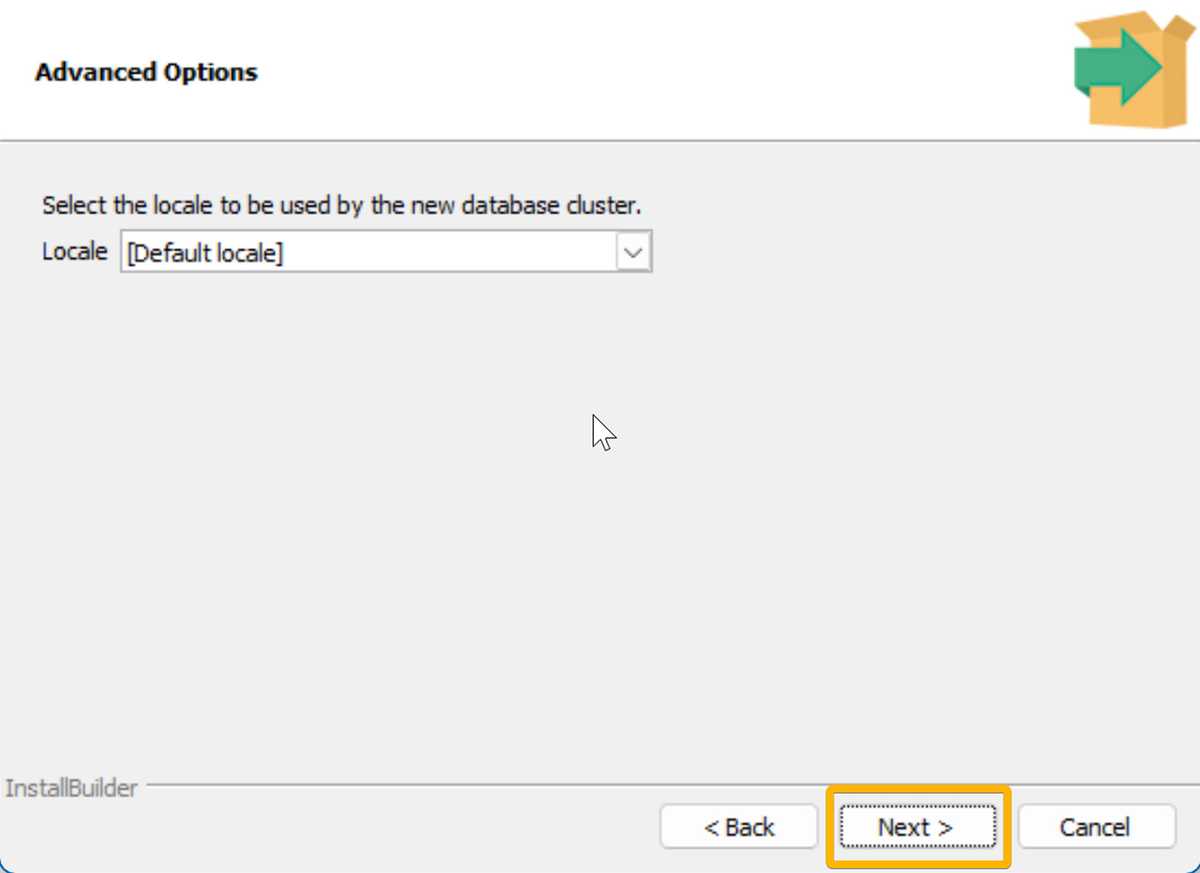
You'll be asked to select a locale for your database. Leave this as the default and click Next, as shown in the following image:
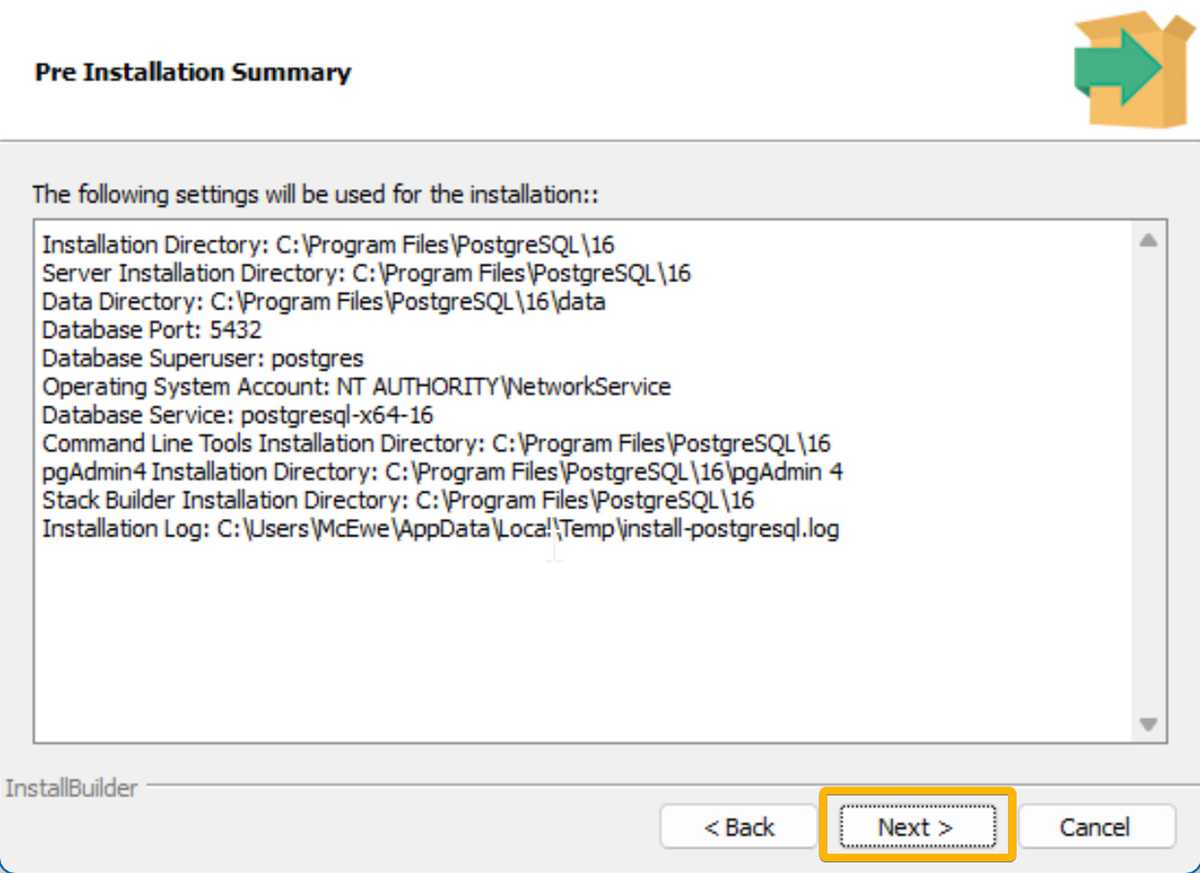
The following gives an outline of the installation and what it's going to do. Leave this as default and click Next as shown in the following image:
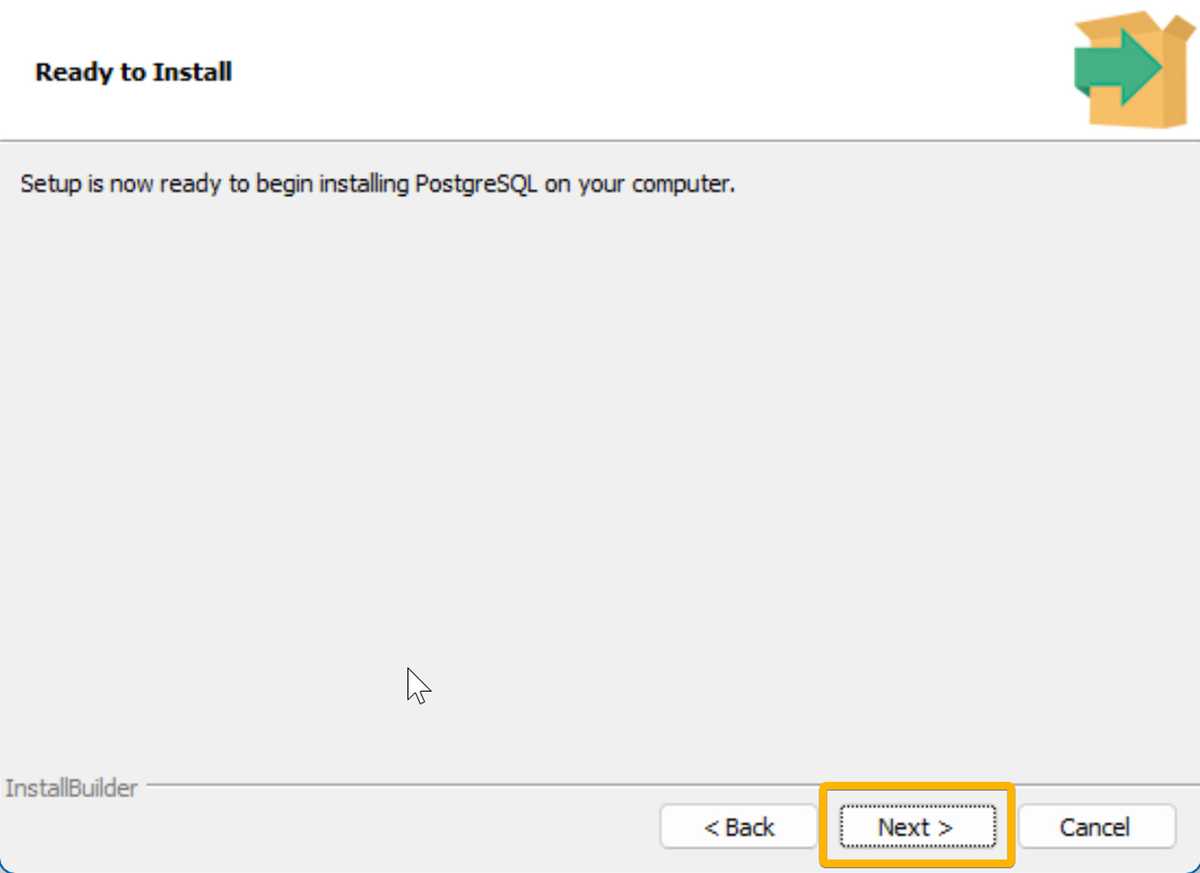
Then finally on the Ready to Install screen click Next to start the installation, as shown in the following image:
Once the installation completes, you'll see a checkbox that say's "Launch Stack Builder at exit". By default this box is checked, you'll need to uncheck it. Then click Finish, as shown in the following image:
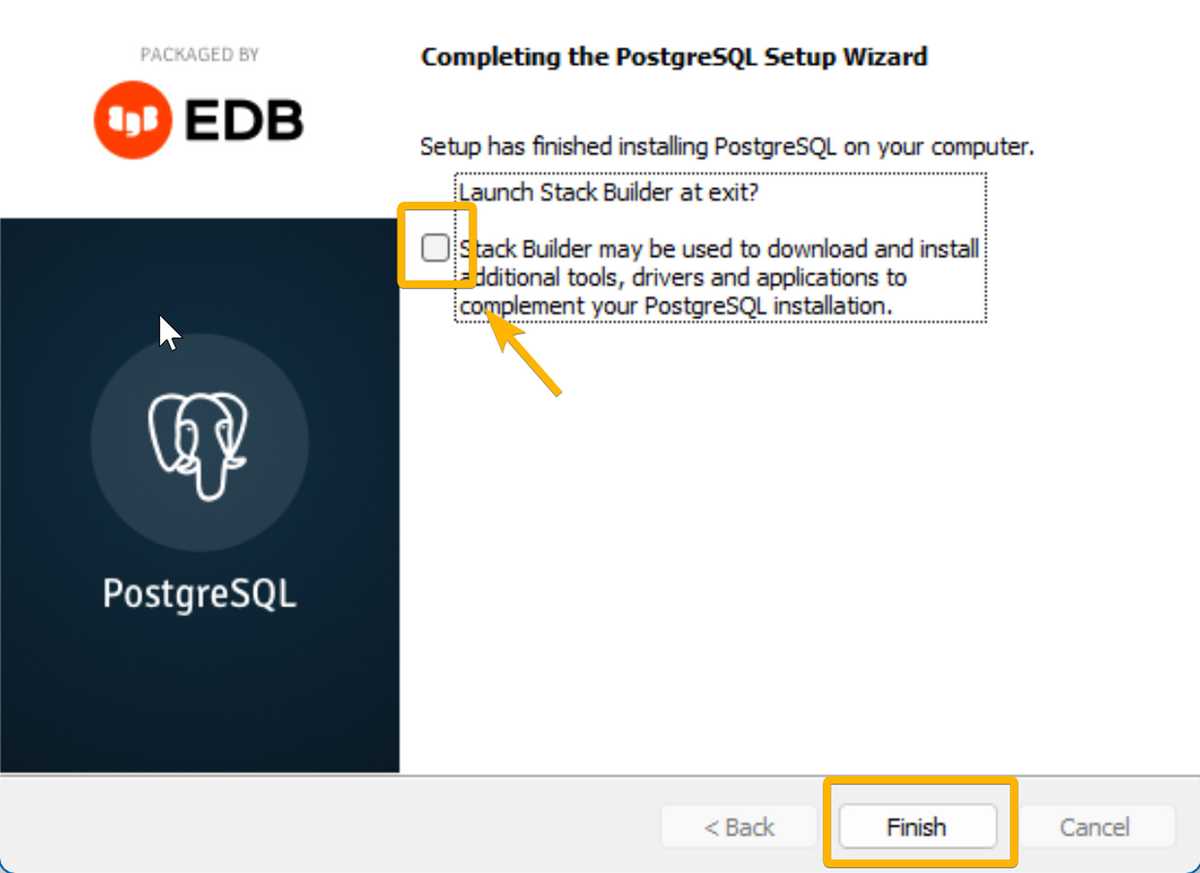
At this point, the installer should close on its own. Now we'll need to add the PATH to the PostgreSQL install to your PATH environment variable.
First you'll need to copy the install path to the PostgreSQL "bin" folder to your clipboard. You'll first need to navigate to the bin location of our install.
Open any folder on your computer and select This PC in the left-hand navigation bar and open Program Files, as shown in the following image:
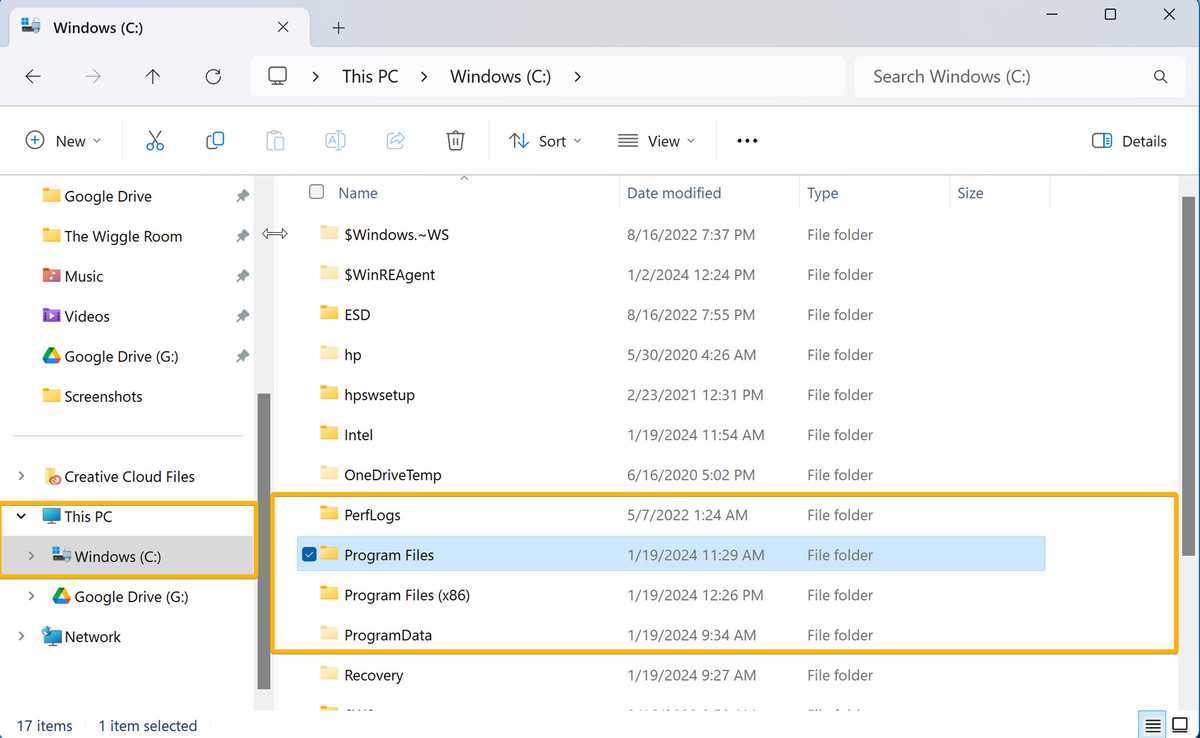
Open PostgreSQL and then open the version folder, as shown in the following images:

Then
Note: The version number will be different depending on the version you installed.

Then

Once you reach the bin folder, right-click the address at the top of the screen and select "Copy address as text", like in the following image:

Now that you've got the install path copied to your clipboard, press the Windows key on your keyboard and search for "Edit the system environment variables". Once that appears in the search screen, click on it, as shown in the following image:

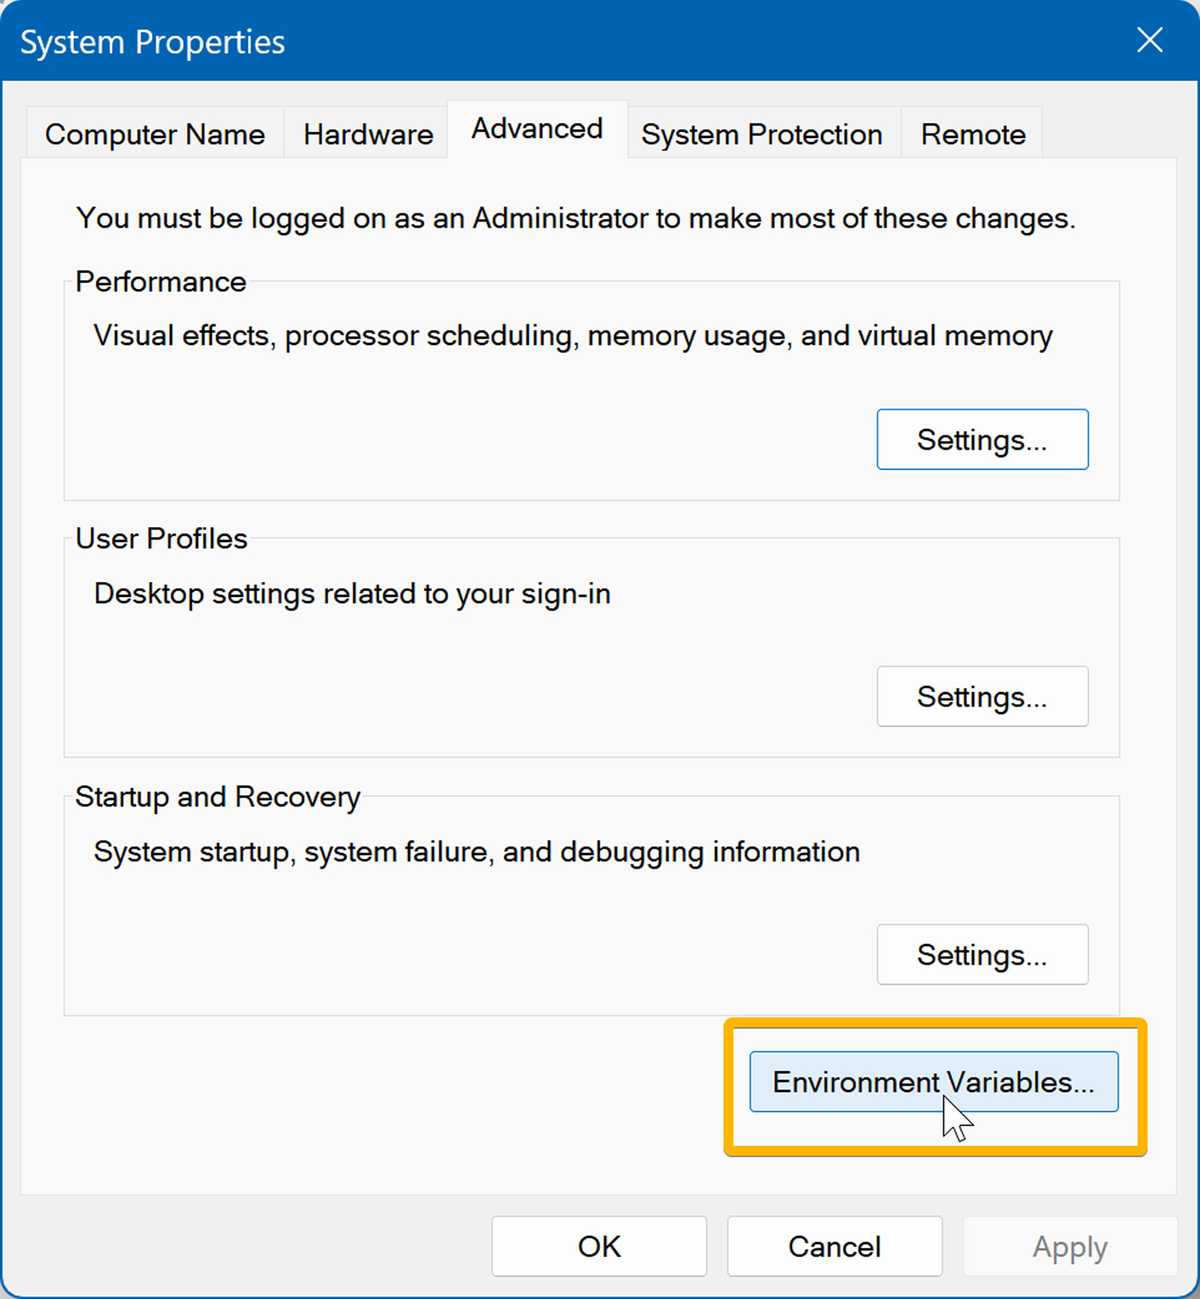
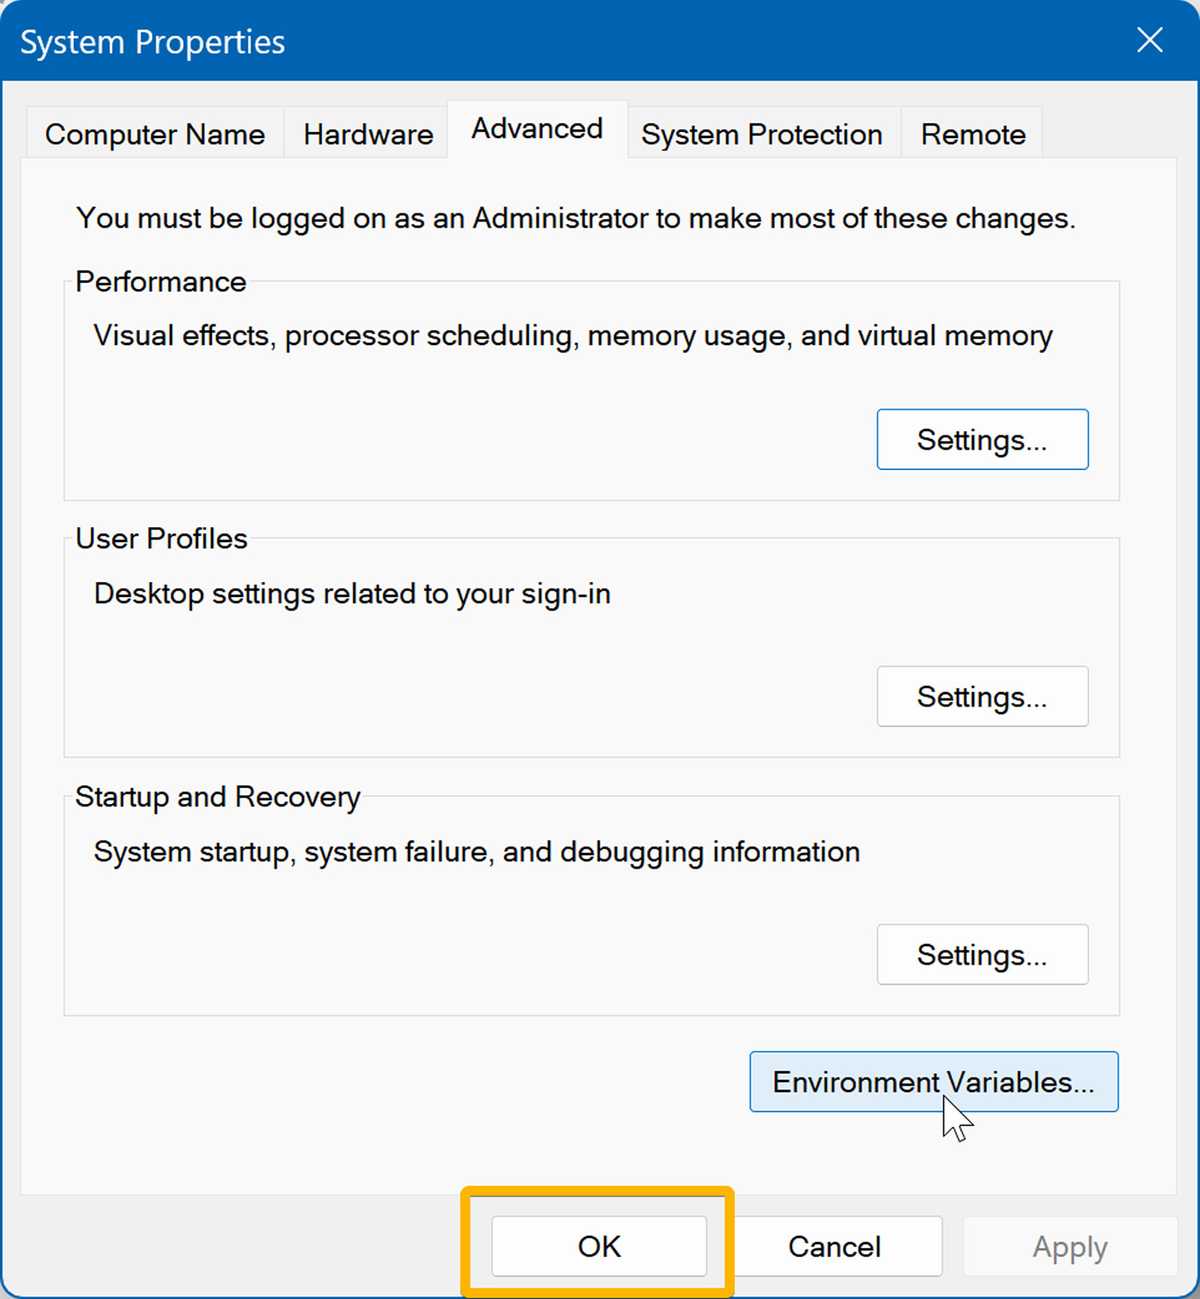
You'll then be prompted with the System Properties screen. Navigate into the Advanced (if not already highlighted) tab and select "Environment Variables...", as shown in the following image:
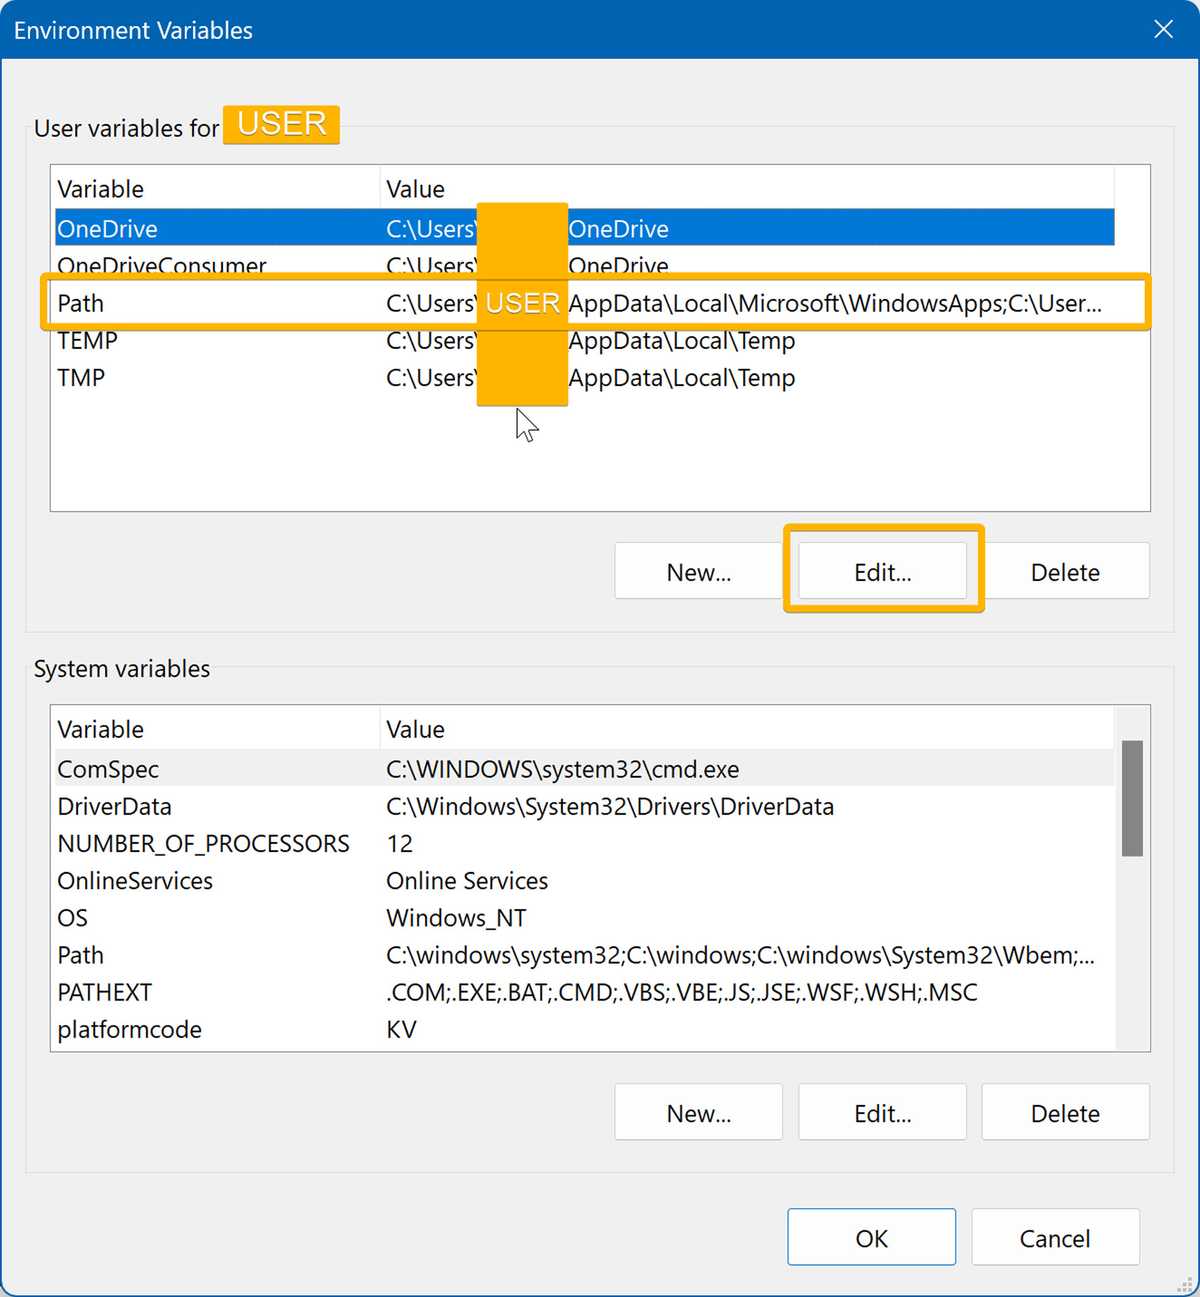
On the Environment Variables screen, under "User variables for <user>" (where <user> is your username on that computer), click into Path and then click the "Edit..." button in the top section of the screen. It should look like the following image:
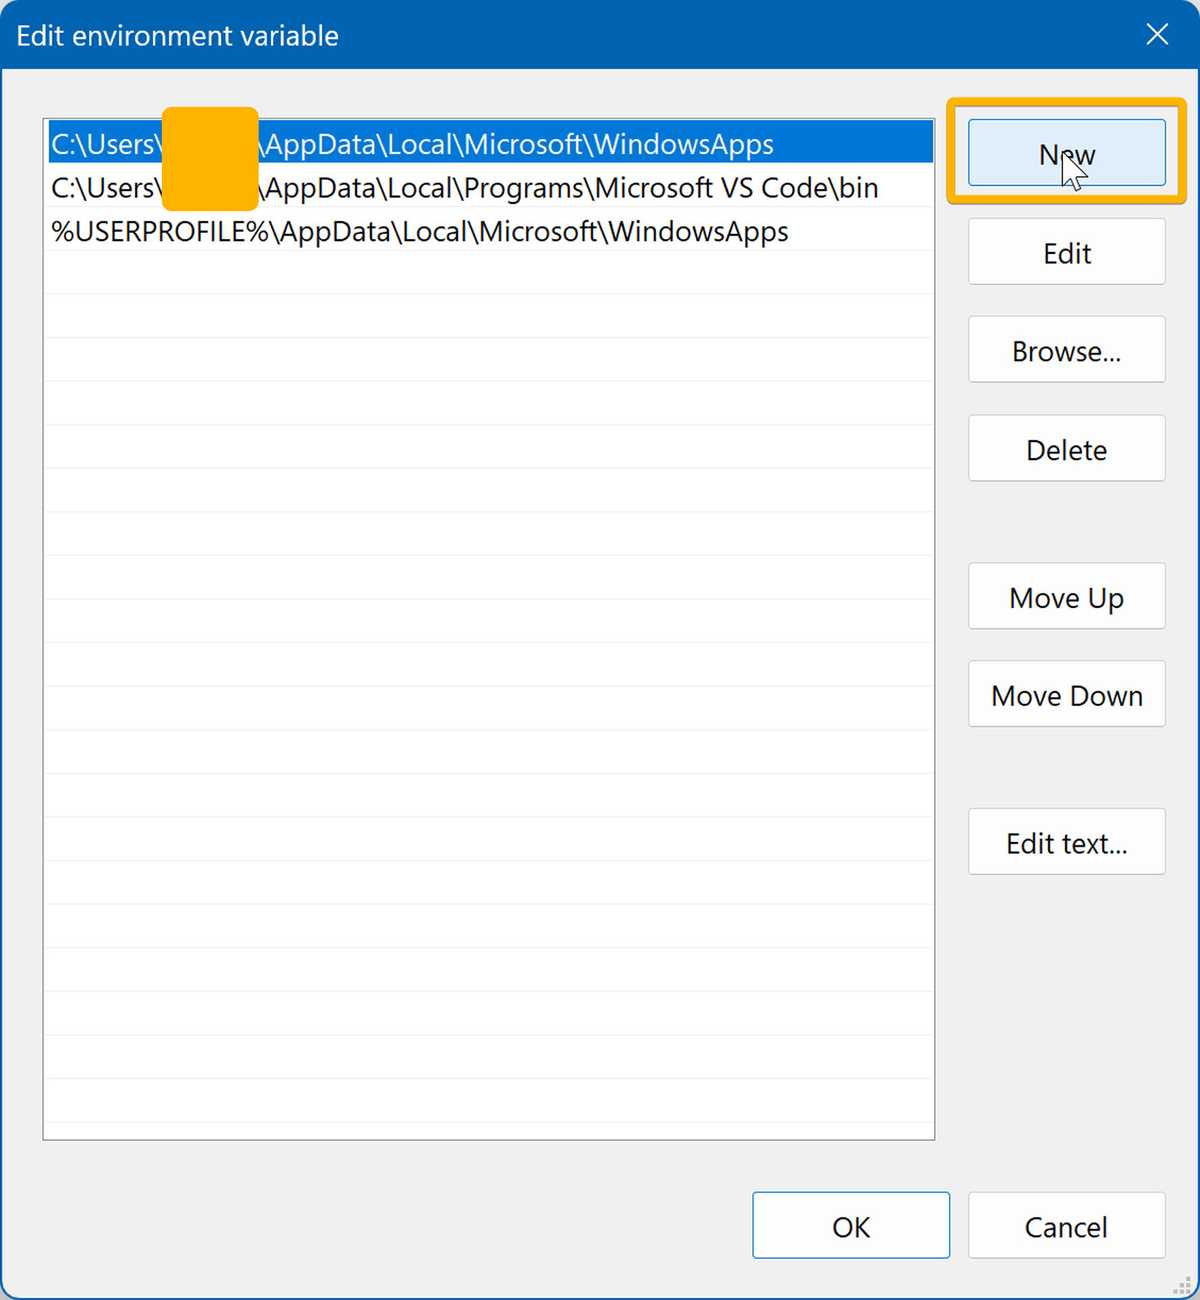
In the "Edit environment variable" window, select New, as shown in the following image:
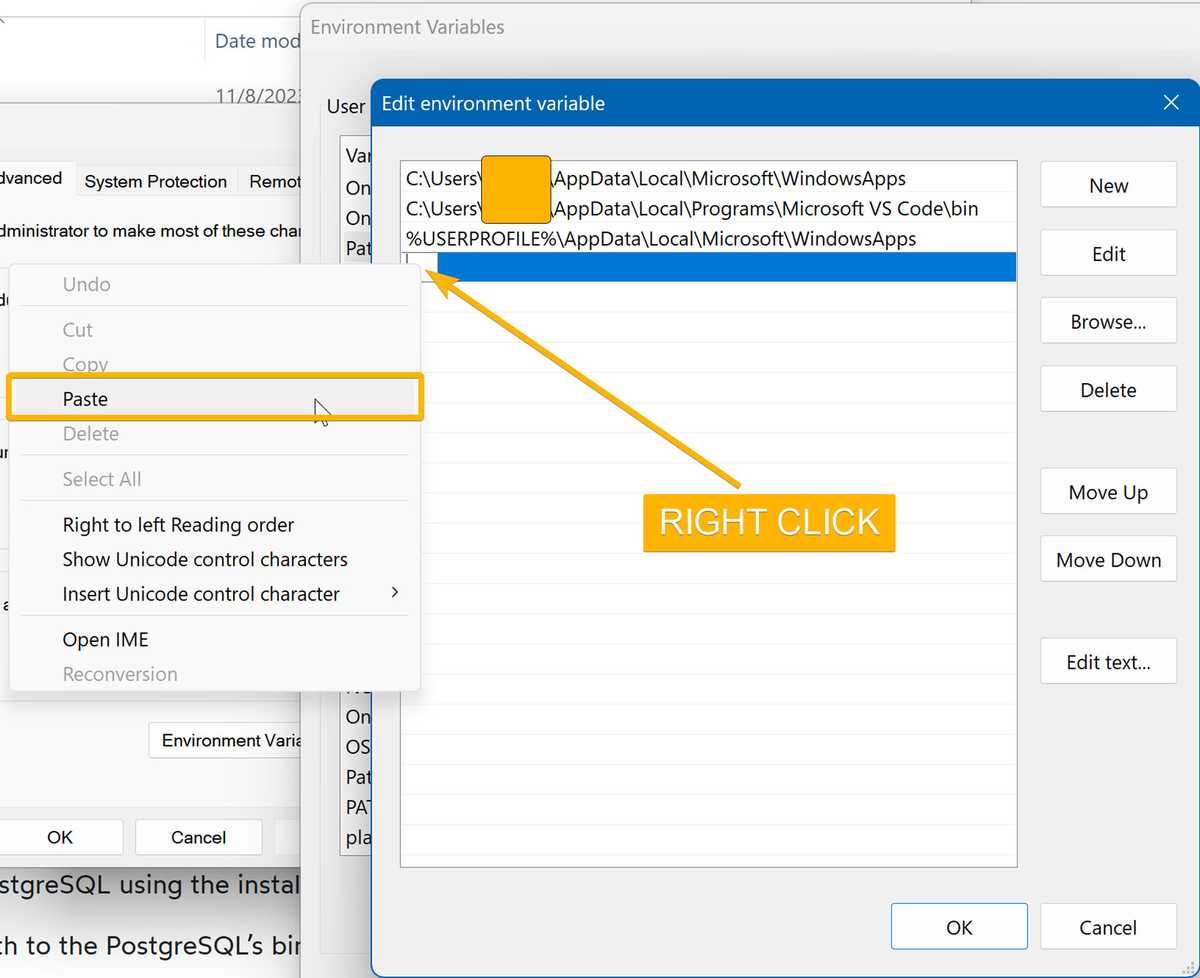
Your cursor will appear in a new line at the bottom of the variables. Paste your PATH in this box and click OK. Your screen should resemble the following image:
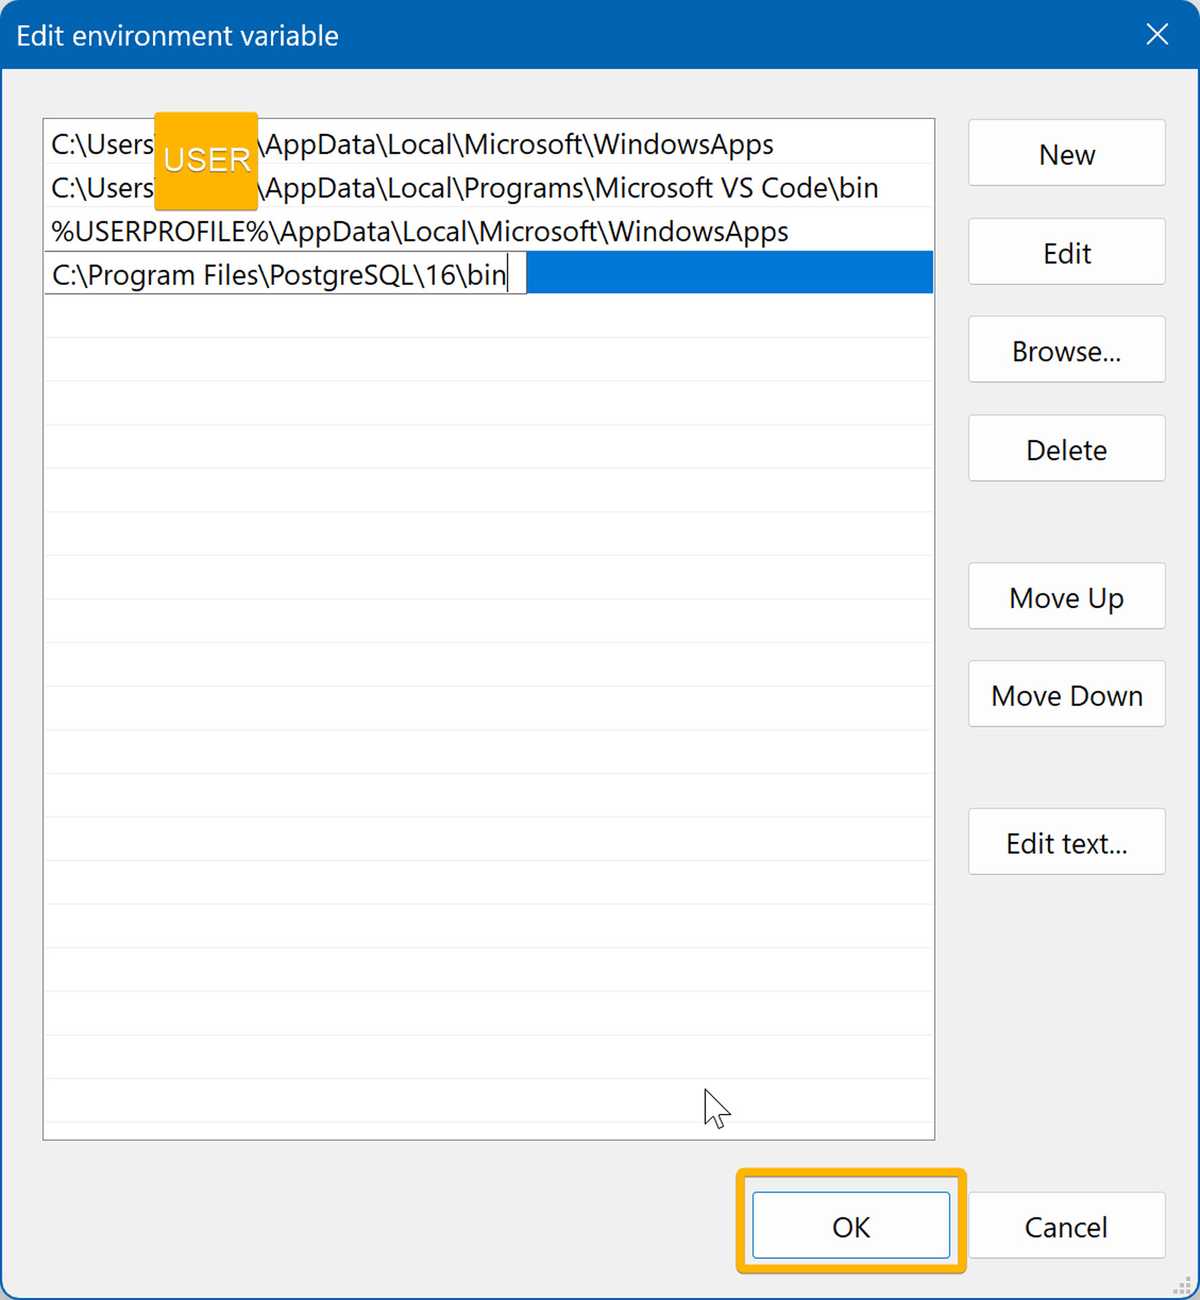
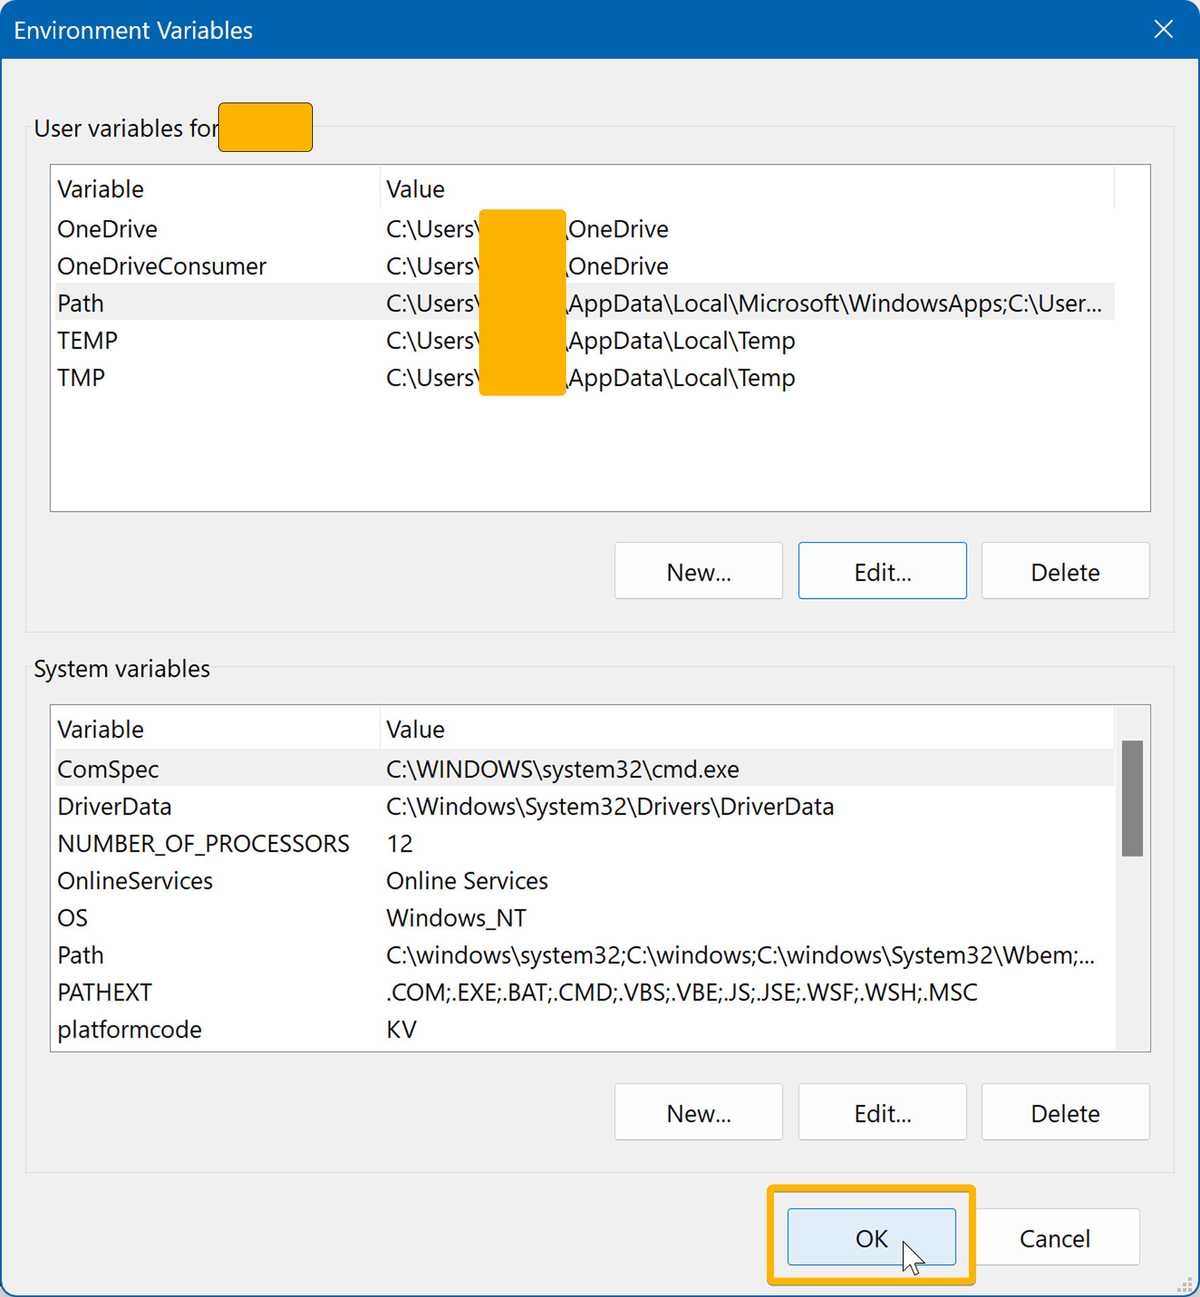
Your path should now be pasted into the box. Click OK to close the Environment Variables window, and then click OK again to close the System Properties window. As shown in the following images:
First we'll need to determine what shell we're using. To do this, open Terminal and type the following command:
echo $0
Press Enter. You'll see the following output:
-bash
or
-zsh
If you see -bash, you're using the Bash shell. If you see -zsh, you're using the Z shell. If you see something else, you're using a different shell.
Now that we know what shell we're using, we'll need to add the path of the PostgreSQL install to your PATH in your shell configuration file.
First, we'll need to copy the PATH to PostgreSQL to your clipboard. Your bin folder is likely located at /Library/PostgreSQL/<version_number>/bin.
Recall what shell you're using. You'll need to know this to determine which shell configuration file to edit. If you're using Bash, you'll need to edit the .bash_profile file. If you're using Z shell, you'll need to edit the .zshrc file.
Open your terminal and type the following command echo 'export PATH="/Library/PostgreSQL/<version_number>/bin:$PATH"' >> ~/.<config_file> to insert your PATH into your shell configuration file:
Note: Replace
<version_number>and<config_file>with the version number of your PostgreSQL install and your configuration file for your respective shell. For example, if you installed version 16, you would replace<version_number>with16and you were using Z shell, replace<config_file>withzshrc.
For Bash:
echo 'export PATH="/Library/PostgreSQL/16/bin:$PATH"' >> ~/.bash_profile
For Z shell:
echo 'export PATH="/Library/PostgreSQL/16/bin:$PATH"' >> ~/.zshrc
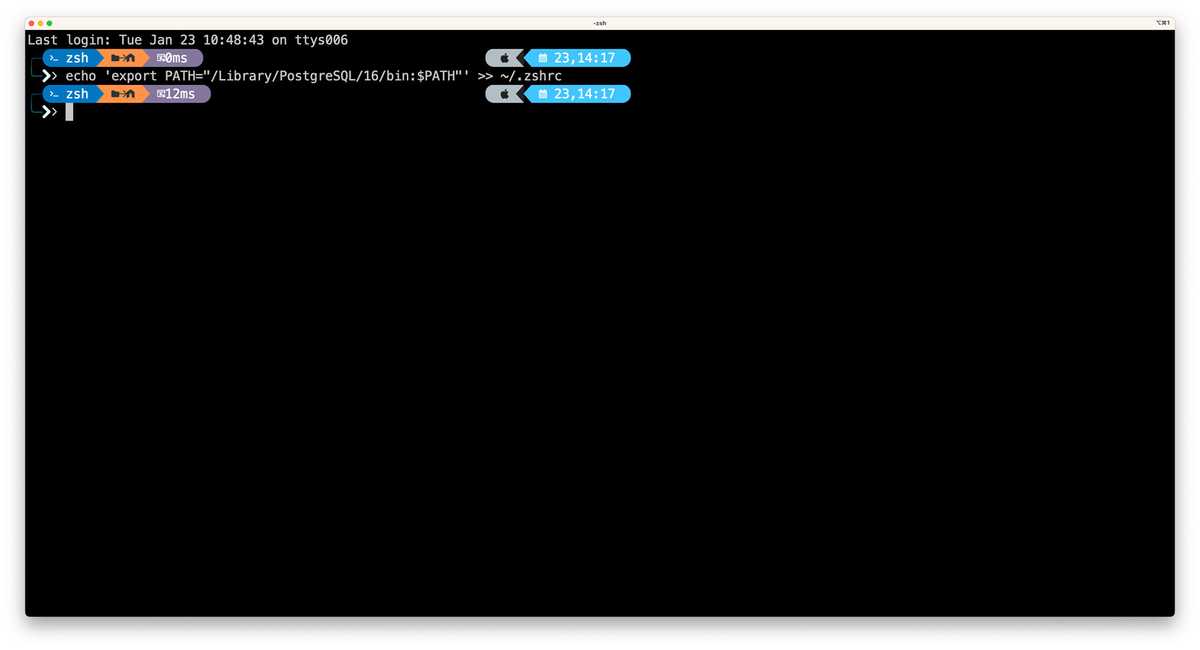
Now that you've added the PATH, restart your terminal completely. You can verify that the installation was correct by typing the following into the terminal:
psql -V
The PATH followed by the PostgreSQL version number should be printed to the screen. Once you verify that the PostgreSQL server was correctly installed, you can now test the login.
Type the following command to login with your user and press enter:
psql -U postgres
After entering your password, you'll see the following prompt:
Note: As you type your password, you won't see any characters appear on the screen. This is normal behavior.
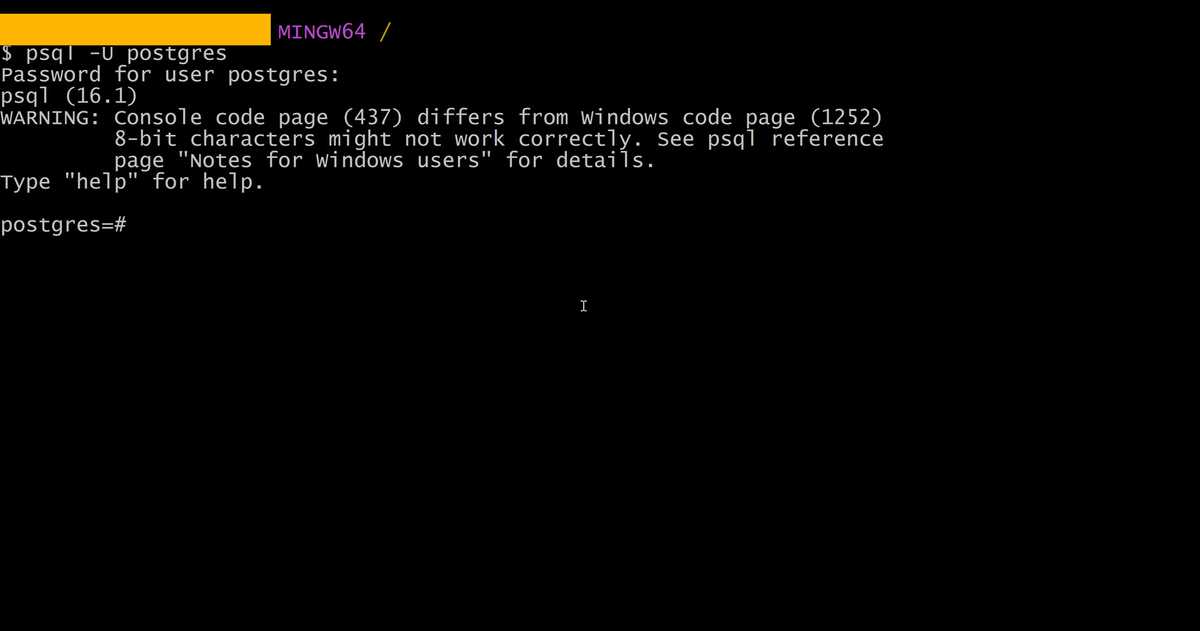
You can now quit, type the following command and press enter:
\q
Congratulations, you are now done installing PostgreSQL on your machine!
When you installed PostgreSQL using the installer, you also installed pgAdmin. pgAdmin is a web-based interface for managing PostgreSQL databases. It's a great tool for managing your databases, and we'll be using it throughout this class.
Search for and open pgAdmin on your machine.
Once loaded, you'll see a screen with a list item on the left called "Servers". Click the drop down arrow highlighted in the following image:
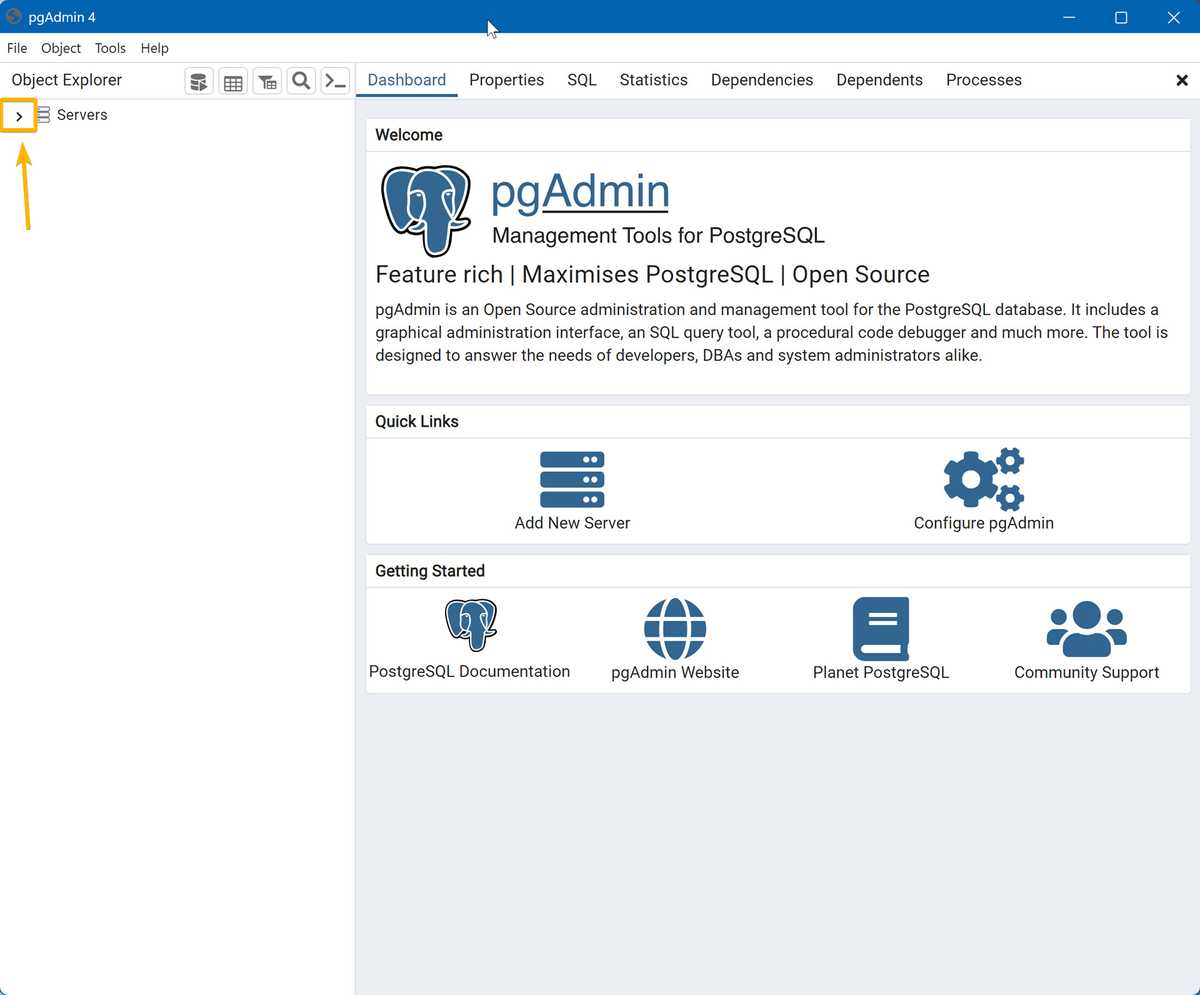
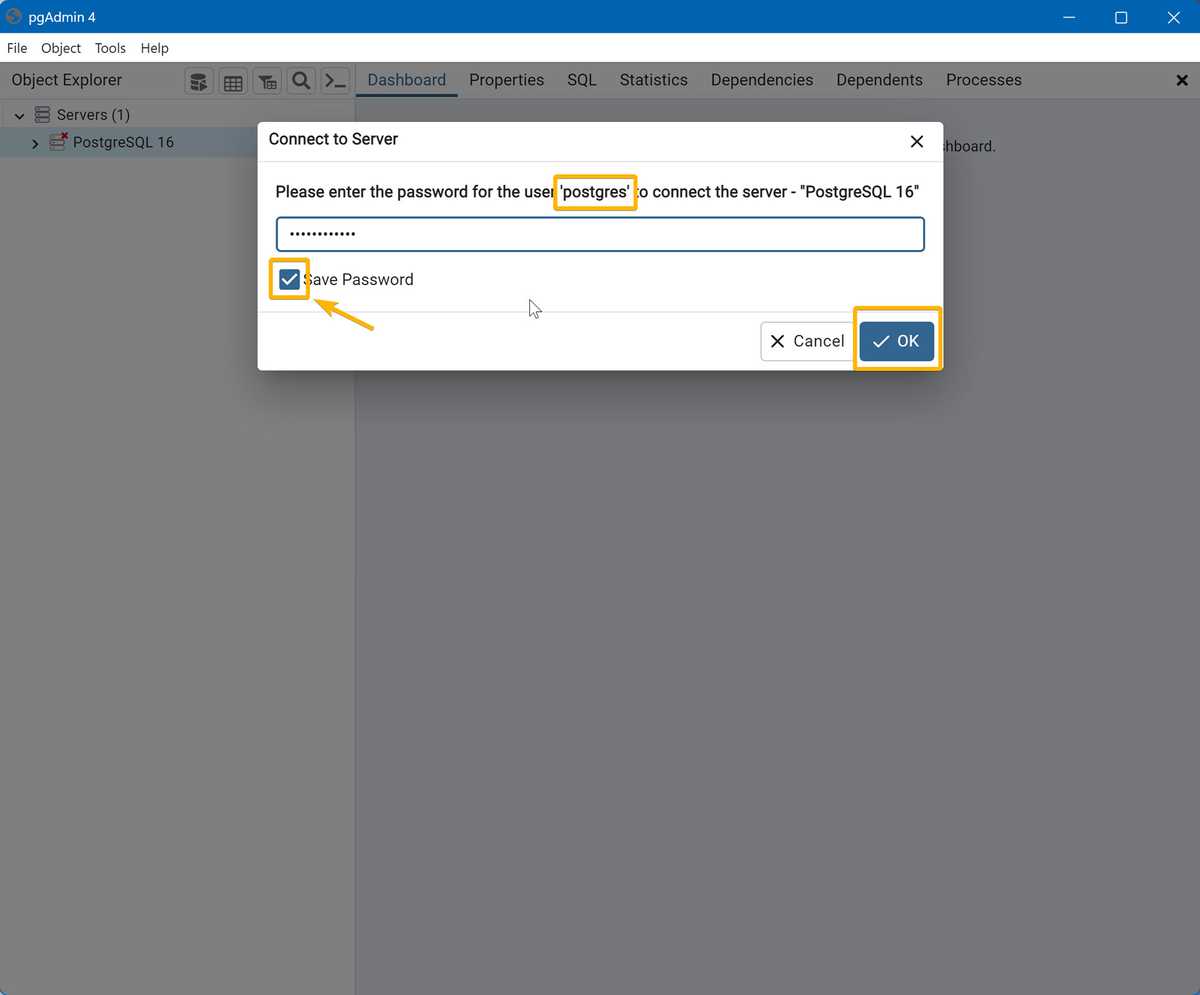
Once you click the drop down arrow you will be prompted to enter a password. Enter the password you created when you installed PostgreSQL and click OK, as shown in the following image:
If entered correctly, you'll see the list item drop down and reveal a server called "PostgreSQL 16", as shown in the following image:
Note: Your server name may be different depending on the version of PostgreSQL you installed.
Note: If you don't see the server, right-click the "Servers" list item and select "Refresh Servers".
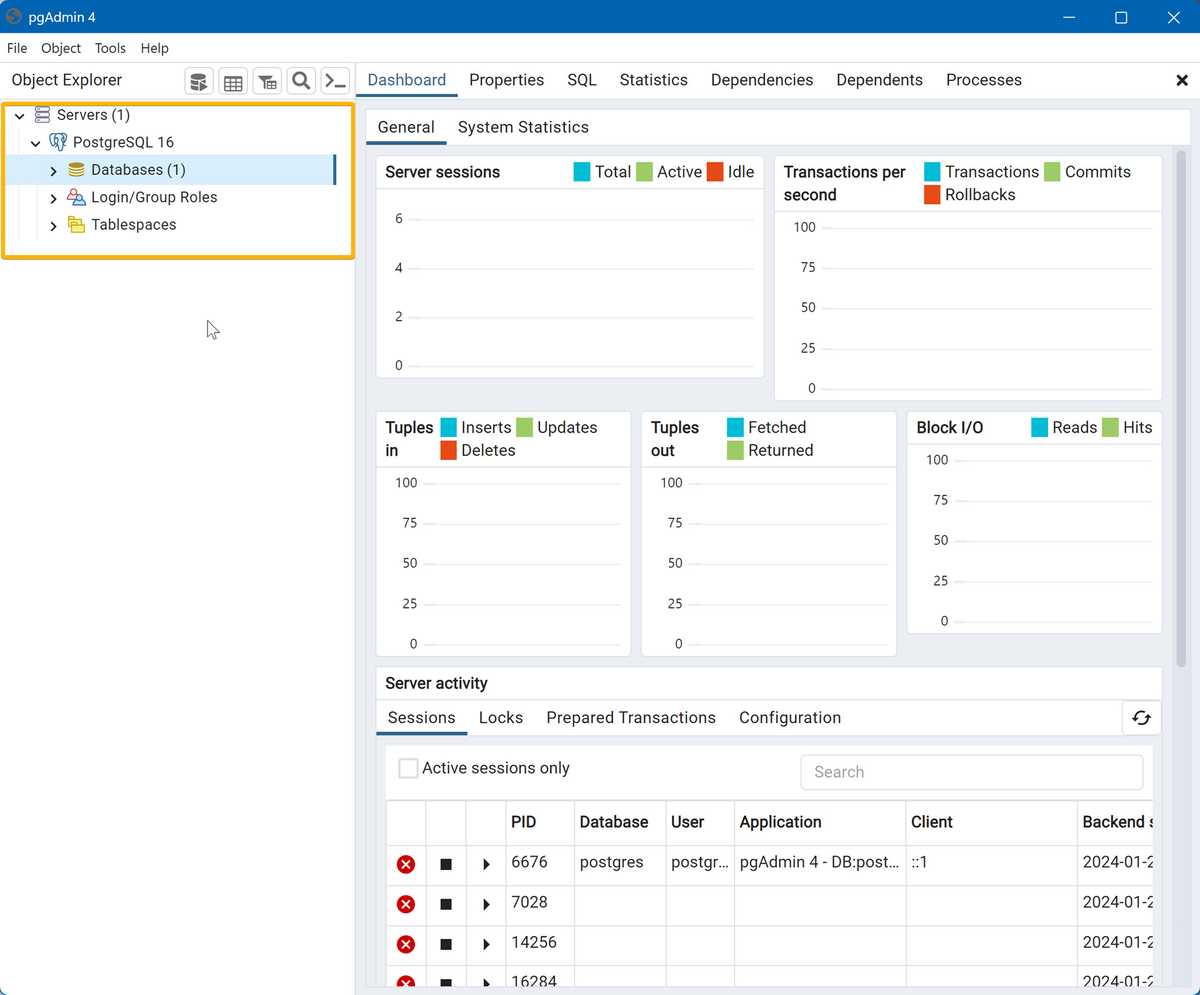
Congratulations, you've successfully setup pgAdmin on your machine!
This page was updated 2 months ago
© 2022 edX Boot Camps LLC. Confidential and Proprietary. All Rights Reserved.
Category: postgresql
Tagged under: postgresql, postgresql server, windows installation, mac installation, installation, guide, sql, databases, pgadmin,
All Posts
- OpenAI Account Setup Guide
- NodeJS Installation Guide
- PostgreSQL Reference Guide
- GitHub Copilot Guide
- PostgreSQL Installation Guide
- Deploy with Render and PostgreSQL
- API Resources
- Render Deployment Guide
- Deploying a MERN Stack Application to Render
- Deploy with Render and MongoDB Atlas
- The Science and Research Behind Our Unconventional Educational Approach
- What Makes Up a Web Development Project?
- Localhost Loopback Issues Troubleshooting Guide
- Video Submission Guide
- A Growth Mindset for Life
- Web Literacy
- Developer Resources
- Introduction to Computer Structure and Organization
- MySQL Installation Guide
- HTML Cheatsheet
- Advanced Computer Skills
- Introduction to Computer Skills
- How to Use API Keys
- How to Install MongoDB
- MySQL Reference Guide
- Heroku Deployment Guide
- Getting Started with Git
- Using the GraphQL Playground in a MERN application
- Professional README Guide
- Regular Expression Tutorial
- How to Install the Heroku CLI
- How to Install NodeJS
- Deploy with Heroku and MySQL
- Deploy with Heroku and MongoDB Atlas
- Set Up MongoDB Atlas